

- 📖 Geeky Medics OSCE Book
- ⚡ Geeky Medics Bundles
- ✨ 1300+ OSCE Stations
- ✅ OSCE Checklist PDF Booklet
- 🧠 UKMLA AKT Question Bank
- 💊 PSA Question Bank
- 💉 Clinical Skills App
- 🗂️ Flashcard Collections | OSCE, Medicine, Surgery, Anatomy
- 💬 SCA Cases for MRCGP
To be the first to know about our latest videos subscribe to our YouTube channel 🙌
Ankle and foot examination frequently appears in OSCEs and you’ll be expected to identify relevant clinical signs using your examination skills. This ankle and foot examination OSCE guide provides a clear step-by-step approach to examining the ankle and foot, with an included video demonstration.
Musculoskeletal examinations can be broken down into four key components: look, feel, move and special tests. This can be helpful as an aide-memoire if you begin to feel like you’ve lost your way during an OSCE.
Introduction
Wash your hands and don PPE if appropriate.
Introduce yourself to the patient including your name and role.
Confirm the patient’s name and date of birth.
Briefly explain what the examination will involve using patient-friendly language.
Gain consent to proceed with the examination.
Adequately expose the patient’s legs from the knee down.
Position the patient standing for initial inspection of the ankles and feet.
Ask the patient if they have any pain before proceeding with the clinical examination.
Look
General inspection
Clinical signs
Perform a brief general inspection of the patient, looking for clinical signs suggestive of underlying pathology:
- Body habitus: obesity is a significant risk factor for joint pathology due to increased mechanical load (e.g. osteoarthritis).
- Scars: may provide clues regarding previous lower limb surgery.
- Wasting of muscles: suggestive of disuse atrophy secondary to joint pathology or a lower motor neuron injury.
Objects or equipment
Look for objects or equipment on or around the patient that may provide useful insights into their medical history and current clinical status:
- Walking aids: the ability to walk can be impacted by a wide range of knee, hip and ankle pathology.
- Prescriptions: prescribing charts or personal prescriptions can provide useful information about the patient’s recent medications (e.g. analgesia).
Gait
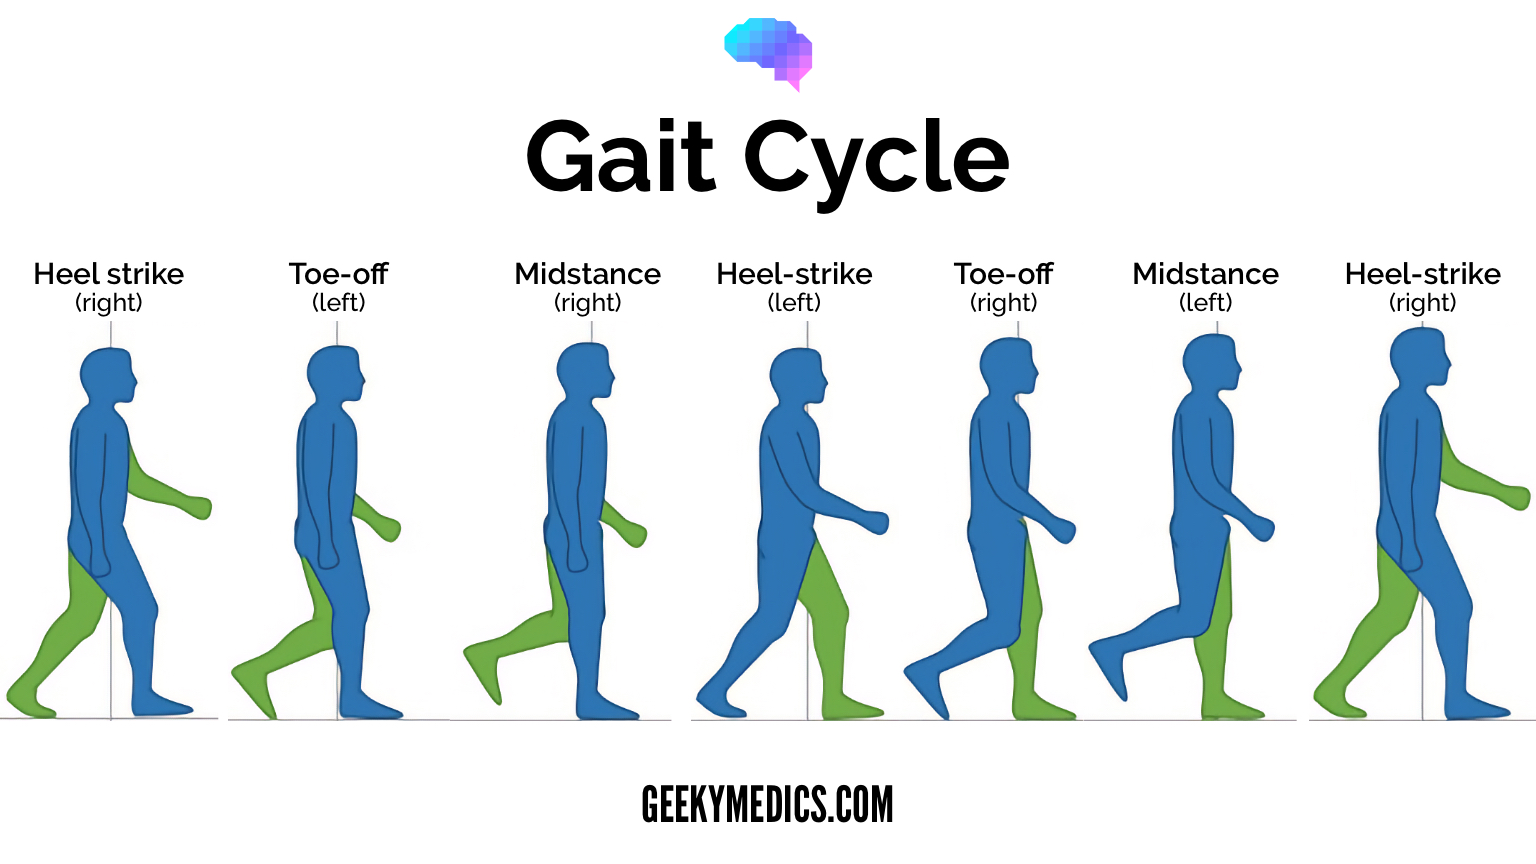
Ask the patient to walk to the end of the examination room and then turn and walk back whilst you observe their gait paying attention to:
- Gait cycle: note any abnormalities of the gait cycle (e.g. abnormalities in toe-off or heel strike).
- Range of movement: often reduced in the context of chronic joint pathology (e.g. osteoarthritis, inflammatory arthritis).
- Limping: may suggest joint pain (i.e. antalgic gait), weakness or joint instability (e.g. ligamentous injury).
- Leg length: note any discrepancy which may be the cause or the result of joint pathology.
- Turning: patients with joint disease may turn slowly due to restrictions in joint range of movement or instability.
- Height of steps: high-stepping gait is associated with foot drop, which can be caused by peroneal nerve palsy (e.g. trauma, surgery).
Ask the patient to walk on their tip-toes and then on their heels to further screen for pathology. Patient’s with arthritis or lower limb muscle weakness will struggle to perform these tasks.
 Observe the patient's gait


Gait cycle
The gait cycle has six phases:
- Heel-strike: initial contact of the heel with the floor.
- Foot flat: weight is transferred onto this leg.
- Mid-stance: the weight is aligned and balanced on this leg.
- Heel-off: the heel lifts off the floor as the foot rises but the toes remain in contact with the floor.
- Toe-off: as the foot continues to rise the toes lift off the floor.
- Swing: the foot swings forward and comes back into contact with the floor with a heel strike (and the gait cycle repeats).
Closer inspection of the ankles and feet
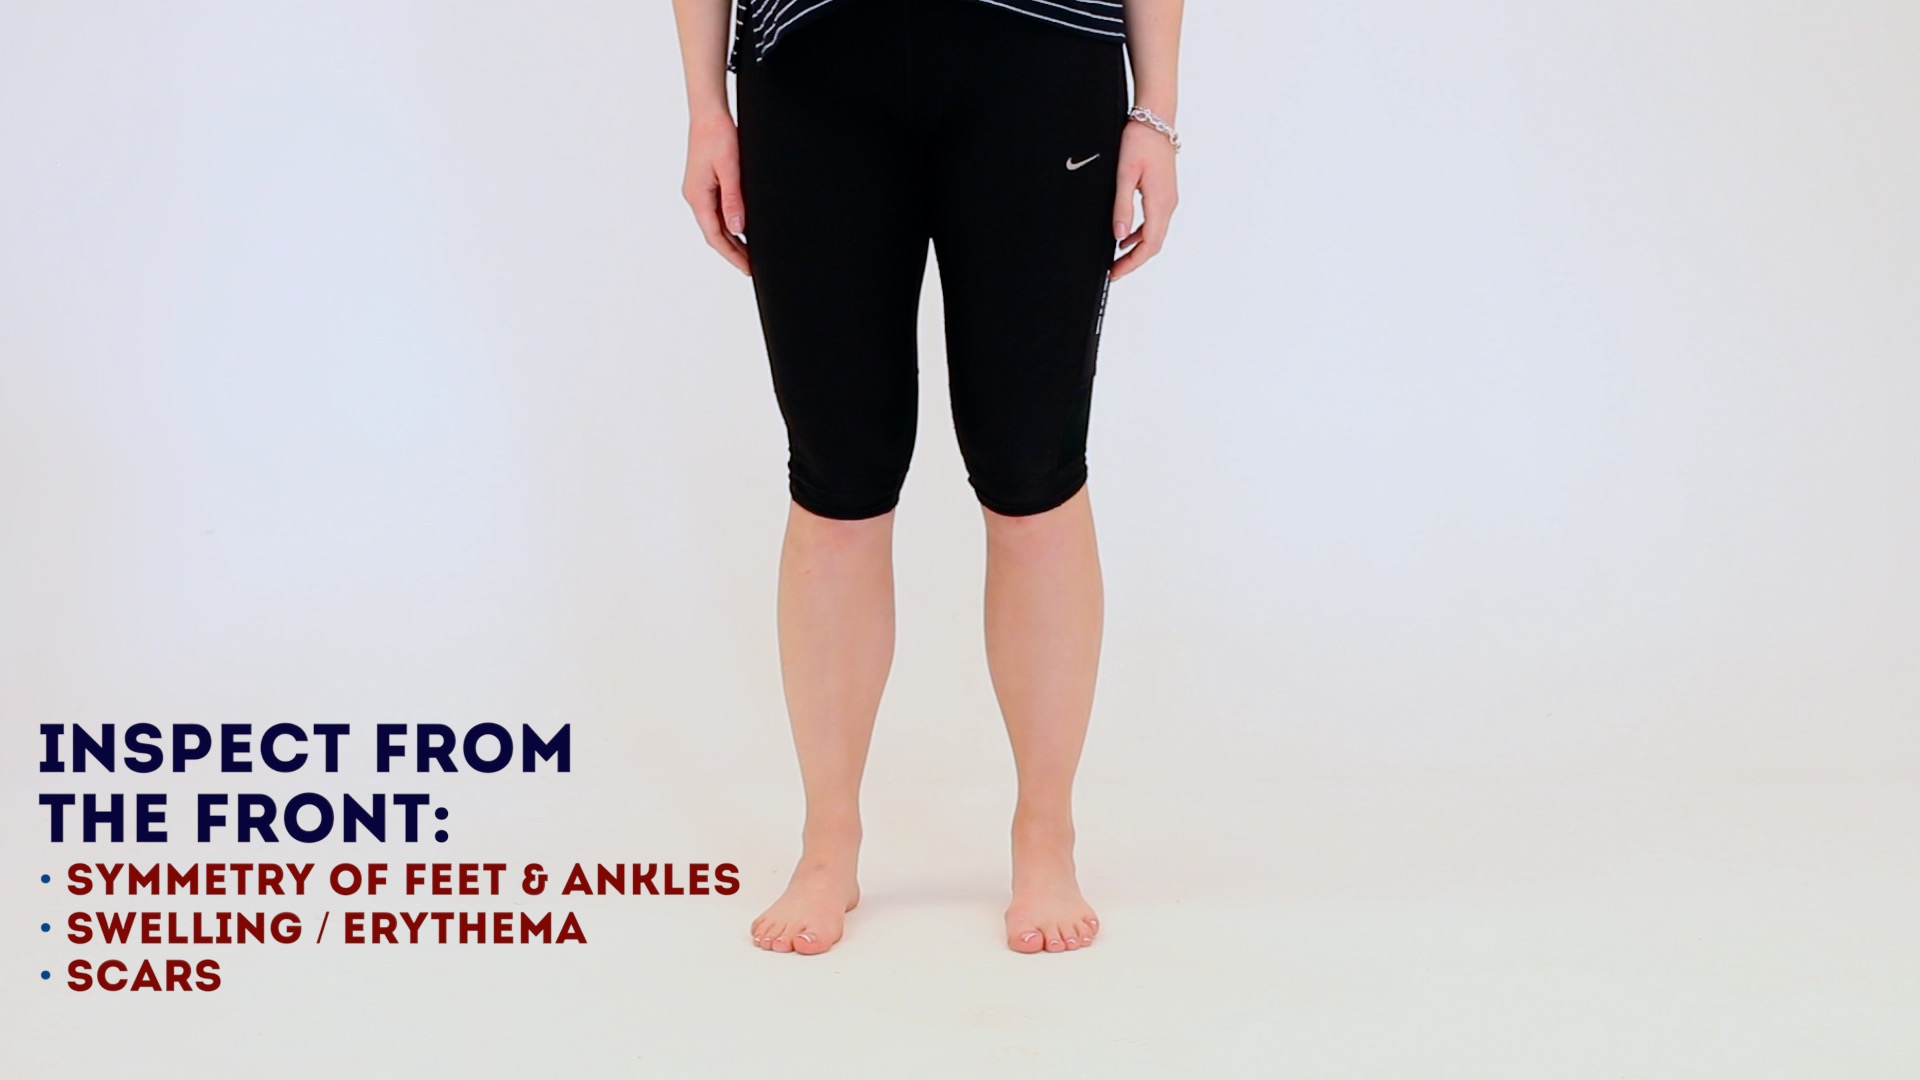
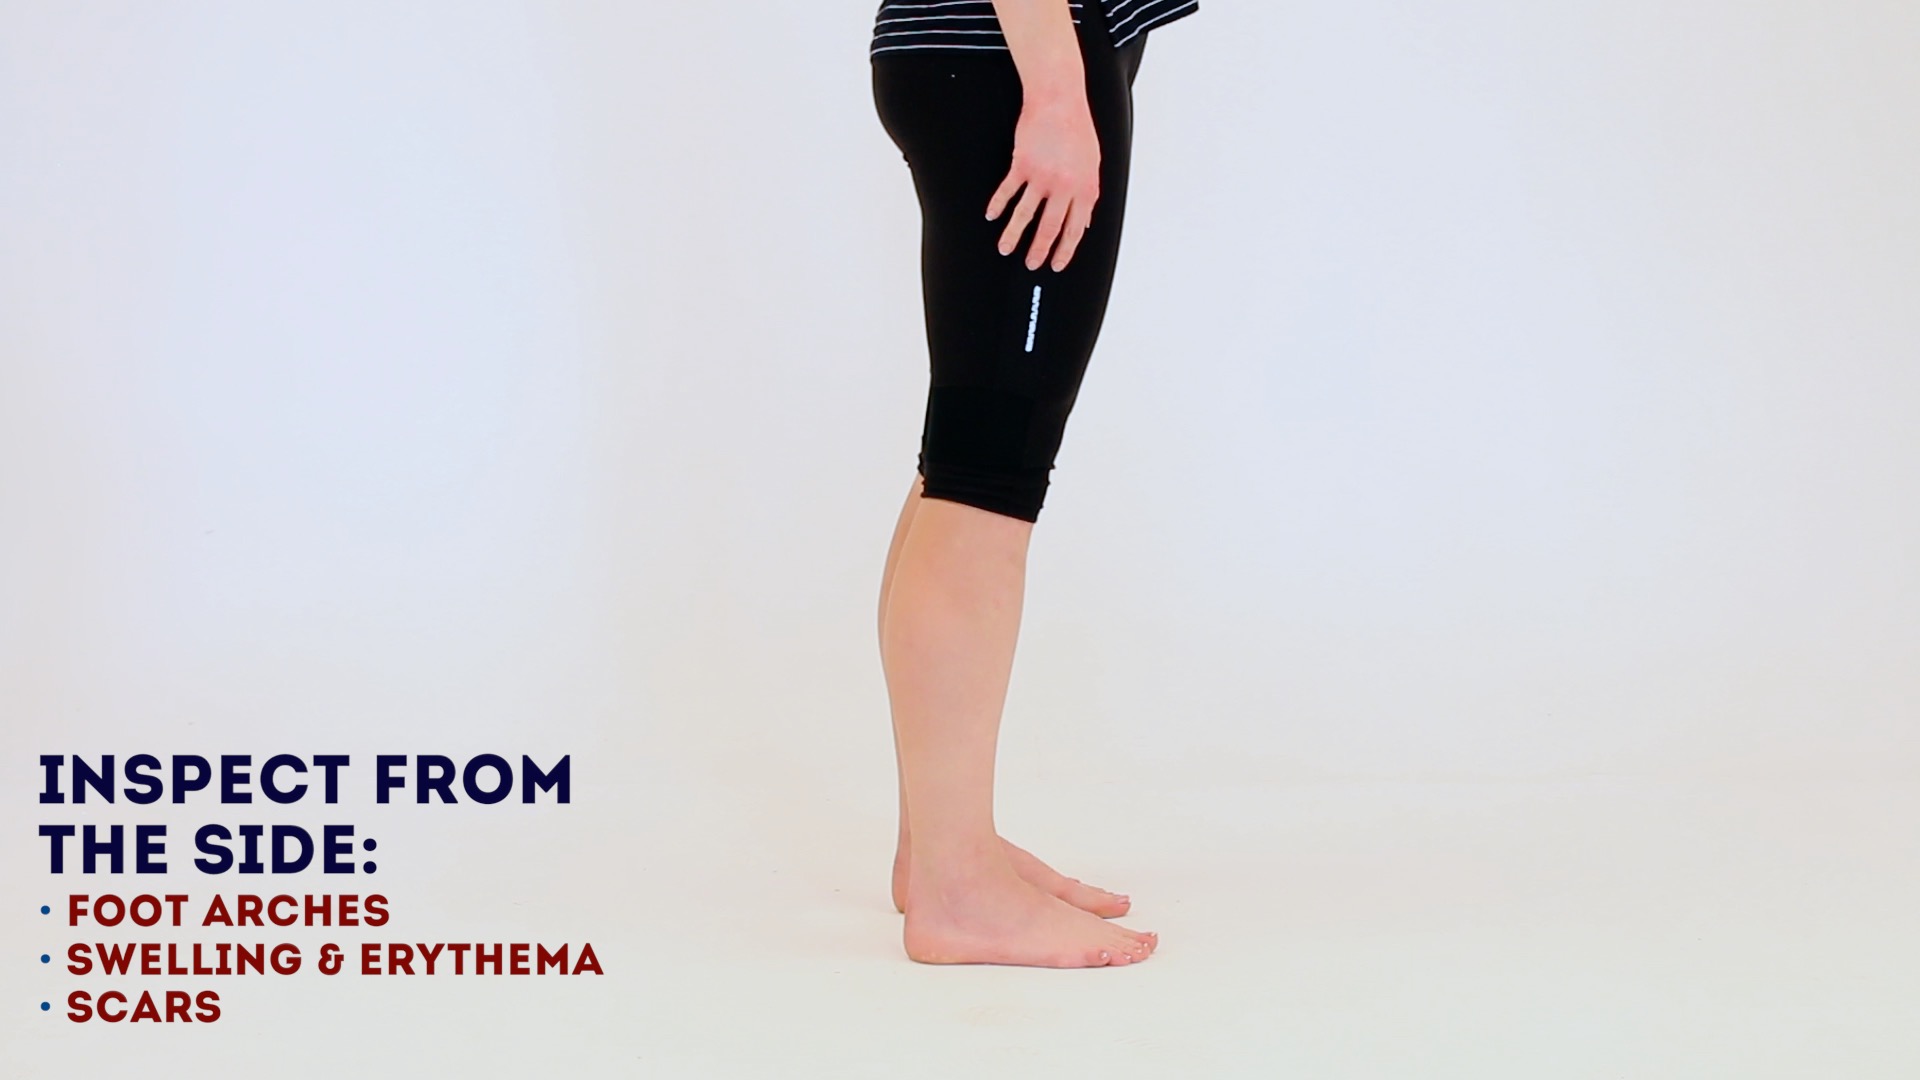
Ask the patient to stand and turn in 90° increments as you inspect the ankles and feet from each angle for evidence of pathology.
Anterior inspection
Inspect the anterior aspect of the ankles and feet noting any abnormalities:
- Scars: note the location of scars as they may provide clues as to the patient’s previous surgical history or indicate previous joint trauma.
- Bruising: suggestive of recent trauma or spontaneous haemarthrosis (e.g. patients on anticoagulants or with clotting disorders such as haemophilia).
- Swelling: note any evidence of asymmetry in the size of the ankle joints that may suggest unilateral swelling (e.g. effusion, inflammatory arthropathy, septic arthritis, haemarthrosis, Charcot joint).
- Psoriasis plaques: typically present over extensor surfaces and important to note due to the association with psoriatic arthritis.
- Fixed flexion deformity of the toes: subtypes include hammer-toe and mallet-toe.
- Big toe misalignment: note any evidence of lateral (hallux valgus/bunion) or medial (hallux varus) big toe angulation.
- Calluses: thickened, hardened skin that develops as a result of repetitive friction which may be caused by poorly fitting footwear or a gait abnormality.
Lateral inspection
Inspect the lateral aspect of the ankles and feet, noting any abnormalities:
- Foot arch: inspect for evidence of flat feet (pes planus) or an abnormally raised foot arch (pes cavus).
Posterior inspection
Inspect the posterior aspect of the ankles and feet noting any abnormalities:
- Scars: again look for scars indicative of previous trauma or surgery.
- Muscle wasting: inspect for any asymmetry in the muscle bulk of the posterior compartment of the lower leg suggestive of disuse atrophy or a lower motor neuron lesion.
- Heel misalignment: may be caused by a valgus or varus deformity of the ankle joint.
- Achilles tendon: discontinuity and swelling may indicate tendonitis and/or rupture.
Feel
Ask the patient to lay on the clinical examination couch.
Temperature
Assess and compare ankle joint and foot temperature using the back of your hands.
Increased temperature of a joint, particularly if also associated with swelling and tenderness may indicate septic arthritis or inflammatory arthritis.
Pulses
Posterior tibial pulse
Palpate the posterior tibial pulse:
- The posterior tibial pulse can be located posterior to the medial malleolus of the tibia.
- Palpate the pulse to confirm its presence and then compare pulse strength between the feet.
Dorsalis pedis pulse
Palpate the dorsalis pedis pulse:
- The dorsalis pedis pulse can be located over the dorsum of the foot, lateral to the extensor hallucis longus tendon, over the second and third cuneiform bones.
- Palpate the pulse to confirm its presence and then compare pulse strength between the feet.
Metatarsophalangeal joint squeeze
Gently squeeze across the metatarsophalangeal (MTP) joints and observe for verbal and non-verbal signs of discomfort. Tenderness is suggestive of active inflammatory arthropathy.
Ankle and foot palpation
Palpate the ankle joints and the various joints/bones of each foot, noting any swelling, irregularity or tenderness:
- Metatarsal and tarsal bones
- Tarsal joint
- Ankle joint
- Subtalar joint
- Calcaneum
- Medial/lateral malleoli
- Distal fibula
Achilles tendon palpation
Palpate the gastrocnemius muscle and the Achilles tendon:
- Note any focal tenderness or swelling suggestive of tendonitis.
- Note any discontinuity in the tendon suggestive of rupture.
- Assess the temperature of the joints


 joints")


Move
The ankle joint and the joints of the feet should be assessed and compared.
If the patient is known to have an issue with a particular ankle or foot, you should assess the ‘normal’ ankle or foot first for comparison.
Active and passive movement
Active movement refers to a movement performed independently by the patient. Ask the patient to carry out a sequence of active movements to assess joint function. As the patient performs each movement, note any restrictions in the range of the joint’s movement and also look for signs of discomfort. It’s important to clearly explain and demonstrate each movement you expect the patient to perform to aid understanding.
Passive movement refers to a movement of the patient, controlled by the examiner. This involves the patient relaxing and allowing you to move the joint freely to assess the full range of joint movement. It’s important to feel for crepitus as you move the joint (which can be associated with osteoarthritis) and observe any discomfort or restriction in the joint’s range of movement.
Ask the patient to perform all of the below actively and then repeat the movements passively.
Foot plantarflexion
Normal range of movement: 0-50°
Instructions: “Push your feet downwards, like you are pressing a car pedal.”
Foot dorsiflexion
Normal range of movement: 0-20º
Instructions: “Extend your feet backwards, like you’re trying to point them up towards your head.”
Toe flexion
Instructions: “Curl up your toes as tight as you can.”
Toe extension
Instructions: “Extend your toes backwards, like you’re trying to point them towards your head.”
Ankle/foot inversion
Normal range of movement: 0-35º
Instructions: “Try to touch the soles of your feet together.”
Ankle/foot eversion
Normal range of movement: 0-15º
Instructions: “Try to angle the soles of your feet outwards as far as you are able to.”
Passive movement only
The movements of the following joints need to be assessed passively as they are difficult to isolate with active movements:
- Subtalar joint
- Midtarsal joint
- Assess ankle plantarflexion


Special tests
Simmonds’ test
Simmonds’ test is used to assess for clinical evidence of Achilles tendon rupture:
1. Ask the patient to kneel on a chair with their feet hanging over the edge.
2. Squeeze each of the patient’s calves in turn.
Interpretation
In healthy individuals, the foot should plantarflex when you squeeze the calf due to the contraction of the gastrocnemius muscle and the subsequent pulling force transmitted via the Achilles tendon.
There will be no movement of the foot if the Achilles tendon is ruptured due to loss of continuity between the gastrocnemius and the foot.
- Squeeze the patient's calf


To complete the examination…
Explain to the patient that the examination is now finished.
Thank the patient for their time.
Dispose of PPE appropriately and wash your hands.
Summarise your findings.
Example summary
“Today I examined Mrs Smith, a 32-year-old female. On general inspection, the patient appeared comfortable at rest, with no stigmata of musculoskeletal disease. There were no objects or medical equipment around the bed of relevance.
“The ankles and feet appeared normal on inspection and the patient’s gait was unremarkable. The range of movement throughout the ankles and feet was normal.”
“In summary, these findings are consistent with a normal ankle and foot examination.”
“For completeness, I would like to perform the following further assessments and investigations.”
Further assessments and investigations
- Neurovascular examination of both lower limbs.
- Examination of the knee and hip joint.
- Further imaging if indicated (e.g. X-ray and MRI).
Reviewer
Mr Tejas Yarashi
Trauma & Orthopaedic Surgeon (ST7)
References
- J. Terrence Jose Jerome. Adapted by Geeky Medics. Licence: CC BY.
- James Heilman, MD. Adapted by Geeky Medics. Psoriasis plaque. Licence: CC BY-SA.
- Richard Huber. Adapted by Geeky Medics. Hammer toe. Licence: CC BY-SA.
- Lamiot. Adapted by Geeky Medics. Hallux valgus. Licence: CC BY-SA.
- Gzzz. Adapted by Geeky medics. Hallux varus. Licence: CC BY-SA.
- Jmarchn. Adapted by Geeky Medics. Foot calluses. Licence: CC BY-SA.
- Benefros. Adapted by Geeky Medics. Pes cavus. Licence: CC BY-SA.
- Grook Da Oger. Adapted by Geeky Medics. Licence: CC BY-SA.
- Adapted by Geeky Medics. BoH, CC BY-SA 4.0
