

- 📖 Geeky Medics OSCE Book
- ⚡ Geeky Medics Bundles
- ✨ 1300+ OSCE Stations
- ✅ OSCE Checklist PDF Booklet
- 🧠 UKMLA AKT Question Bank
- 💊 PSA Question Bank
- 💉 Clinical Skills App
- 🗂️ Flashcard Collections | OSCE, Medicine, Surgery, Anatomy
- 💬 SCA Cases for MRCGP
To be the first to know about our latest videos subscribe to our YouTube channel 🙌
Paediatrics is full of respiratory presentations and thus, respiratory examinations. This guide provides an overview of how to perform a paediatric respiratory examination in an OSCE setting.
It is important to be flexible when examining a child, adjusting your approach whilst taking into consideration the patient’s age, personality and how unwell they are.
Be opportunistic in your examination – taking advantage of periods of quiet to listen to the chest and open mouth yawns or cries to look at the throat. Remember, parents and carers can also be a great asset – helping to explain the next step in the examination and position the child as you need them. Work as a team!
Introduction
Wash your hands and don PPE if appropriate.
Introduce yourself to the parents and the child, including your name and role.
Confirm the child’s name and date of birth.
Briefly explain what the examination will involve using patient-friendly language: “Today I’d like to perform a respiratory examination, which will involve observing your child, feeling their pulse and listening to their breathing with my stethoscope.”
Gain consent from the parents/carers and/or child before proceeding: “Are you happy for me to carry out the examination?”
General inspection
Appearance and behaviour
Observe the child in their environment (e.g. waiting room, hospital bed) and take note of their appearance and behaviour:
- Activity/alertness: note if the child appears alert and engaged, or quiet and listless.
- Cyanosis: bluish discolouration of the skin due to poor circulation (e.g. peripheral vasoconstriction secondary to hypovolaemia) or inadequate oxygenation of the blood (e.g. right-to-left cardiac shunting).
- Shortness of breath: may indicate underlying cardiovascular (e.g. congenital heart disease) or respiratory disease (e.g. asthma).
- Pallor: a pale colour of the skin that can suggest underlying anaemia (e.g. blood dyscrasia, chronic disease) or poor perfusion (e.g. congestive cardiac failure).
- Weight: note if the child appears a healthy weight for their age and height.
Syndromic features
Pay attention to features that may indicate the presence of an underlying genetic condition:
- Stature (e.g. tall/short)
- Syndromic facial features
See the end of this guide for a non-exhaustive list of clinical syndromes which can be associated with respiratory system pathology.
Sounds
Note any audible sounds as you observe the child and consider what underlying pathology they may indicate:
- Cough with wheeze: asthma, viral-induced wheeze
- Productive cough: lower respiratory tract infection
- Barking cough: croup, laryngomalacia
- Dry cough: allergies, tuberculosis
- Hoarse voice: laryngitis
- Hot potato voice: peritonsillar abscess
- Acute stridor: croup, foreign body, bacterial tracheitis, epiglottitis
- Chronic stridor: laryngomalacia, subglottic stenosis
Equipment
Observe for any equipment in the child’s immediate surroundings and consider why this might be relevant to the respiratory system:
- Mobility aids: neuromuscular disorder
- Feeding tubes (NG/NJ/gastrostomy): ex-premature infant, cystic fibrosis
- Oxygen saturation monitor or oxygen cylinder: chronic lung disease
- Tracheostomy: upper airway obstruction – each child in the UK should have a box of emergency tracheostomy equipment (often blue/red in colour). See our tracheostomy overview guide.
Medications
Note any medications by the bedside or in the child’s room and consider what underlying diagnoses they may indicate:
- Antibiotics: pneumonia, bronchiectasis, cystic fibrosis
- Inhalers: asthma
- Pancreatic enzymes: cystic fibrosis
 Cyanosis 1


Hands
The hands can provide lots of clinically relevant information and therefore a focused, structured assessment is essential.
Inspect the hands
General observations
Inspect the hands for clinical signs relevant to the cardiovascular system:
- Colour: pallor suggests poor peripheral perfusion (e.g. congestive heart failure) and cyanosis may indicate underlying hypoxaemia.
- Tremor: may be caused by beta 2 agonist use (e.g. salbutamol).
- Eczema: increased likelihood of asthma and hayfever (atopy).
Finger clubbing
Finger clubbing involves uniform soft tissue swelling of the terminal phalanx of a digit with subsequent loss of the normal angle between the nail and the nail bed. Finger clubbing is associated with several underlying disease processes, but those most likely to appear in a respiratory OSCE station include bronchiectasis, cystic fibrosis and primary ciliary dyskinesia.
To assess for finger clubbing:
- Ask the child to copy you in placing the nails of their index fingers back to back.
- In a healthy individual, you should be able to observe a small diamond-shaped window (known as Schamroth’s window).
- When finger clubbing develops, this window is lost.
- If the child is too young for this to be possible, you can simply inspect the fingers, looking for soft tissue swelling of the terminal phalanx of the digits.
- Finger clubbing 2

Pulse
Radial pulse
Palpate the child’s radial pulse, located at the radial side of the wrist, with the tips of your index and middle fingers aligned longitudinally over the course of the artery.
Once you have located the radial pulse, assess the rate and rhythm.
In babies, assess the femoral pulse instead.
Heart rate
Assessing heart rate:
- You can calculate the heart rate in a number of ways, including measuring for 60 seconds, measuring for 30 seconds and multiplying by 2 or measuring for 15 seconds and multiplying by 4.
- For irregular rhythms, you should measure the pulse for a full 60 seconds to improve accuracy.
- Palpate the radial pulse

Face
Observe the child’s facial complexion and features, including their eyes, ears, nose, mouth and throat.
General appearance
Inspect the general appearance of the child’s face for signs relevant to the respiratory system:
- Nasal flaring/grunting: indicative of increased work of breathing.
- Micrognathia (undersized jaw): associated with a wide range of genetic syndromes (e.g. Pierre Robin, Noonan, Marfan).
Eyes
Inspect the eyes for signs relevant to the respiratory system:
- Conjunctival pallor: suggestive of underlying anaemia. Gently pull down their lower eyelid to inspect the conjunctiva.
Ears
Inspect the ears for signs relevant to the respiratory system:
- Tympanic membrane: may be inflamed or bulging in the context of acute otitis media which often accompanies viral upper respiratory tract infections.
- Hearing aids: hearing loss is associated with primary ciliary dyskinesia.
Nose
Inspect the nose for signs relevant to the respiratory system:
- Deviated nasal septum: may contribute to breathing difficulties.
- Nasal polyps: associated with atopy and cystic fibrosis.
Mouth
Inspect the mouth for signs relevant to the respiratory system (tip – ask the child to see how long their tongue is or how big their mouth is):
- Central cyanosis: bluish discolouration of the lips and/or the tongue associated with hypoxaemia (e.g. persistent pulmonary hypertension, bronchospasm, lower respiratory tract infection).
- Cleft palate: the full palate should be examined by visual inspection.
Throat
Inspect the throat for signs relevant to the respiratory system:
- Inspect the throat using a pen torch and tongue depressor (this is often best left until the end of the examination of young children, as it is likely to upset them).
- Tonsillar hypertrophy: may indicate a history of recurrent tonsillitis and airway obstruction.
- Conjunctival pallor


Tracheal position
Inspect the position of the trachea, which should be central in healthy children.
Causes of tracheal deviation
- The trachea deviates away from pneumothorax and large pleural effusions.
- The trachea deviates towards lobar collapse and pneumonectomy.
Close inspection of the chest
Ask the parent or child (if appropriate) to expose the child’s chest.
Observe the chest, paying particular attention to the respiratory rate and work of breathing.
Closely inspect the anterior chest
Look for clinical signs that may provide clues as to the child’s past medical/surgical history:
- Scars suggestive of previous thoracic surgery: see the thoracic scars section below.
- Pectus excavatum: a caved-in or sunken appearance of the chest (e.g. Marfan syndrome).
- Pectus carinatum: protrusion of the sternum and ribs (e.g. Noonan syndrome).
- Asymmetry of chest wall movement: may indicate underlying pneumothorax or consolidation.
- Harrison’s sulcus (indrawing of the chest wall from long term diaphragmatic tug): associated with poorly controlled asthma.
- Chest hyper-expansion (barrel chest): can be associated with asthma and chronic respiratory obstruction.
- Pectus carinatum 5


Respiratory rate
Assess the child’s respiratory rate for 60 seconds to calculate the number of breaths per minute:
- Note any asymmetries in the expiratory and inspiratory phases of respiration (e.g. the expiratory phase is often prolonged in asthma exacerbations).
- The range of a normal respiratory rate varies significantly depending on the age of the child, so make sure to take this into account.
| Age | Respiratory rate |
| Newborn | 40-60 breaths/minute |
| 1 week to 3 months | 30-50 breaths/minute |
| 3 months to 2 years | 30-40 breaths/minute |
| 2 to 10 years | 14-24 breaths/minute |
| >10 years | 12-20 breaths/minute |
Work of breathing
Assess for signs of increased work of breathing.
General signs of increased work of breathing:
- Difficulty speaking (or feeding)
- Expiratory grunting (increasing positive end-expiratory pressure)
Recession:
- Tracheal tug
- Supraclavicular recession
- Intercostal recession
- Subcostal recession
Use of accessory muscles:
- Nasal flaring
- Abdominal breathing
- Head bobbing (secondary to sternocleidomastoid contractions)
- Intercostal recession 7

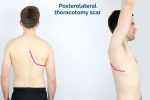
Thoracic scars
- Median sternotomy scar: located in the midline of the thorax. This surgical approach is used for cardiac valve replacement and pulmonary artery banding.
- Right thoracotomy scar: located between the lateral border of the sternum and the mid-axillary line at the 4th or 5th intercostal space on the right. This surgical approach is used to perform pulmonary artery banding and a Blalock–Taussig shunt.
- Left thoracotomy scar: located between the lateral border of the sternum and the mid-axillary line at the 4th or 5th intercostal space on the left. This surgical approach is used to perform pulmonary artery banding, patent ductus arteriosus ligation, a Blalock–Taussig shunt and coarctation of the aorta repair.
- Infraclavicular scar: located in the infraclavicular region (on either side). This surgical approach is used for pacemaker insertion.
- Left mid-axillary scar: this surgical approach is used for the insertion of a subcutaneous implantable cardioverter-defibrillator (ICD).
- Subclavicular incision


Palpation of the chest
Palpate the apex beat
Palpate the apex beat with your fingers placed horizontally across the chest.
In healthy individuals, it is typically located in the 5th intercostal space in the midclavicular line.
Causes of a displaced apex beat
Leftward displacement: cardiomegaly, right pleural effusion, right tension pneumothorax Rightward displacement: dextrocardia, diaphragmatic hernia, left pleural effusion, left tension pneumothorax
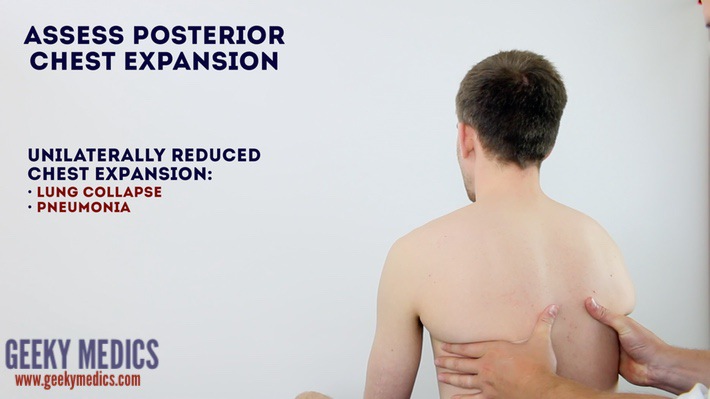
Assess chest expansion
1. Place your hands on the child’s chest, inferior to the nipples.
2. Wrap your fingers around either side of the chest.
3. Bring your thumbs together in the midline, so that they touch.
4. Observe the movement of your thumbs (in healthy individuals they should move symmetrically upwards/outwards during inspiration and symmetrically downwards/inwards during expiration).
Reduced movement of one of your thumbs indicates reduced chest expansion on that side.
Causes of reduced chest expansion
Reduced chest expansion can be caused by lung collapse, pneumonia and restrictive lung disease.
- Palpate the apex beat


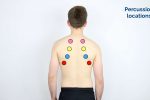
Percussion of the chest
Percussion of the chest involves listening to the volume and pitch of percussion notes across the chest to identify underlying pathology. Correct technique is essential to generating effective percussion notes.
Warn the child before beginning percussion – ‘I’m going to play your chest like a drum!’
Perform percussion gently, comparing one side to the other.
Percussion is often not performed on younger children.
Percussion technique
1. Place your non-dominant hand on the child’s chest wall.
2. Position your middle finger over the area you want to percuss, firmly pressed against the chest wall.
3. With your dominant hand’s middle finger, strike the middle phalanx of your non-dominant hand’s middle finger using a swinging movement of the wrist.
4. The striking finger should be removed quickly, otherwise, you may muffle the resulting percussion note.
Areas to percuss
Percuss the following areas of the chest, comparing side to side as you progress (see image example below):
- Supraclavicular region: lung apices
- Infraclavicular region
- Chest wall: percuss over 3-4 locations bilaterally
- Axilla
Types of percussion note
- Resonant: a normal finding.
- Dullness: suggests increased tissue density (e.g. cardiac dullness, consolidation, tumour, lobar collapse).
- Stony dullness: typically caused by an underlying pleural effusion.
- Hyper-resonance: the opposite of dullness, suggestive of decreased tissue density (e.g. pneumothorax).
- Percuss the lung fields


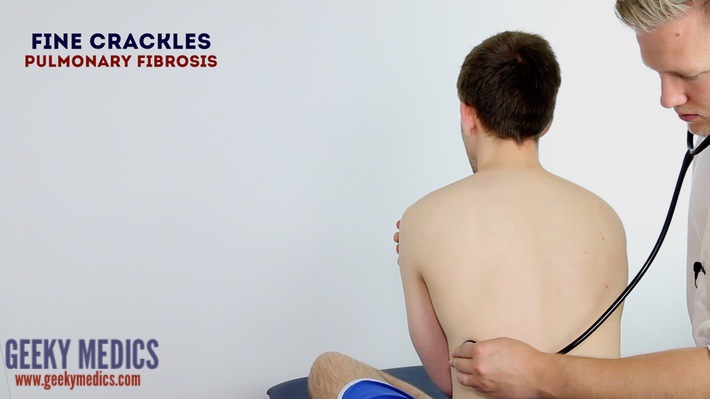
Auscultation
Start by showing the child your stethoscope and demonstrate it on your own chest and/or on one of their toys to familiarise them with this piece of equipment.
Suggest listening to their chest, making sure the stethoscope diaphragm isn’t cold prior to it making contact with the child.
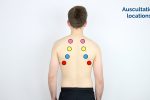
When auscultating the chest, it is important that you have a systematic approach that allows you to compare each area on both the left and the right as you progress.
Technique
1. Ask the child to take ‘big breaths’ – some abnormal sounds may be inaudible if taking shallow breaths.
2. Position the diaphragm of the stethoscope over each of the relevant locations on the chest wall to ensure all lung regions have been assessed and listen to the breathing sounds during inspiration and expiration. Assess the quality and volume of breath sounds and note any added sounds.
3. Auscultate each side of the chest at each location to allow for direct comparison and increased sensitivity at detecting local abnormalities.
Quality of breath sounds
- Vesicular: the normal quality of breath sounds in healthy individuals.
- Bronchial: harsh-sounding (similar to auscultating over the trachea), inspiration and expiration are equal and there is a pause between. This type of breath sound is associated with consolidation. Be aware that harsh breath sounds from the upper airway are readily transmitted to the upper chest in infants, which can be misinterpreted as abnormal added sounds.
Volume of breath sounds
- Quiet breath sounds: suggest reduced air entry into that region of the lung (e.g. pleural effusion, pneumothorax).
- When presenting your findings, state ‘reduced breath sounds’, rather than ‘reduced air entry’.
Added sounds
- Wheeze: a continuous, coarse, whistling sound produced in the respiratory airways during breathing. Wheeze is often associated with asthma and bronchiectasis.
- Stridor: a high-pitched extra-thoracic breath sound resulting from turbulent airflow through narrowed upper airways. Stridor has a wide range of causes, including foreign body inhalation (acute) and subglottic stenosis (chronic).
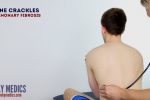
- Coarse crackles: discontinuous, brief, popping lung sounds typically associated with pneumonia, bronchiectasis and pulmonary oedema.
- Fine end-inspiratory crackles: often described as sounding similar to the noise generated when separating velcro. Fine end-inspiratory crackles are associated with pulmonary fibrosis.
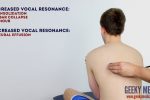
Assess vocal resonance
Assessing vocal resonance in an adult involves auscultating over different areas of the chest wall whilst the patient repeats a word or number consistently. The presence of increased tissue density or fluid affects the volume at which the patient’s speech is transmitted to the diaphragm of the stethoscope.
Vocal resonance may be difficult/impossible to assess in small children and therefore it is often not performed in this context. We have included further details on how to assess and interpret vocal resonance below.
Technique
1. Ask the child to say “99” or some other word every time you listen to their chest.
2. Auscultate all major regions of the anterior chest wall, comparing each side at each location.
Abnormal vocal resonance
Increased volume over an area suggests increased tissue density (e.g. consolidation, tumour, lobar collapse).
Decreased volume over an area suggests the presence of fluid or air outside of the lung (e.g. pleural effusion, pneumothorax).
- Areas to auscultate the lungs on the anterior chest wall


Lymph nodes
Inspect for any evidence of obvious lymphadenopathy affecting the neck.
Palpate the lymph nodes
1. Position yourself behind the child and use both hands to start palpating the neck.
2. Use the pads of the second, third and fourth fingers to press and roll the lymph nodes over the surrounding tissue to assess the various characteristics of the lymph nodes. By using both hands (one for each side) you can note any asymmetry in size, consistency and mobility of lymph nodes.
3. Start in the submental area and progress through the various lymph node chains. Any order of examination can be used, but a systematic approach will ensure no areas are missed:
- Submental
- Submandibular
- Pre-auricular
- Post-auricular
- Superficial cervical
- Deep cervical
- Posterior cervical
- Supraclavicular
Take caution when examining the anterior cervical chain that you do not compromise cerebral blood flow (due to carotid artery compression). It may be best to examine one side at a time here.
A common mistake is a “piano-playing” or “spider’s legs” technique with the fingertips over the skin rather than correctly using the pads of the second, third and fourth fingers to press and roll the lymph nodes over the surrounding tissue.
Causes of lymphadenopathy
Lymphadenopathy may indicate infection (most commonly) or malignancy.
- Palpate the lymph nodes

Posterior chest assessment
Assess the posterior chest including inspection, chest expansion, percussion, vocal resonance and auscultation.
Allocate adequate time to assessing the posterior aspect of the chest as this is where you are most likely to identify clinical signs.
- Posterolateral thoracotomy scar


")


Final steps
Assess for evidence of oedema:
- Ask the parents if the child looks puffy or swollen.
- Inspect the limbs, sacral area and face: affected areas will depend on the age of the child and mobility status.
- Pedal oedema 8

To complete the examination…
Explain to the child and parents that the examination is now finished.
Ensure the child is re-dressed after the examination.
Thank the child and parents for their time.
Explain your findings to the parents.
Ask if the parents and child (if appropriate) have any questions.
Dispose of PPE appropriately and wash your hands.
Summarise your findings to the examiner.
Further assessments and investigations
Suggest further assessments and investigations to the examiner:
- Cardiovascular examination: if concerned about cardiac pathology (e.g. heart failure with secondary pulmonary oedema).
- Inhaler technique assessment: if asthmatic and concerned about long term management.
- Record a full set of vital signs
- Assess peak expiratory flow rate: if asthmatic to assess response to treatment.
- Send a sputum sample for culture: if concerned about possible pneumonia.
- Plot the height and weight of the child on a growth chart
- Venous blood gas: if concerned about respiratory failure.
- Chest X-ray: if concerned about consolidation or pneumothorax.
Syndromes that may impact the respiratory system
Below is a non-exhaustive list of clinical syndromes which can be associated with respiratory system pathology. The features of the syndrome relevant to the respiratory system are shown in bold.
| Syndrome | Clinical features |
| DiGeorge syndrome A constellation of signs and symptoms associated with defective development of the pharyngeal pouch system. Most cases are caused by a heterozygous chromosomal deletion at 22q11.2. |
Hearing loss Cleft palate Micrognathia Hypoplastic malar Recurrent chest infections |
| Down’s syndrome A genetic disorder caused by the presence of all or part of a third copy of chromosome 21. |
Epicanthic folds Brushfield spots Protruding tongue Low set ears Recurrent chest infections Persistent pulmonary hypertension |
| Fetal alcohol spectrum disorder A range of effects that can occur in an individual who was prenatally exposed to alcohol. |
Microcephaly Intrauterine growth restriction (IUGR) Smooth philtrum Joint abnormality Lung hypoplasia Altered surfactant production |
| Marfan syndrome An autosomal dominant connective tissue disorder. |
Hypermobility Pneumothorax Chest wall deformities |
| Pierre Robin sequence Most cases are thought to result from hypoplasia of the mandible that occurs before the ninth week of development. |
Cleft palate Micrognathia Glossoptosis |
| Stickler syndrome An inherited disorder of connective tissue. |
Flat face Upturned nose Prominent eyes Mid-facial hypoplasia Hypotonia Hypermobility Eye disorders Feeding/breathing difficulties Scoliosis |
| Treacher Collins syndrome An autosomal-dominant disorder of craniofacial development with a variable degree of penetrance. |
Malar hypoplasia Down slanting palpebral fissures Lower lip defect External ear abnormality Eye disorders Cleft palate Underdevelopment of the facial bones and airway can lead to airway obstruction. |
Reviewer
Dr Sunil Bhopal
Senior Paediatric Registrar
References
Text references
- RCPCH. Spotting the sick child [LINK]
- Lissauer, T., Clayden, G., & Craft, A (2012). Illustrated textbook of paediatrics. Edinburgh: Mosby.
- Robertson (2017). Paediatric Respiratory History and Examination. Royal Children’s Hospital Melbourne.[LINK] (Accessed 4 Mar 19)
- Tasker, R. C., McClure, R. J. & Acerini, C. L. (2013). Oxford handbook of paediatrics. Oxford: Oxford University Press.
- Taylor, Gfeller, & Ring (date unknown). Respiratory Examination. Learnpediatrics.com Narration. The University of British Columbia. [LINK](Accessed 4 Mar 2019)
- Whitehouse & Ng (2019). Respiratory Examination Guide. MRCPCH Clinical Revision. Trainees Committee, London School of Paediatrics.[LINK] (Accessed 4 Mar 2019)
Image references
- Cornelia Csuk. Adapted by Geeky Medics. Cyanosis. Licence: CC BY-SA.
- Desherinka. Adapted by Geeky Medics. Finger clubbing. Licence: CC BY-SA.
- Ankit Jain, MBBS, corresponding author Anuradha Patel, MD, FRCA and Ian C. Hoppe, MD. Adapted by Geeky Medics. Central cyanosis. Licence: CC BY-SA.
- BruceBlaus. Adapted by Geeky Medics. Cleft palate. Licence: CC BY-SA.
- Jprealini. Adapted by Geeky Medics. Pectus carinatum. Licence: CC BY-SA.
- Aurora Bakalli, Tefik Bekteshi, Merita Basha, Afrim Gashi, Afërdita Bakalli and Petrit Ademaj. Adapted by Geeky Medics. Pectus excavatum. Licence: CC BY-SA.
- Bobjgalindo. Adapted by Geeky Medics. Intercostal recession. Licence: CC BY-SA.
- James Heilman, MD. Adapted by Geeky Medics. Pedal oedema. Licence: CC BY-SA.
