
- 📖 Geeky Medics OSCE Book
- ⚡ Geeky Medics Bundles
- ✨ 1300+ OSCE Stations
- ✅ OSCE Checklist PDF Booklet
- 🧠 UKMLA AKT Question Bank
- 💊 PSA Question Bank
- 💉 Clinical Skills App
- 🗂️ Flashcard Collections | OSCE, Medicine, Surgery, Anatomy
- 💬 SCA Cases for MRCGP
To be the first to know about our latest videos subscribe to our YouTube channel 🙌
Introduction
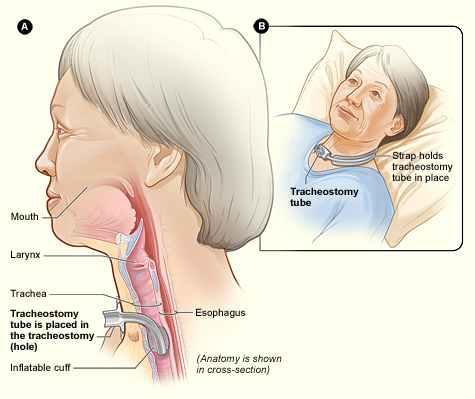
Tracheostomy is a procedure where an artificial airway is established in the cervical trachea. The first clearly documented tracheostomy (or tracheotomy) dates back to the 15th century, although it is believed that the procedure might have been performed as early as 2000 BC. In modern medicine, this procedure is performed on a daily basis. However, the term ‘tracheostomy’ has evolved to refer to both the procedure and the clinical condition of having a tracheostomy tube.
The National Tracheostomy Safety Project estimates that in England each year, around 10 – 15000 percutaneous tracheostomies are performed in the intensive care unit, and 5000 surgical tracheostomies within head and neck surgical practice.¹ The implications are wide-reaching, as safe caring for tracheostomy patients requires knowledge and competencies in dealing with everyday care, weaning and decannulation as well as emergencies arising from tracheostomy tubes.
Caring for a patient with tracheostomy can be challenging and is often a source of anxiety for junior doctors, especially when they do not work within specialist units that handle these patients routinely. In this article, we will talk about the basic principles of routine and emergency tracheostomy management.
Why, when, how and what?
The most common indication for a tracheostomy is to facilitate weaning off ventilation in intensive care patients.
Other reasons for tracheostomy include:
- upper airway obstruction;
- to secure and maintain a safe airway in cases where the upper airway is unsafe (e.g. injuries to the face, head and neck);
- bronchial toilet and secretion removal;
- airway protection (e.g. neuromuscular disorders)
In non-emergency settings, there is no convincing data to guide the timing of tracheostomy in patients who are ventilated via endotracheal tube on an intensive care unit, but ten days is often widely accepted as the time when tracheostomy should be considered. Nevertheless, the benefits and potential risks of tracheostomy need to be considered, and in all cases discussed with patients and family members.
Tracheostomy can be performed with open dissection through the anterior neck or percutaneously. The percutaneous tracheostomy technique has gained popularity since its introduction in the 1980s, as it is seen to be an effective alternative to surgical tracheostomy, whilst avoiding the need for transfer to the operating theatre with comparable outcomes.2,3 Seldinger technique is the most widely practiced and described percutaneous tracheostomy technique.
The basic descriptions of tracheostomy tubes are shown in Table 1.
Table 1 Basic descriptions of tracheostomy tubes
| Description | Variation | Remarks |
| Size | The inner diameter of the tube is taken as the size. For example, the commonly used size for an average female adult is 7.0mm. | |
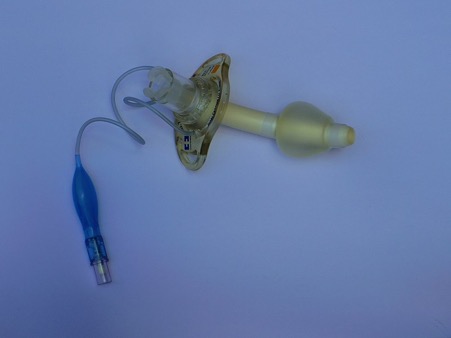
| Cuff | Cuffed | A soft balloon around the distal end of the tube to seal the airway. Cuffed tubes are necessary when airway protection or positive ventilation is required. Assuming tube and cuff are correctly placed and inflated, the patient will not be able to breathe through an occluded lumen. |
| Uncuffed | Rarely used in acute care. Generally used in patients who have an effective cough and gag reflex, for longer-term management of secretions. | |
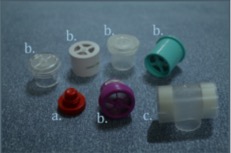
| Fenestration | Fenestrated | Opening(s) in the outer cannula that allows air to pass through the patient’s oral/nasal pharynx, as well as the tracheal opening. Allows speech but increases the risk of aspiration. A non-fenestrated inner cannula can be placed if needed (e.g. emergency ventilation). |
| Non-fenestrated | No opening(s) | |
| Cannula | Single | Rarely used due to concerns surrounding blockage and difficulty in cleaning. |
| Double | Commonly used. Inner cannula serves as a removable line to facilitate cleaning. In cases of blockage, the inner cannula can be removed and the airway re-established (assuming the tube is correctly placed). |
Some tubes may have subglottic suction, which is thought to reduce the incidence of ventilator-associated pneumonia. In patients with an abnormally large distance from skin to the trachea, adjustable flange tracheostomy tubes may be used.
There are many different manufacturers and devices. Common brand names in the U.K. are Shiley, Kapitex, Tracoe Twist, and Portex. The silver Negus is a common permanent tracheostomy tube. The specifications of the tubes by different manufacturers guide their use and purpose.
It is far more important to understand the basic descriptions and the types of tubes commonly used in their hospital settings than remembering a list of manufacturer brands!
‘Routine’ care and weaning
Multidisciplinary, ward-based tracheostomy care is internationally recognised to minimise tracheostomy-related complications and to improve outcomes.4 Ideally, weekly tracheostomy ward rounds should be performed, with the team comprising of a physician (commonly intensive care or ENT specialist), physiotherapist, airway clinical nurse specialist, speech and language therapist and nurse.
The team aims to ensure that routine care of tracheostomy is achieved and provides a strategy for eventual weaning or decannulation. In addition, the team is able to identify issues surrounding staff competencies, logistics and shortfalls in care, whilst providing support and setting standards.
The cornerstone in caring for patients with tracheostomy remains the prevention of tube blockage. A useful tip to remember in managing tracheostomy is to imagine that all the native functions of the upper airway need to be replicated i.e. humidification, clearing of secretions, stoma care, speech, airway protection and swallowing (Figure 1). The commonest measures undertaken in the day-to-day care of a tracheostomy tube are outlined in Table 2.
Table 2 Common measures taken in the daily management of a tracheostomy
| Care | Actions |
| Daily checks |
Items that must be checked include bedhead sign with correct information, type and size of the tube, availability of spare and emergency equipment, cough effort, swallowing, sputum characteristics, inner cannula, tracheostomy tube and stoma, observations. Each patient should have an emergency tracheostomy box that contains all the necessary equipment. |
| Humidification | A method of artificial humidification must be employed to avoid drying up of secretions, which may form a crust around tracheostomy or cause a fatal blockage. Examples of humidification are heated humidification circuit, heat-moist-exchanger, saline nebuliser, mucolytics and hydration. |
| Clearing of secretions | In addition to cough, suctioning with flexible suction catheters through the tracheostomy tube must be performed with varying intervals and depth depending on the patient’s condition. |
| Stoma care | The wound should be checked regularly to ensure it is clean and healthy. Granulation, skin sore and wound breakdown may occur. |
| Inner cannula care | The inner cannula should be removed and inspected at least once per 8-hour shift. Again, intervals may be shorter for better management of secretions. At Charing Cross Hospital, it is recommended that inner cannula be checked every four hours. |
| Oral care and swallowing | Oral care is important to prevent colonisation by microorganisms and superimposed infection. If unable to self-care, daily assessment of the oral cavity and clearing of oral secretions should be carried out. |
| Cuff management | Capillary pressure of the trachea wall is normally between 20 – 30 mmHg and blood flow may be impaired by obstruction pressure between 22 – 37 mmHg, causing tissue necrosis and subsequent fistula, stenosis, tracheomalacia etc. The recommended cuff pressure, which should be checked once every 8-hour shift, is between 10 – 18 mmHg (15 – 25 cm H2O). |
Weaning is a process towards complete independence from ventilatory or respiratory support, which eventually leads to decannulation (except for cases where the tube is permanent).
In order to achieve safe decannulation, various protocols exist to ascertain and establish the ability of the native airway to function without the artificially inserted tracheostomy tube. Speaking valves and caps are commonly used to cause an increase in resistance to airflow through the trachea and to encourage airflow through the normal passage. If patients are able to tolerate these systems that are applied over a period of time, often 24 hours, without extra respiratory support, they are deemed suitable for decannulation. It is important to note that neither of these processes should be trialled with an inflated cuff!
Weaning is a dynamic process that involves an assessment of the patient at each step. Some patients may achieve decannulation with very little problem; some may not achieve safe decannulation at all.
In principle, when the decision is made for weaning and decannulation, patients go through (I) cuff deflation, (II) use of one-way valve, (III) capping off tracheostomy tube, and (IV) decannulation in a step-wise manner.
Where there are difficulties, troubleshooting potential causes requires experience and guidance from the multidisciplinary tracheostomy team. For example, stridor may occur when a cap is used. In this instance, the cap should be removed and ENT advice should be sought (endoscopic assessment of the upper airway may be warranted to identify obstruction in the supraglottic, glottic or subglottic region).
Decannulation is considered when there is MDT agreement that the patient is able to tolerate capping off for a set period of time, there is sufficient swallowing function, cough strength is sufficient to expel secretions from the trachea and there is no planned intervention requiring an artificial airway.
After decannulation, patients are actively monitored for signs of respiratory distress for 48 hours with emergency equipment available by the bedside during this period of time. Safe decannulation should be achievable if the patient progresses through the weaning process satisfactorily.
Emergency care
Remember, tracheostomy emergencies should be managed with the same ABCDE principles as any other emergency situation!
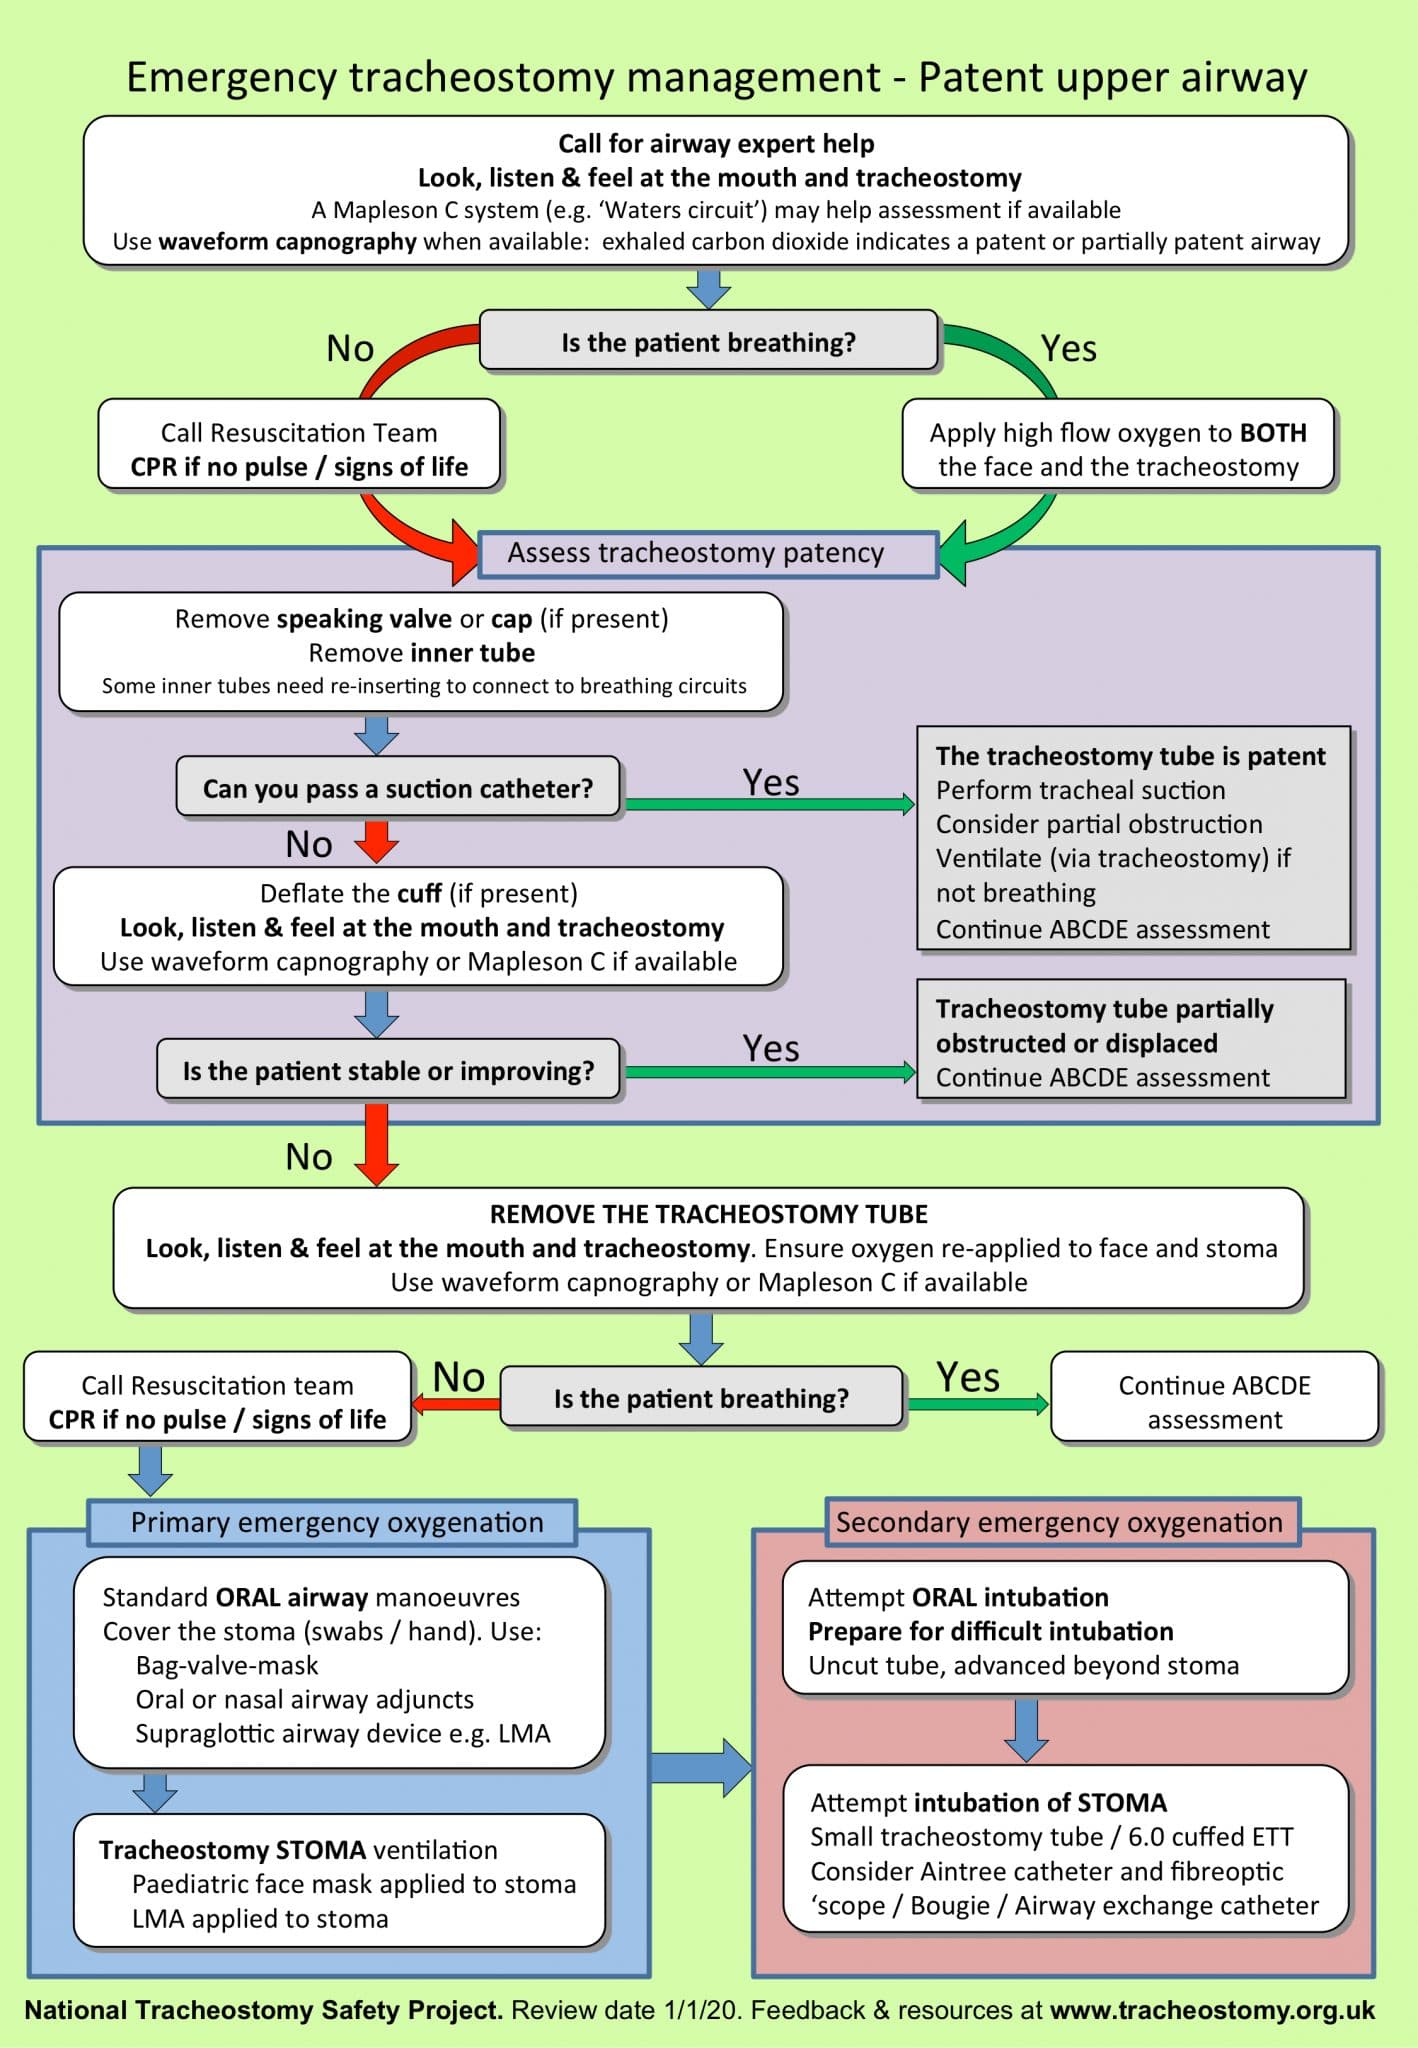
An algorithm developed by the National Tracheostomy Safety Project is extremely useful in an emergency.
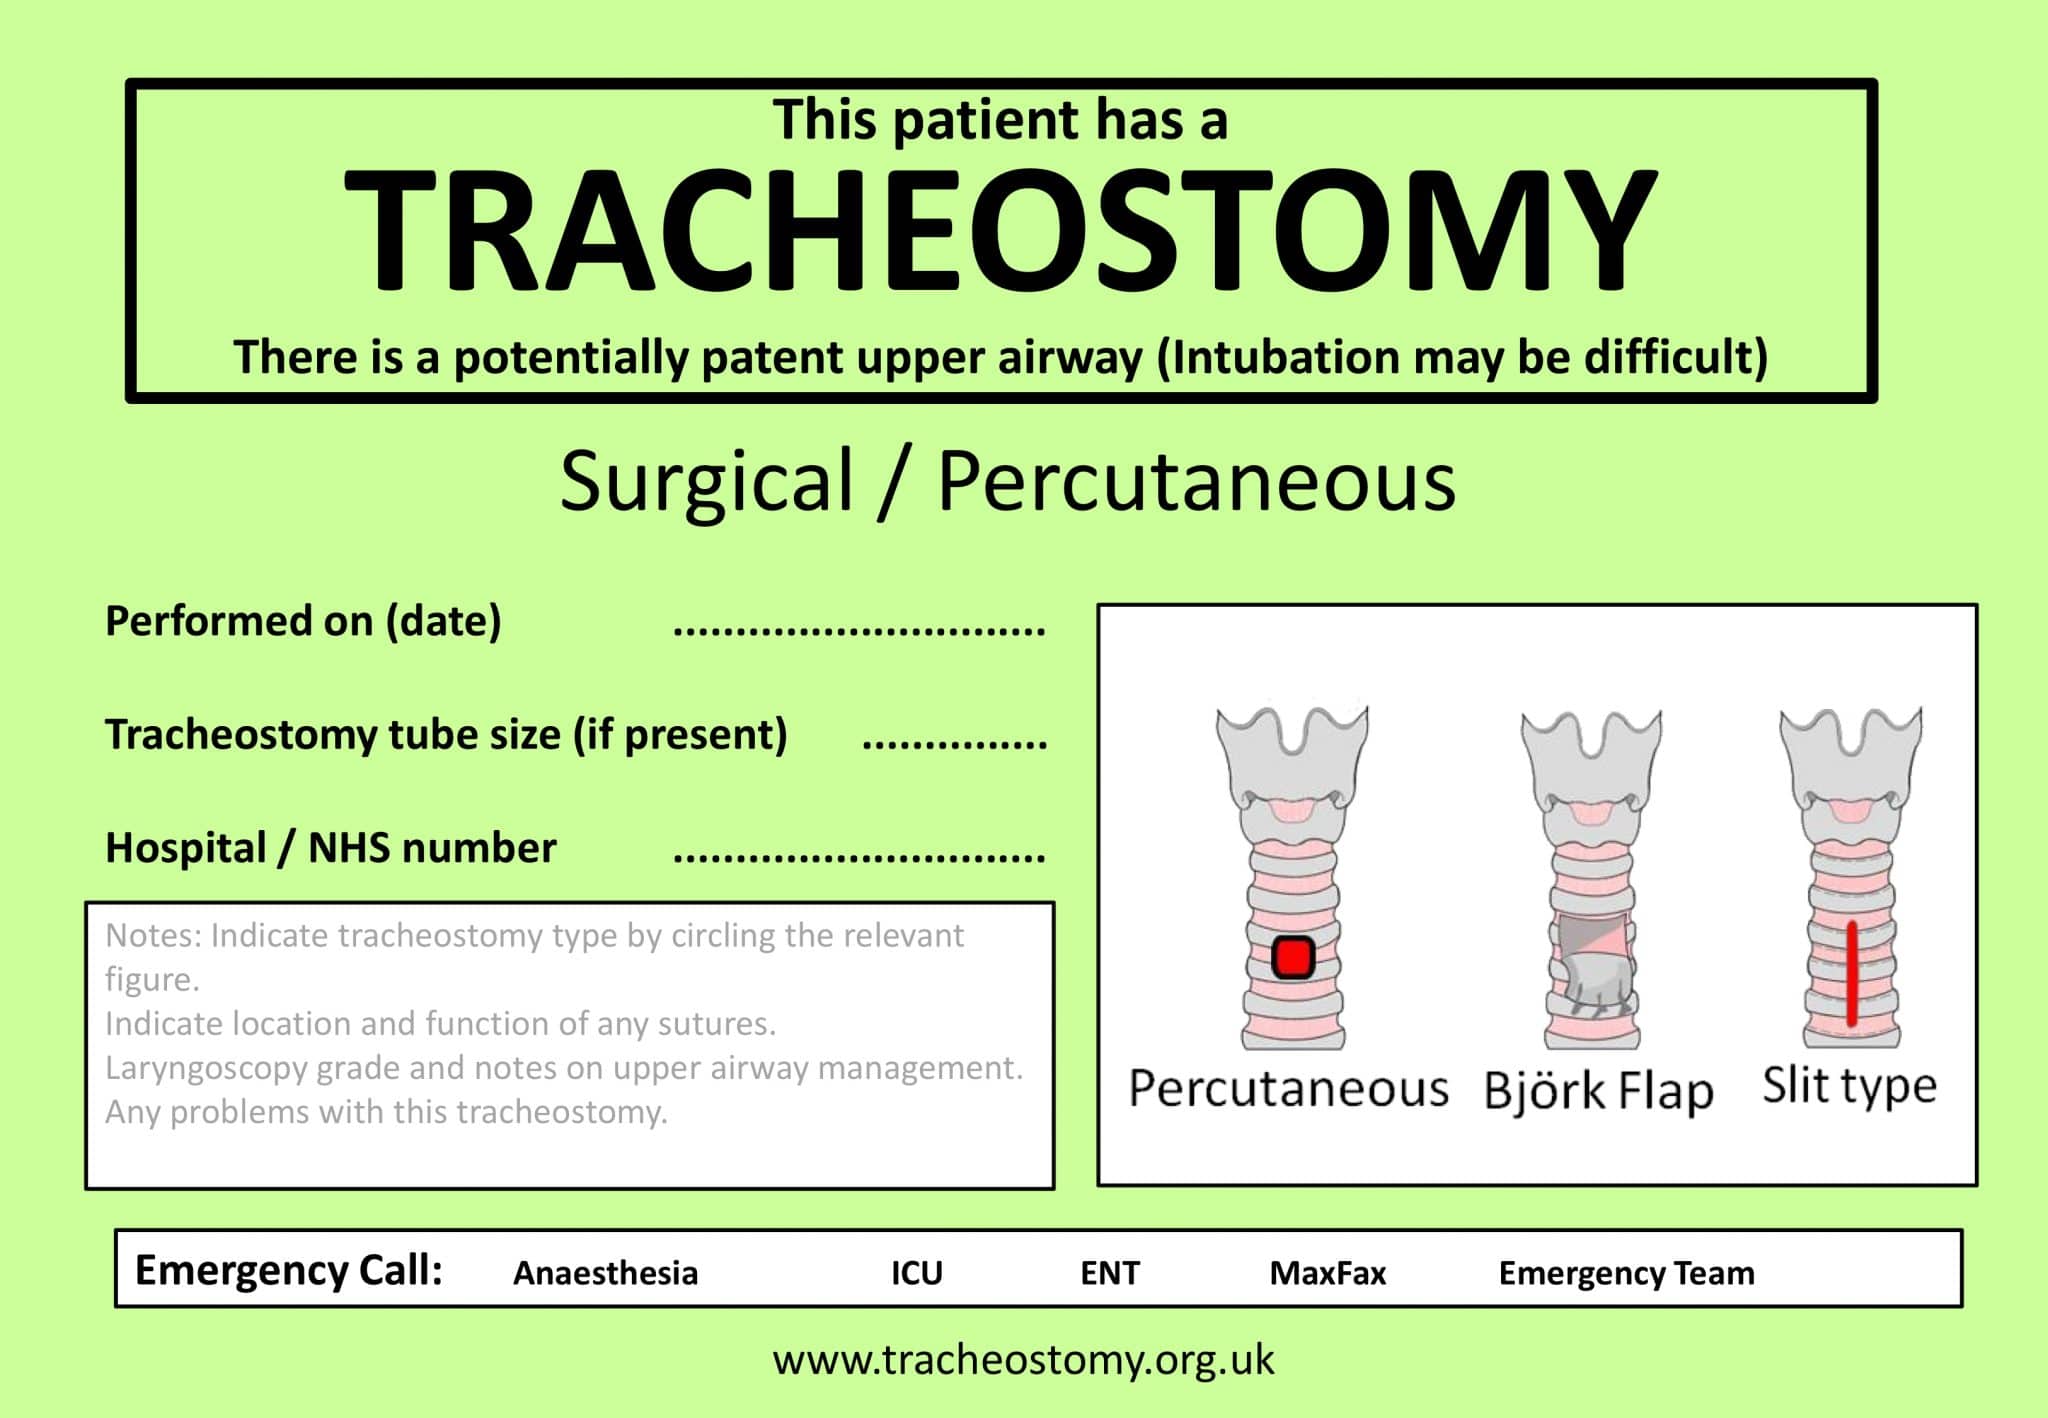
A bedhead sign developed following consultation with key national bodies, (Figure 4) also contains useful information that summarises key details regarding the tracheostomy, method of formation of the stoma and presence of ‘stay sutures’; whereas the algorithm (Figure 5) provides stepwise guidance in dealing with an emergency in a tracheostomy or laryngectomy. 7
There are separate bedhead signs and algorithms for laryngectomy (‘red algorithm’) and these should also be clearly displayed.
Tips for junior doctors
Junior doctors are often the first to be called or be present in an emergency. It is recognised that competency of the staff, including junior doctors, looking after tracheostomy patients should be achieved and maintained. In the United Kingdom, hospital trusts have local policies in place to ensure that this is the case. There are also various resources available online, such as interactive algorithms and videos, for learning by healthcare staff. A helpful resource is the National Tracheostomy Safety Project.
A few tips for junior doctors:
- Remember ABCDE: the first clinical steps should always involve opening the airway and looking for evidence of breathing (if cardiac arrest is identified, commence CPR).
- The priorities are oxygenation and getting help!
- Learn and acquire competency to detect airway problems, assess tracheostomy and airway patency and to provide basic emergency oxygenation.
- Tracheostomy patients have potentially two airways, so the face and tracheostomy tube should be assessed following basic airway opening manoeuvres.
- Oxygen should be provided via the face as well as the tracheostomy tube if the patient is breathing.
- Tube blockage by mucous plugging or thick secretions is one of the commonest causes for an emergency, therefore primary responders should remove the inner cannula and pass a suction catheter as part of the assessment of tube patency or treatment of tube blockage. Difficulty in passing the suction catheter suggests that the tube may be displaced or partially obstructed, so the next reasonable step is to assess for air movement via the tracheostomy tube. If help was sought early, it should arrive by this point. Further manoeuvres often require specialised skills by anaesthetics or ENT specialists. Removing the tracheostomy tube and attempting to replace should be done only once anaesthetic or ENT help has arrived. Sometimes the insertion of an endotracheal tube through the tracheostomy wound can provide an airway in an emergency.
Conclusion
It is becoming increasingly common that junior doctors look after patients with tracheostomy. Basic understanding of the management of tracheostomy on a day-to-day basis and during emergencies is paramount in delivering safe care. A multidisciplinary approach to tracheostomy care is internationally recognised to be effective and to improve outcomes. Junior doctors should develop a good grasp of the basic principles of tracheostomy management, and where appropriate they should know to seek help or advice.
References
- MC Grath BA. Comprehensive Tracheostomy Care: The national tracheostomy safety project manual. McGrath B, editor. Wiley; 2014. 52-61 p.
- Higgins KM, Punthakee X. Meta-Analysis Comparison of Open Versus Percutaneous Tracheostomy. Laryngoscope. 2007;
- Johnson-Obaseki S, Veljkovic A, Javidnia H. Complication rates of open surgical versus percutaneous tracheostomy in critically ill patients. Laryngoscope. 2016;
- Speed L, Harding KE. Tracheostomy teams reduce total tracheostomy time and increase speaking valve use: A systematic review and meta-analysis. J Crit Care. 2013;
- Tenbergen. Tracheostomy tubes. Licence: [CC BY-SA 4.0].
- Photo courtesy of National Tracheostomy Safety Project Comprehensive Tracheostomy Care Manual.
- McGrath BA, Bates L, Atkinson D, Moore JA. Multidisciplinary guidelines for the management of tracheostomy and laryngectomy airway emergencies. Anaesthesia. Published in 2012.
