

- 📖 Geeky Medics OSCE Book
- ⚡ Geeky Medics Bundles
- ✨ 1300+ OSCE Stations
- ✅ OSCE Checklist PDF Booklet
- 🧠 UKMLA AKT Question Bank
- 💊 PSA Question Bank
- 💉 Clinical Skills App
- 🗂️ Flashcard Collections | OSCE, Medicine, Surgery, Anatomy
- 💬 SCA Cases for MRCGP
To be the first to know about our latest videos subscribe to our YouTube channel 🙌
Introduction
An ascitic drain (therapeutic paracentesis) involves removing excessive ascitic fluid from a patient’s abdomen.
This is a therapeutic procedure, however, a sample of ascitic fluid can be taken during insertion to be sent for ascitic fluid analysis.
When draining ascitic fluid, patients should be administered 100ml of human albumin solution 20% (HAS) for every 2-3 litres of ascitic fluid drained.
This guide provides a step-by-step approach to performing an ascitic drain in an OSCE setting (using a Bonanno catheter), it is NOT intended to be used to guide patient care.
Gather equipment
Gather the appropriate equipment to perform an ascitic tap:
- Sterile gloves
- Apron
- Dressings pack
- Sterile surface (nursing trolley which has been appropriately cleaned)
- Ascitic drain pack (e.g. Bonanno)
- 20ml syringe
- Sharps container
- Chlorhexidine swab (ChloraPrep™)
- Urinary catheter bag and stand
- 2x cannula dressings
- 20% human albumin solution (HAS)
- Scalpel blade
- Local anaesthetic: lidocaine 1% or 2%, drawing-up needle, orange needle (25G), green needle (19G), 2oml syringe
- Specimen container (usually a white top specimen pot): if sending fluid samples for ascitic fluid analysis
Ultrasound (if available)
Ideally, ultrasound is used to confirm the presence of ascites and identify a suitable needle insertion site. However, it is possible to perform this procedure without ultrasound.
Introduction
Wash your hands using alcohol gel. If your hands are visibly soiled, wash them with soap and water.
Don PPE if appropriate.
Introduce yourself to the patient including your name and role.
Confirm the patient’s name and date of birth.
Explain what the procedure will involve using patient-friendly language: “I need to insert an ascitic drain into your abdomen. The purpose of this procedure is to reduce the fluid that has accumulated in your abdomen. This involves inserting a large needle into your abdomen and then a drain. This drain will be there for a few hours. It can be painful when the needle is inserted so we are going to use a local anaesthetic. There are a few risks associated with this procedure. These risks include bleeding, pain, infection, damage to surrounding organs and fluid depletion which could cause kidney injury.”
Gain written consent to proceed with inserting the ascitic drain.
Check if the patient has an allergy to local anaesthetic (if requested) or to the skin preparation agent.
Check for any contraindications.
Ask the patient if they have any pain before continuing with the clinical procedure.
Ascitic drain contraindications
Infection overlying the intended drain insertion site is a contraindication to inserting an ascitic drain. If an infection is present, select another site on the patient’s abdomen to take the sample.
Other cautions (but not contraindications) include:
- Coagulopathy (INR >2.0)
- Platelets <50
- Pregnancy
- Organomegaly
Ascitic drain complications
Potential complications of ascitic drain insertion should be discussed with the patient and recorded on the consent form. Complications may include:
- Bleeding
- Pain
- Infection
- Damage to surrounding structures (specifically bowel perforation)
- Kidney injury secondary to fluid depletion
Confirm ascites and identify insertion site
Position the patient so that they are lying flat.
Perform an abdominal examination to confirm the presence of ascites (shifting dullness).
Whilst confirming ascites, find the optimal location for the ascitic drain using percussion. This will be the area of the abdomen where the volume of ascites is greatest whilst the patient is lying flat and has the dullest percussion note.
If available: use ultrasound to assess the location of ascites further and to find the ideal location for drain insertion.
Remove equipment from its packaging and place it onto a sterile surface so that it is easily accessible during the procedure.
Ascitic drain location
An ascitic drain is usually inserted in the right or left lower quadrant of the abdomen, where the ascitic fluid accumulates most. Avoid inserting the drain too superiorly, due to the risk of injuring the liver or spleen.
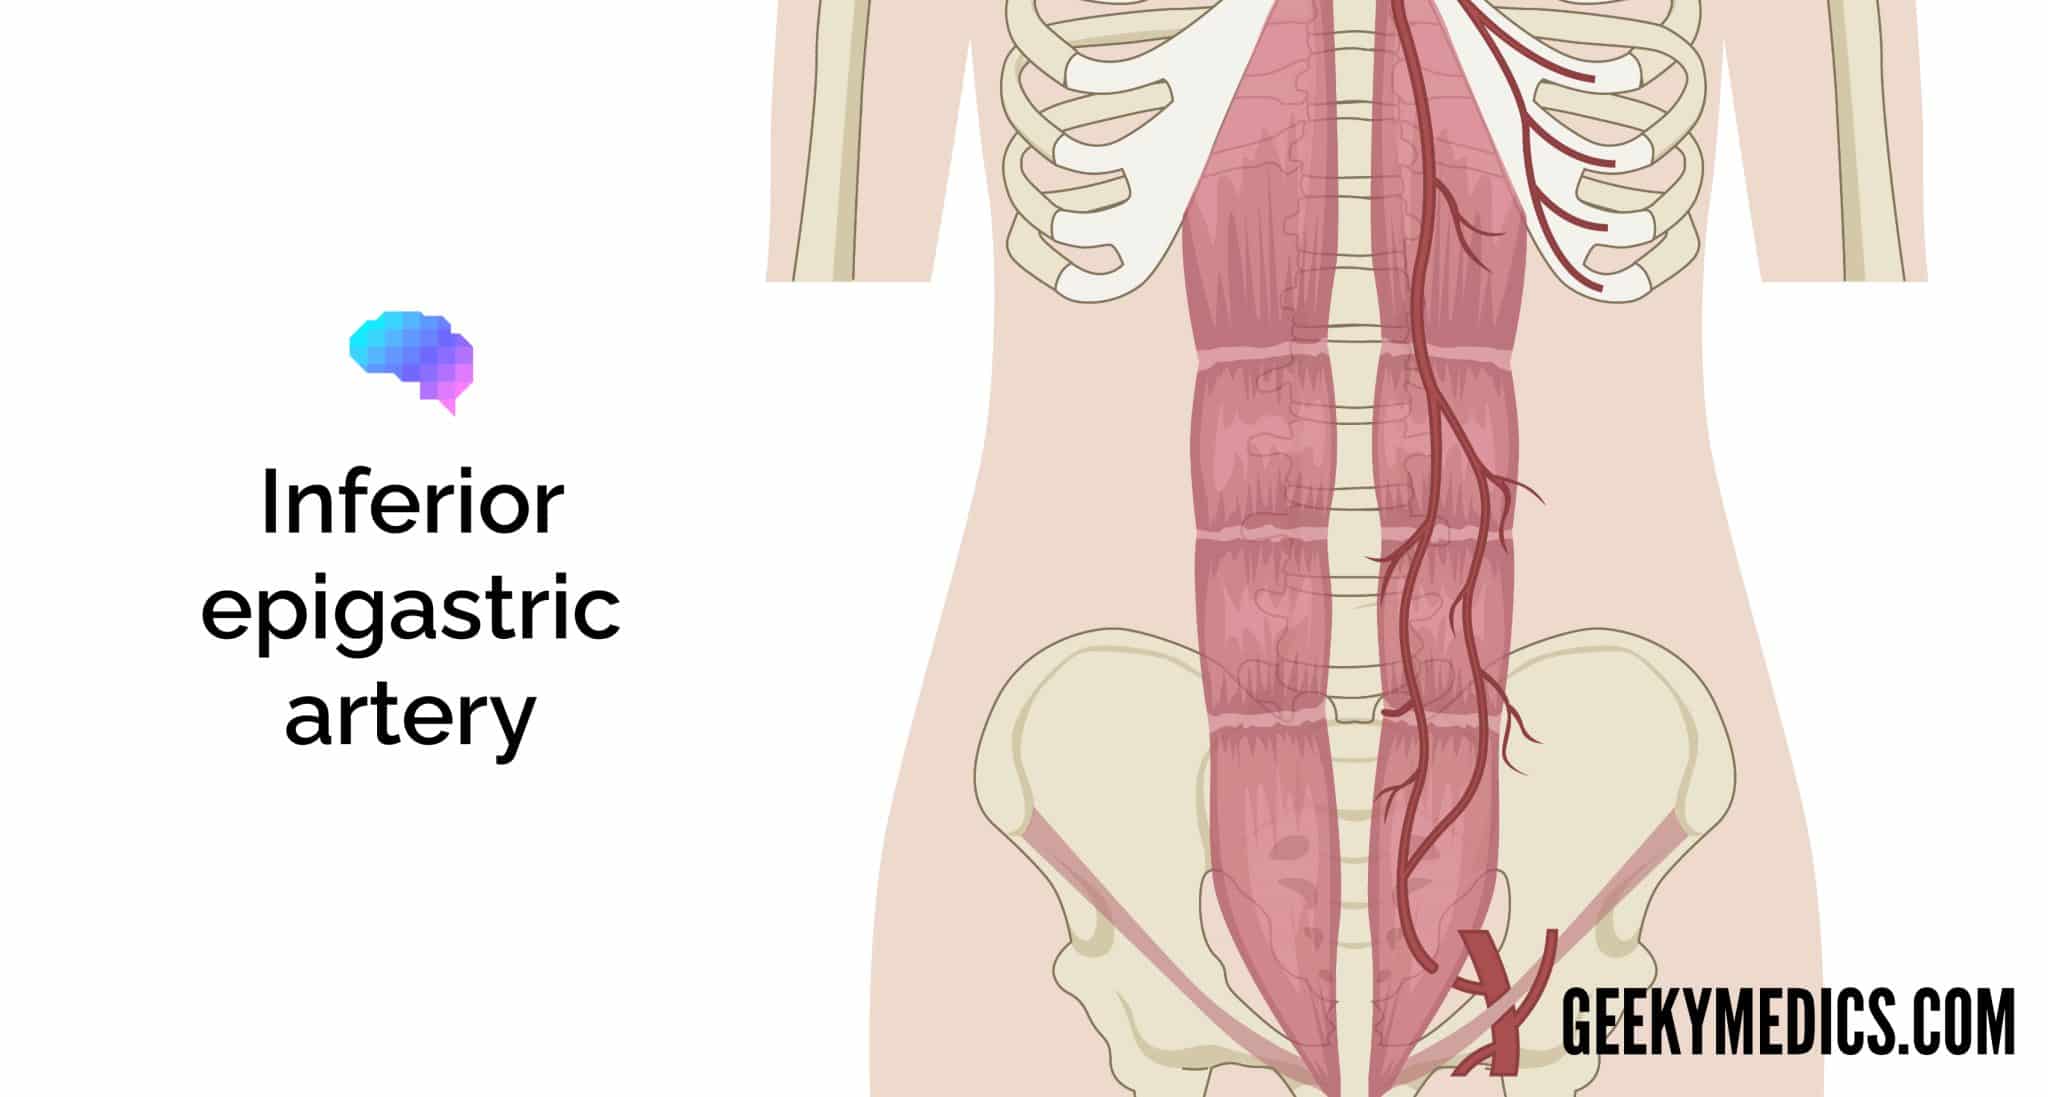
It is important to avoid the inferior epigastric artery which runs within the rectus sheath approximately 4-8cm from the midline.
Prepare the insertion site
Wash your hands and don sterile gloves and an apron.
Clean the insertion site and the surrounding area thoroughly using chlorhexidine solution and allow it to dry.
Insert the ascitic drain
Local anaesthetic
1. Prepare and administer lidocaine subcutaneously using an orange needle (25G) over the planned puncture site (creating a bleb). Aspirate to ensure you are not in a blood vessel.
2. Replace the 25G orange needle with a 19G green needle.
3. Administer lidocaine deeper into the tissue, aspirating as you go until you get a flashback of ascitic fluid.
Insertion of an ascitic drain (using a Bonanno catheter)
1. Make a small incision in the patient’s skin at the intended drain insertion site (to make the insertion easier).
2. Pick up the Bonanno catheter and straighten it out using the plastic sheath.
3. Insert the needle into the Bonanno catheter then remove the plastic sheath.
4. Attach a 20ml syringe to the end of the needle.
5. Holding the needle perpendicular to the skin, insert the needle into the previously identified location on the patient’s abdomen.
6. Advance the needle slowly, ensuring you aspirate as you advance.
7. Once you aspirate ascitic fluid, insert the needle half a centimetre more.
8. Aspirate 20ml of ascitic fluid.
9. Start to pull back the needle, whilst simultaneously advancing the Bonanno catheter (the needle will provide the stability needed for the catheter to be inserted). The technique used here is similar to inserting an intravenous cannula.
10. Advance the Bonanno catheter until it is at the hilt.
11. Remove the needle.
12. Secure the catheter with two cannula dressings on either side, anchoring the drain to the patient’s skin.
13. Attach Bonanno catheter to catheter bag (it should not be placed on the floor due to infection risk and trip hazard).
14. Leave on free drainage for a maximum of six hours.
15. Ask the ward staff to remove the drain after six hours and document when the ascitic drain is removed and the total volume of ascitic fluid removed.
Z-track technique
The Z-track technique is an alternative technique which can be used to reduce leakage of ascitic fluid following paracentesis.
The skin is stretched approximately 2cm before inserting the needle into the epidermis. The skin is held in this position whilst the needle is advanced. The skin is then released after the needle has been removed. This technique creates a non-linear path between the skin and abdominal cavity.
Human albumin solution
Prescribe and administer 100ml of human albumin solution 20% (HAS) for every 2-3 litres of ascitic fluid drained. HAS may need to be ordered from the hospital blood bank.
Ascitic fluid analysis
If the ascitic fluid is being sent for analysis, place the aspirated ascitic fluid into specimen containers.
To complete the procedure…
Explain to the patient that the procedure is now complete.
Thank the patient for their time.
Dispose of PPE and other clinical waste into an appropriate clinical waste bin.
Wash your hands.
Document the details of the procedure including:
- Whether local anaesthetic was used
- Volume and colour of ascitic fluid aspirated
- Any immediate post-procedure concerns to complications
- Prescription for human albumin solution
When the ascitic drain is removed, the total volume of ascitic fluid removed should be documented and the time of drain removal.
Send the ascitic samples to the lab for analysis in an appropriate plastic leak-proof bag with the completed laboratory request form:
- Cytology
- Gram staining
- Microscopy, culture and sensitivity
- Albumin, protein, LDH, glucose, white cell count
For more information on interpreting results, see the Geeky Medics guide to ascitic fluid analysis.
Reviewers
Dr Coral Hollywood
Consultant Gastroenterologist
Dr Richard Makins
Consultant Gastroenterologist
Editor
Dr Chris Jefferies
