

- 📖 Geeky Medics OSCE Book
- ⚡ Geeky Medics Bundles
- ✨ 1300+ OSCE Stations
- ✅ OSCE Checklist PDF Booklet
- 🧠 UKMLA AKT Question Bank
- 💊 PSA Question Bank
- 💉 Clinical Skills App
- 🗂️ Flashcard Collections | OSCE, Medicine, Surgery, Anatomy
- 💬 SCA Cases for MRCGP
To be the first to know about our latest videos subscribe to our YouTube channel 🙌
Cardiovascular examination frequently appears in OSCEs and you’ll be expected to pick up the relevant clinical signs using your examination skills. This cardiovascular examination OSCE guide provides a clear step-by-step approach to examining the cardiovascular system, with an included video demonstration.
Introduction
Wash your hands and don PPE if appropriate.
Introduce yourself to the patient including your name and role.
Confirm the patient’s name and date of birth.
Briefly explain what the examination will involve using patient-friendly language.
Gain consent to proceed with the examination.
Adjust the head of the bed to a 45° angle.
Adequately expose the patient’s chest for the examination (offer a blanket to allow exposure only when required and if appropriate, inform patients they do not need to remove their bra). Exposure of the patient’s lower legs is also helpful to assess for peripheral oedema and signs of peripheral vascular disease.
Ask the patient if they have any pain before proceeding with the clinical examination.
General inspection
Clinical signs
Inspect the patient from the end of the bed whilst at rest, looking for clinical signs suggestive of underlying pathology:
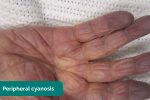
- Cyanosis: a bluish discolouration of the skin due to poor circulation (e.g. peripheral vasoconstriction secondary to hypovolaemia) or inadequate oxygenation of the blood (e.g. right-to-left cardiac shunting).
- Shortness of breath: may indicate underlying cardiovascular (e.g. congestive heart failure, pericarditis) or respiratory disease (e.g. pneumonia, pulmonary embolism).
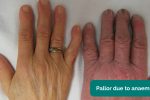
- Pallor: a pale colour of the skin that can suggest underlying anaemia (e.g. haemorrhage, chronic disease) or poor perfusion (e.g. congestive cardiac failure). It should be noted that a healthy individual may have a pale complexion that mimics pallor, however, pathological causes should be ruled out.
- Malar flush: plum-red discolouration of the cheeks associated with mitral stenosis.
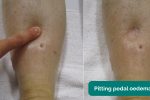
- Oedema: typically presents with swelling of the limbs (e.g. pedal oedema) or abdomen (i.e. ascites). There are many causes of oedema, but in the context of a cardiovascular examination OSCE station, congestive heart failure is the most likely culprit.
Objects and equipment
Look for objects or equipment on or around the patient that may provide useful insights into their medical history and current clinical status:
- Medical equipment: note any oxygen delivery devices, ECG leads, medications (e.g. glyceryl trinitrate spray), catheters (note volume/colour of urine) and intravenous access.
- Mobility aids: items such as wheelchairs and walking aids give an indication of the patient’s current mobility status.
- Pillows: patients with congestive heart failure typically suffer from orthopnoea, preventing them from being able to lie flat. As a result, they often use multiple pillows to prop themselves up.
- Vital signs: charts on which vital signs are recorded will give an indication of the patient’s current clinical status and how their physiological parameters have changed over time.
- Fluid balance: fluid balance charts will give an indication of the patient’s current fluid status which may be relevant if a patient appears fluid overloaded or dehydrated.
- Prescriptions: prescribing charts or personal prescriptions can provide useful information about the patient’s recent medications.
 General inspection

Hands
The hands can provide lots of clinically relevant information and therefore a focused, structured assessment is essential.
Inspection
General observations
Inspect the hands for clinical signs relevant to the cardiovascular system:
- Colour: pallor suggests poor peripheral perfusion (e.g. congestive heart failure) and cyanosis may indicate underlying hypoxaemia.
- Tar staining: caused by smoking, a significant risk factor for cardiovascular disease (e.g. coronary artery disease, hypertension).
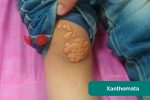
- Xanthomata: raised yellow cholesterol-rich deposits that are often noted on the palm, tendons of the wrist and elbow. Xanthomata are associated with hyperlipidaemia (typically familial hypercholesterolaemia), another important risk factor for cardiovascular disease (e.g. coronary artery disease, hypertension).
- Arachnodactyly (‘spider fingers’): fingers and toes are abnormally long and slender, in comparison to the palm of the hand and arch of the foot. Arachnodactyly is a feature of Marfan’s syndrome, which is associated with mitral/aortic valve prolapse and aortic dissection.
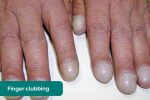
Finger clubbing
Finger clubbing involves uniform soft tissue swelling of the terminal phalanx of a digit with subsequent loss of the normal angle between the nail and the nail bed. Finger clubbing is associated with several underlying disease processes, but those most likely to appear in a cardiovascular OSCE station include congenital cyanotic heart disease, infective endocarditis and atrial myxoma (very rare).
To assess for finger clubbing:
- Ask the patient to place the nails of their index fingers back to back.
- In a healthy individual, you should be able to observe a small diamond-shaped window (known as Schamroth’s window)
- When finger clubbing develops, this window is lost.
Signs in the hands associated with endocarditis
There are several other signs in the hands that are associated with endocarditis including:
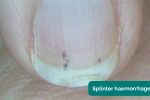
- Splinter haemorrhages: a longitudinal, red-brown haemorrhage under a nail that looks like a wood splinter. Causes include local trauma, infective endocarditis, sepsis, vasculitis and psoriatic nail disease.
- Janeway lesions: non-tender, haemorrhagic lesions that occur on the thenar and hypothenar eminences of the palms (and soles). Janeway lesions are typically associated with infective endocarditis.
- Osler’s nodes: red-purple, slightly raised, tender lumps, often with a pale centre, typically found on the fingers or toes. They are typically associated with infective endocarditis.
Palpation
Temperature
Place the dorsal aspect of your hand onto the patient’s to assess temperature:
- In healthy individuals, the hands should be symmetrically warm, suggesting adequate perfusion.
- Cool hands may suggest poor peripheral perfusion (e.g. congestive cardiac failure, acute coronary syndrome).
- Cool and sweaty/clammy hands are typically associated with acute coronary syndrome.
Capillary refill time (CRT)
Measuring capillary refill time (CRT) in the hands is a useful way of assessing peripheral perfusion:
- Apply five seconds of pressure to the distal phalanx of one of a patient’s fingers and then release.
- In healthy individuals, the initial pallor of the area you compressed should return to its normal colour in less than two seconds.
- A CRT that is greater than two seconds suggests poor peripheral perfusion (e.g. hypovolaemia, congestive heart failure) and the need to assess central capillary refill time.
- Inspect the hands


Pulses and blood pressure
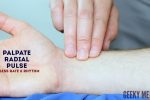
Radial pulse
Palpate the patient’s radial pulse, located at the radial side of the wrist, with the tips of your index and middle fingers aligned longitudinally over the course of the artery.
Once you have located the radial pulse, assess the rate and rhythm.
Heart rate
Assessing heart rate:
-
You can calculate the heart rate in a number of ways, including measuring for 60 seconds, measuring for 30 seconds and multiplying by 2 or measuring for 15 seconds and multiplying by 4. The shorter the interval used, the higher the risk of obtaining an inaccurate result, so wherever possible, you should palpate for a full 60 seconds.
-
For irregular rhythms, you should measure the pulse for a full 60 seconds to improve accuracy.
Normal and abnormal heart rates
- In healthy adults, the pulse should be between 60-100 bpm.
- A pulse <60 bpm is known as bradycardia and has a wide range of aetiologies (e.g. healthy athletic individuals, atrioventricular block, medications, sick sinus syndrome).
- A pulse of >100 bpm is known as tachycardia and has a wide range of aetiologies (e.g. anxiety, supraventricular tachycardia, hypovolaemia, hyperthyroidism).
- An irregular rhythm is most commonly caused by atrial fibrillation, but other causes include ectopic beats in healthy individuals and atrioventricular blocks.
Radio-radial delay
Radio-radial delay describes a loss of synchronicity between the radial pulse on each arm, resulting in the pulses occurring at different times.
To assess for radio-radial delay:
- Palpate both radial pulses simultaneously.
- In healthy individuals, the pulses should occur at the same time.
- If the radial pulses are out of sync, this would be described as radio-radial delay.
Causes of radio-radial delay include:
- Subclavian artery stenosis (e.g. compression by a cervical rib)
- Aortic dissection
- Aortic coarctation
Collapsing pulse
A collapsing pulse is a forceful pulse that rapidly increases and subsequently collapses. It is also sometimes referred to as a ‘water hammer pulse’.
To assess for a collapsing pulse:
- Ask the patient if they have any pain in their right shoulder, as you will need to move it briskly as part of the assessment for a collapsing pulse (if they do, this assessment should be avoided).
- Palpate the radial pulse with your right hand wrapped around the patient’s wrist.
- Palpate the brachial pulse (medial to the biceps brachii tendon) with your left hand, whilst also supporting the patient’s elbow.
- Raise the patient’s arm above their head briskly.
- Palpate for a collapsing pulse: As blood rapidly empties from the arm in diastole, you should be able to feel a tapping impulse through the muscle bulk of the arm. This is caused by the sudden retraction of the column of blood within the arm during diastole.
Causes of a collapsing pulse
- Normal physiological states (e.g. fever, pregnancy)
- Cardiac lesions (e.g. aortic regurgitation, patent ductus arteriosus)
- High output states (e.g. anaemia, arteriovenous fistula, thyrotoxicosis)
Brachial pulse
Palpate the brachial pulse
Palpate the brachial pulse in their right arm, assessing volume and character:
1. Support the patient’s right forearm with your left hand.
2. Position the patient so that their upper arm is abducted, their elbow is partially flexed and their forearm is externally rotated.
3. With your right hand, palpate medial to the biceps brachii tendon and lateral to the medial epicondyle of the humerus. Deeper palpation is required (compared to radial pulse palpation) due to the location of the brachial artery.
Types of pulse character
- Normal
- Slow-rising (associated with aortic stenosis)
- Bounding (associated with aortic regurgitation as well as CO2 retention)
- Thready (associated with intravascular hypovolaemia in conditions such as sepsis)
Blood pressure
Measure the blood pressure
Measure the patient’s blood pressure in both arms (see our blood pressure guide for more details).
A comprehensive blood pressure assessment should also include lying and standing blood pressure.
In a cardiovascular examination OSCE station, you are unlikely to have to carry out a thorough blood pressure assessment due to time restraints, however, you should demonstrate that you have an awareness of what this would involve.
Blood pressure abnormalities
Blood pressure abnormalities may include:
- Hypertension: blood pressure of greater than or equal to 140/90 mmHg if under 80 years old or greater than or equal to 150/90 mmHg if you’re over 80 years old.
- Hypotension: blood pressure of less than 90/60 mmHg.
- Narrow pulse pressure: less than 25 mmHg of difference between the systolic and diastolic blood pressure. Causes include aortic stenosis, congestive heart failure and cardiac tamponade.
- Wide pulse pressure: more than 100 mmHg of difference between systolic and diastolic blood pressure. Causes include aortic regurgitation and aortic dissection.
- Difference between arms: more than 20 mmHg difference in blood pressure between each arm is abnormal and may suggest aortic dissection.
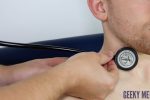
Carotid pulse
The carotid pulse can be located between the larynx and the anterior border of the sternocleidomastoid muscle.
Auscultate the carotid artery
Prior to palpating the carotid artery, you need to auscultate the vessel to rule out the presence of a bruit. The presence of a bruit suggests underlying carotid stenosis, making palpation of the vessel potentially dangerous due to the risk of dislodging a carotid plaque and causing an ischaemic stroke.
Place the diaphragm of your stethoscope between the larynx and the anterior border of the sternocleidomastoid muscle over the carotid pulse and ask the patient to take a deep breath and then hold it whilst you listen.
Be aware that at this point in the examination, the presence of a ‘carotid bruit’ may, in fact, be a radiating cardiac murmur (e.g. aortic stenosis).
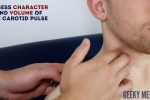
Palpate the carotid pulse
If no bruits were identified, proceed to carotid pulse palpation:
1. Ensure the patient is positioned safely on the bed, as there is a risk of inducing reflex bradycardia when palpating the carotid artery (potentially causing a syncopal episode).
2. Gently place your fingers between the larynx and the anterior border of the sternocleidomastoid muscle to locate the carotid pulse.
3. Assess the character (e.g. slow-rising, thready) and volume of the pulse.
- Palpate the radial pulse


Jugular venous pressure (JVP)
Jugular venous pressure (JVP) provides an indirect measure of central venous pressure. This is possible because the internal jugular vein (IJV) connects to the right atrium without any intervening valves, resulting in a continuous column of blood. The presence of this continuous column of blood means that changes in right atrial pressure are reflected in the IJV (e.g. raised right atrial pressure results in distension of the IJV).
The IJV runs between the medial end of the clavicle and the ear lobe, under the medial aspect of the sternocleidomastoid, making it difficult to visualise (its double waveform pulsation is, however, sometimes visible due to transmission through the sternocleidomastoid muscle).
Because of the inability to easily visualise the IJV, it’s tempting to use the external jugular vein (EJV) as a proxy for assessment of central venous pressure during clinical assessment. However, because the EJV typically branches at a right angle from the subclavian vein (unlike the IJV which sits in a straight line above the right atrium) it is a less reliable indicator of central venous pressure.
See our guide to jugular venous pressure (JVP) for more details.
Measure the JVP
1. Position the patient in a semi-recumbent position (at 45°).
2. Ask the patient to turn their head slightly to the left.
3. Inspect for evidence of the IJV, running between the medial end of the clavicle and the ear lobe, under the medial aspect of the sternocleidomastoid (it may be visible between just above the clavicle between the sternal and clavicular heads of the sternocleidomastoid. The IJV has a double waveform pulsation, which helps to differentiate it from the pulsation of the external carotid artery.
4. Measure the JVP by assessing the vertical distance between the sternal angle and the top of the pulsation point of the IJV (in healthy individuals, this should be no greater than 3 cm).
Causes of a raised JVP
A raised JVP indicates the presence of venous hypertension. Cardiac causes of a raised JVP include:
- Right-sided heart failure: commonly caused by left-sided heart failure. Pulmonary hypertension is another cause of right-sided heart failure, often occurring due to chronic obstructive pulmonary disease or interstitial lung disease.
- Tricuspid regurgitation: causes include infective endocarditis and rheumatic heart disease.
- Constrictive pericarditis: often idiopathic, but rheumatoid arthritis and tuberculosis are also possible underlying causes.
Hepatojugular reflux test
The hepatojugular reflux test involves the application of pressure to the liver whilst observing for a sustained rise in JVP.
Eliciting hepatojugular reflux
To be able to perform the test, there should be at least a 3cm distance from the upper margin of the baseline JVP to the angle of the mandible:
- Position the patient in a semi-recumbent position (45º).
- Apply direct pressure to the liver.
- Closely observe the IJV for a rise.
- In healthy individuals, this rise should last no longer than 1-2 cardiac cycles (it should then fall).
- If the rise in JVP is sustained and equal to or greater than 4cm this is deemed a positive result.
- This assessment can be uncomfortable for the patient and therefore it should only be performed when felt necessary (an examiner will often prevent you from performing it in an OSCE but you should mention it).
Conditions associated with hepatojugular reflux
A positive hepatojugular reflux result suggests the right ventricle is unable to accommodate an increased venous return, but it is not diagnostic of any specific condition. The following conditions frequently produce a positive hepatojugular reflux test:
- Constrictive pericarditis
- Right ventricular failure
- Left ventricular failure
- Restrictive cardiomyopathy
- Assess the JVP


Face
Eyes
Inspect the eyes for signs relevant to the cardiovascular system
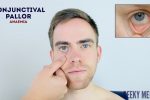
- Conjunctival pallor: suggestive of underlying anaemia. Ask the patient to gently pull down their lower eyelid to allow you to inspect the conjunctiva.
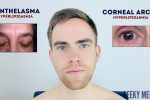
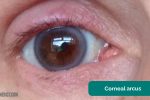
- Corneal arcus: a hazy white, grey or blue opaque ring located in the peripheral cornea, typically occurring in patients over the age of 60. In older patients, the condition is considered benign, however, its presence in patients under the age of 50 suggests underlying hypercholesterolaemia.
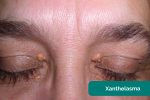
- Xanthelasma: yellow, raised cholesterol-rich deposits around the eyes associated with hypercholesterolaemia.
- Kayser-Fleischer rings: dark rings that encircle the iris associated with Wilson’s disease. The disease involves abnormal copper processing by the liver, resulting in accumulation and deposition in various tissues (including the heart where it can cause cardiomyopathy).
Mouth
Inspect the mouth for signs relevant to the cardiovascular system
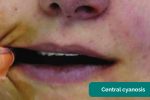
- Central cyanosis: bluish discolouration of the lips and/or the tongue associated with hypoxaemia (e.g. a right to left cardiac shunt)
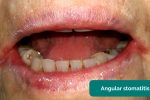
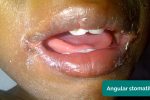
- Angular stomatitis: a common inflammatory condition affecting the corners of the mouth. It has a wide range of causes including iron deficiency.
- High arched palate: a feature of Marfan syndrome which is associated with mitral/aortic valve prolapse and aortic dissection.
- Dental hygiene: poor dental hygiene is a risk factor for infective endocarditis.
- Inspect the eyes


Close inspection of the chest
Closely inspect the anterior chest
Look for clinical signs that may provide clues as to the patient’s past medical/surgical history:
- Scars suggestive of previous thoracic surgery: see the thoracic scars section below.
- Pectus excavatum: a caved-in or sunken appearance of the chest.
- Pectus carinatum: protrusion of the sternum and ribs.
- Visible pulsations: a forceful apex beat may be visible secondary to underlying ventricular hypertrophy.
Thoracic scars
- Median sternotomy scar: located in the midline of the thorax. This surgical approach is used for cardiac valve replacement and coronary artery bypass grafts (CABG).
- Anterolateral thoracotomy scar: located between the lateral border of the sternum and the mid-axillary line at the 4th or 5th intercostal space. This surgical approach is used for minimally invasive cardiac valve surgery.
- Infraclavicular scar: located in the infraclavicular region (on either side). This surgical approach is used for pacemaker insertion.
- Left mid-axillary scar: this surgical approach is used for the insertion of a subcutaneous implantable cardioverter-defibrillator (ICD).
- Inspect for thoracic scars


Palpation
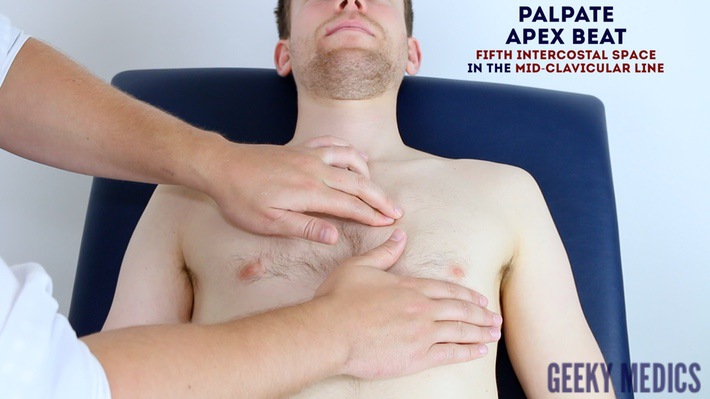
Palpate the chest to assess the location of the apex beat and to identify heaves or thrills.
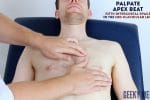
Apex beat
- Palpate the apex beat with your fingers placed horizontally across the chest.
- In healthy individuals, it is typically located in the 5th intercostal space in the midclavicular line. Ask the patient to lift their breast to allow palpation of the appropriate area if relevant.
- Displacement of the apex beat from its usual location can occur due to ventricular hypertrophy.
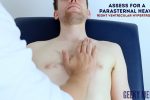
Heaves
- A parasternal heave is a precordial impulse that can be palpated.
- Place the heel of your hand parallel to the left sternal edge (fingers vertical) to palpate for heaves.
- If heaves are present you should feel the heel of your hand being lifted with each systole.
- Parasternal heaves are typically associated with right ventricular hypertrophy.
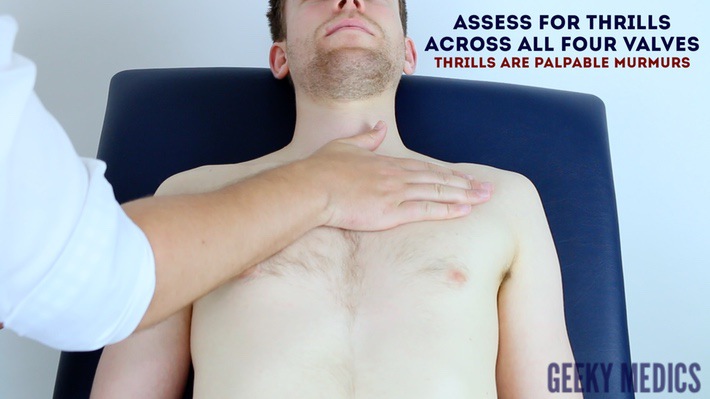
Thrills
- A thrill is a palpable vibration caused by turbulent blood flow through a heart valve (a thrill is a palpable murmur).
- You should assess for a thrill across each of the heart valves in turn (see valve locations below).
- To do this place your hand horizontally across the chest wall, with the flats of your fingers and palm over the valve to be assessed.
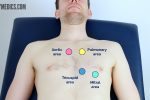
Valve locations
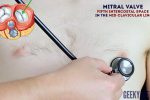
- Mitral valve: 5th intercostal space in the midclavicular line.
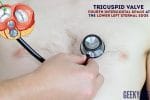
- Tricuspid valve: 4th or 5th intercostal space at the lower left sternal edge.
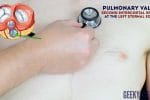
- Pulmonary valve: 2nd intercostal space at the left sternal edge.
- Aortic valve: 2nd intercostal space at the right sternal edge.
- Palpate the apex beat


Auscultation
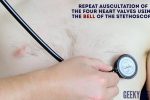
Auscultate the four heart valves
A systematic routine will ensure you remember all the steps whilst giving you several chances to listen to each valve area. Your routine should avoid excess repetition whilst each step should ‘build’ upon the information gathered by the previous steps. Ask the patient to lift their breast to allow auscultation of the appropriate area if relevant.
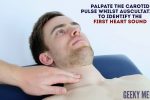
1. Palpate the carotid pulse to determine the first heart sound.
2. Auscultate ‘upwards’ through the valve areas using the diaphragm of the stethoscope whilst continuing to palpate the carotid pulse:
- Mitral valve: 5th intercostal space in the midclavicular line.
- Tricuspid valve: 4th or 5th intercostal space at the lower left sternal edge.
- Pulmonary valve: 2nd intercostal space at the left sternal edge.
- Aortic valve: 2nd intercostal space at the right sternal edge.
3. Repeat auscultation across the four valves with the bell of the stethoscope.
Accentuation manoeuvres
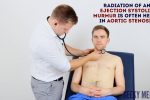
4. Auscultate the carotid arteries using the diaphragm of the stethoscope whilst the patient holds their breath to listen for radiation of an ejection systolic murmur caused by aortic stenosis.
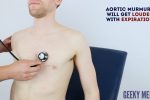
5. Sit the patient forwards and auscultate over the lower left sternal border (3rd/4th intercostal space) with the diaphragm of the stethoscope during expiration to listen for an early diastolic murmur caused by aortic regurgitation.
6. Roll the patient onto their left side and listen over the mitral area with the diaphragm of the stethoscope during expiration to listen for a pansystolic murmur caused by mitral regurgitation. Continue to auscultate into the axilla to identify radiation of this murmur.
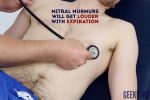
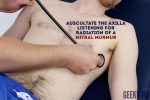
7. With the patient still on their left side, listen again over the mitral area using the bell of the stethoscope during expiration for a mid-diastolic murmur caused by mitral stenosis.
Bell vs diaphragm
The bell of the stethoscope is more effective at detecting low-frequency sounds, including the mid-diastolic murmur of mitral stenosis.
The diaphragm of the stethoscope is more effective at detecting high-frequency sounds, including the ejection systolic murmur of aortic stenosis, the early diastolic murmur of aortic regurgitation and the pansystolic murmur of mitral regurgitation.
- Palpate the carotid pulse to identify the first heart sound


Final steps
Posterior chest wall
Inspection
Inspect the posterior chest wall for any deformities or scars (e.g. posterolateral thoracotomy scar associated with previous lung surgery).
Auscultation
Auscultate the lung fields posteriorly:
- Coarse crackles are suggestive of pulmonary oedema (associated with left ventricular failure).
- Absent air entry and stony dullness on percussion are suggestive of an underlying pleural effusion (associated with left ventricular failure).
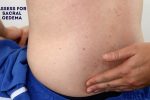
Sacral oedema
Inspect and palpate the sacrum for evidence of pitting oedema.
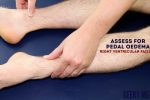
Legs
Inspect and palpate the patient’s ankles for evidence of pitting pedal oedema (associated with right ventricular failure).
Inspect the patient’s legs for evidence of saphenous vein harvesting (performed as part of a coronary artery bypass graft).
- Auscultate the posterior lung fields


To complete the examination…
Explain to the patient that the examination is now finished.
Thank the patient for their time.
Dispose of PPE appropriately and wash your hands.
Summarise your findings.
Example summary
“Today I examined Mrs Smith, a 64-year-old female. On general inspection, the patient appeared comfortable at rest and there were no objects or medical equipment around the bed of relevance.”
“The hands had no peripheral stigmata of cardiovascular disease and were symmetrically warm, with a normal capillary refill time.”
“The pulse was regular and there was no radio-radial delay. On auscultation of the carotid arteries, there was no evidence of carotid bruits and on palpation, the carotid pulse had normal volume and character.”
“On inspection of the face, there were no stigmata of cardiovascular disease noted in the eyes or mouth and dentition was normal.”
“Assessment of the JVP did not reveal any abnormalities and the hepatojugular reflux test was negative.”
“Closer inspection of the chest did not reveal any scars or chest wall abnormalities. The apex beat was palpable in the 5th intercostal space, in the mid-clavicular line. No heaves or thrills were noted.”
“Auscultation of the praecordium revealed normal heart sounds, with no added sounds.”
“There was no evidence of peripheral oedema and lung fields were clear on auscultation.”
“In summary, these findings are consistent with a normal cardiovascular examination.”
“For completeness, I would like to perform the following further assessments and investigations.”
Further assessments and investigations
Suggest further assessments and investigations to the examiner:
- Measure blood pressure: to identify hypotension, hypertension or significant discrepancies between the two arms suggestive of aortic dissection.
- Peripheral vascular examination: to identify peripheral vascular disease, which is common in patients with central cardiovascular pathology.
- Record a 12-lead ECG: to look for evidence of arrhythmias or myocardial ischaemia.
- Dipstick urine: to identify proteinuria or haematuria which can be associated with hypertension.
- Bedside capillary blood glucose: to look for evidence of underlying diabetes mellitus, a significant risk factor for cardiovascular disease.
- Perform fundoscopy: if there were concerns about malignant hypertension, fundoscopy would be performed to look for papilloedema.
Reviewer
Dr Matthew Jackson
Interventional Cardiology Consultant
References
- Heart sounds on auscultation (normal heart sounds, aortic stenosis, aortic regurgitation). Recorded on a Thinklabs Digital Stethoscope (thinklabs.com).
- Adapted by Geeky Medics. James Heilman, MD. Peripheral pallor. Licence: CC BY-SA.
- Adapted by Geeky Medics. James Heilman, MD. Cyanosis. Licence: CC BY-SA.
- Adapted by Geeky Medics. James Heilman, MD. Tar staining. Licence: CC BY-SA.
- Adapted by Geeky Medics. Min.neel. Xanthoma in a child. Licence: CC BY-SA.
- Adapted by Geeky Medics. Desherinka. Finger clubbing. Licence: CC BY-SA.
- Adapted by Geeky Medics. Warfieldian. Janeway lesions. Licence: CC BY-SA.
- Adapted by Geeky Medics. Roberto J. Galindo. Osler’s nodes. Licence CC BY-SA.
- Adapted by Geeky Medics. Klaus D. Peter, Gummersbach, Germany. Xanthelasma. Licence: CC BY 3.0 DE.
- Adapted by Geeky Medics. Herbert L. Fred, MD, Hendrik A. van Dijk. Kayser-Fleischer ring. Licence: CC BY 3.0
- Adapted by Geeky Medics. Ankit Jain, MBBS, corresponding author Anuradha Patel, MD, FRCA and Ian C. Hoppe, MD. Central cyanosis. Licence: CC BY-SA.
- Adapted by Geeky Medics. Matthew Ferguson. Angular stomatitis. Licence: CC BY-SA.
- Adapted by Geeky Medics. James Heilman, MD. Pedal oedema. Licence: CC BY-SA.
- Adapted by Geeky Medics. Singhai A et al. Journal of Dr. NTR University of Health Sciences. Methemoglobinaemia. Licence: CC BY-SA.
- Adapted by Geeky Medics. Oladokun R et al. Atlas of Paediatric HIV infection. Licence: CC BY-SA.
