
- 📖 Geeky Medics OSCE Book
- ⚡ Geeky Medics Bundles
- ✨ 1300+ OSCE Stations
- ✅ OSCE Checklist PDF Booklet
- 🧠 UKMLA AKT Question Bank
- 💊 PSA Question Bank
- 💉 Clinical Skills App
- 🗂️ Flashcard Collections | OSCE, Medicine, Surgery, Anatomy
- 💬 SCA Cases for MRCGP
To be the first to know about our latest videos subscribe to our YouTube channel 🙌
Introduction
Dental trauma is a physical injury that occurs to teeth and/or their supporting tissues.1
Patient groups most at risk of experiencing dental trauma are males between the ages 8-10 years. Other patient groups at risk include those with an increased overjet and incompetent lip coverage, history of previous trauma and those participating in contact sports.1
Management of emergency dental trauma is challenging: the patient is often distressed and may present with multiple injuries.1 Paediatric patients pose the additional challenge of potentially being uncooperative, however, it is imperative that immediate and appropriate management of the traumatised patient is conducted, in order to improve the prognosis of the traumatised tooth.
This article will offer an overview of the management of dental trauma affecting permanent dentition.
For up-to-date guidance regarding the management of dental trauma, reference should be made to the International Association of Dental Traumatology (IADT) website.
History
A thorough history is essential when managing a patient presenting with dental trauma.
It is possible that the patient presents with other injuries, and these often take precedence over dental injuries. History-taking must include a screen for red-flag symptoms suggestive of significant head injury (e.g. loss of consciousness, headache, vomiting).2,3
Details such as when, where and how the accident happened must be obtained as this will affect the prognosis of the traumatised teeth and their management.2
Knowing when the accident happened is important as timings can impact the vitality of the tooth.4 The location may help you ascertain whether or not the wounds are likely to be dirty and subsequently whether a tetanus booster is required. How the accident happened (i.e. the mechanism) may help guide your clinical assessment.2
If the patient is a child, it is important to note who they have attended with and if they have parental responsibility, as this may have implications for consent to treatment. Non-accidental injury (NAI) should be considered if the described mechanism of injury does not fit with the child’s presenting injuries.
Examination
Extra-oral examination
It is important to determine if there are any extra-oral injuries, as these may require management before assessing dental injuries.
Document any visible facial injuries such as abrasions, lacerations, swellings and bruising.
Palpate the facial bones for any step-deformities, tenderness and paraesthesia suggestive of facial fracture.
Thorough documentation is needed for all trauma patients as your notes may be requested to be used in later legal proceedings.2
Intra-oral examination
It may be difficult to assess a patient’s intra-oral injuries due to swelling and tenderness, but it is important that a thorough examination is attempted. Document any intra-oral soft tissue injuries such as swelling, abrasions, lacerations and bleeding around the gingival crevices. A new malocclusion may indicate a mandibular fracture.
The next step is to assess the dentition for injuries. A systematic approach is essential; this can be aided by a “trauma stamp”.

Radiographic examination
Intra-oral radiographs of the traumatised teeth are essential in order to aid in the diagnosis of dental trauma.
Follow-up X-rays can be used to monitor the healing of any bony injuries and identify complications early.
Splinting of traumatised teeth
In order to maintain the repositioned tooth in its correct position and to improve the initial healing process, a splint should be applied to the traumatised tooth/teeth.
Current guidelines stipulate that a short term passive flexible splint should be applied for luxation, root fractures or avulsion injuries. Flexible splints reduce the risk of the tooth becoming ankylosed as they allow for functional movement of the tooth, in contrast to a rigid splint where the tooth is completely immobilised. For a splint to be considered flexible, the diameter of the wire should be no greater than 0.3mm-0.4mm.7
A splint is considered to be rigid if the wire diameter exceeds 0.4mm. These splints are only recommended for the treatment of dentoalveolar fractures.
Concussion5,7
Concussion involves injury to the tooth’s supporting structures without displacement or an increase in mobility.6
Clinical findings
Typical clinical findings include:
- Tooth tenderness to percussion
- No increased mobility
- Tooth remains in its socket
- No changes in occlusion
Radiographic findings
There are typically no visible abnormalities on X-ray.
Management
No active treatment is usually required, however, one must monitor the tooth for signs of devitalisation.
Follow-up
During each review appointment, a new trauma stamp should be completed and a new intra-oral periapical (IOPA) of the traumatised tooth should be completed.
After initial injury patients must be reviewed FOUR weeks later for signs of devitalisation.
If the tooth is vital, the injury does not need to be followed up for ONE YEAR unless the patient reports problems.
Subluxation5,7
Subluxation involves injury to the tooth’s supporting tissues resulting in increased mobility without displacement from the socket.
Clinical findings
Typical clinical findings in subluxation include:
- Tooth tenderness to percussion
- Increased mobility of the tooth
- Tooth remains in its socket
- Bleeding from the gingival sulcus
- No changes in occlusion
Radiographic findings
There are usually no significant X-ray abnormalities.
Management
No active treatment is required.
To reduce discomfort for patients, a flexible splint can be applied for TWO weeks to stabilise the tooth.
Follow-up
During each review appointment, a new trauma stamp should be completed and a new IOPA of the traumatised tooth should be taken.
The patient should be reviewed TWO weeks after the initial injury and the splint should be removed. The next review can be 12 weeks after the initial injury if the patient remains asymptomatic.
The patient should then be reviewed SIX months after the initial injury and if the tooth remains vital the patient can next be reviewed ONE year after the injury.

Extrusive luxation5,7
Extrusive luxation involves the displacement of the tooth out of its socket in an axial direction.
Clinical findings
Typical clinical findings in extrusive luxation include:
- Elongated appearance of the tooth
- Increased mobility of the tooth
- Tooth tenderness to percussion
- Change in occlusion
- Negative response of the tooth to vitality tests
Radiographic findings
The tooth is displaced from its socket and there is increased periodontal ligament space.
Management
Administer local anaesthetic before repositioning the tooth with digital pressure.
It may require a surprising amount of force to reduce the tooth to its correct position, and a “click” noise is to be expected.
Once repositioned, a flexible splint should be applied and worn for TWO weeks. In teeth with mature apices that have been moderately/severely luxated, root canal treatment should be started SEVEN to TEN days after the injury.
Teeth that have been minorly extruded should be monitored for pulpal vitality and managed accordingly should the tooth lose vitality.
Follow-up
Initial review at two weeks for splint removal with clinical and radiographic assessment.
The traumatised tooth should next be reviewed FOUR weeks after the initial injury and then again at SIX to EIGHT weeks.
The traumatised tooth should then be reviewed SIX months after the initial injury and then again ONE year after the injury.
If there have been no changes, the tooth can then be reviewed FIVE years after the initial injury.
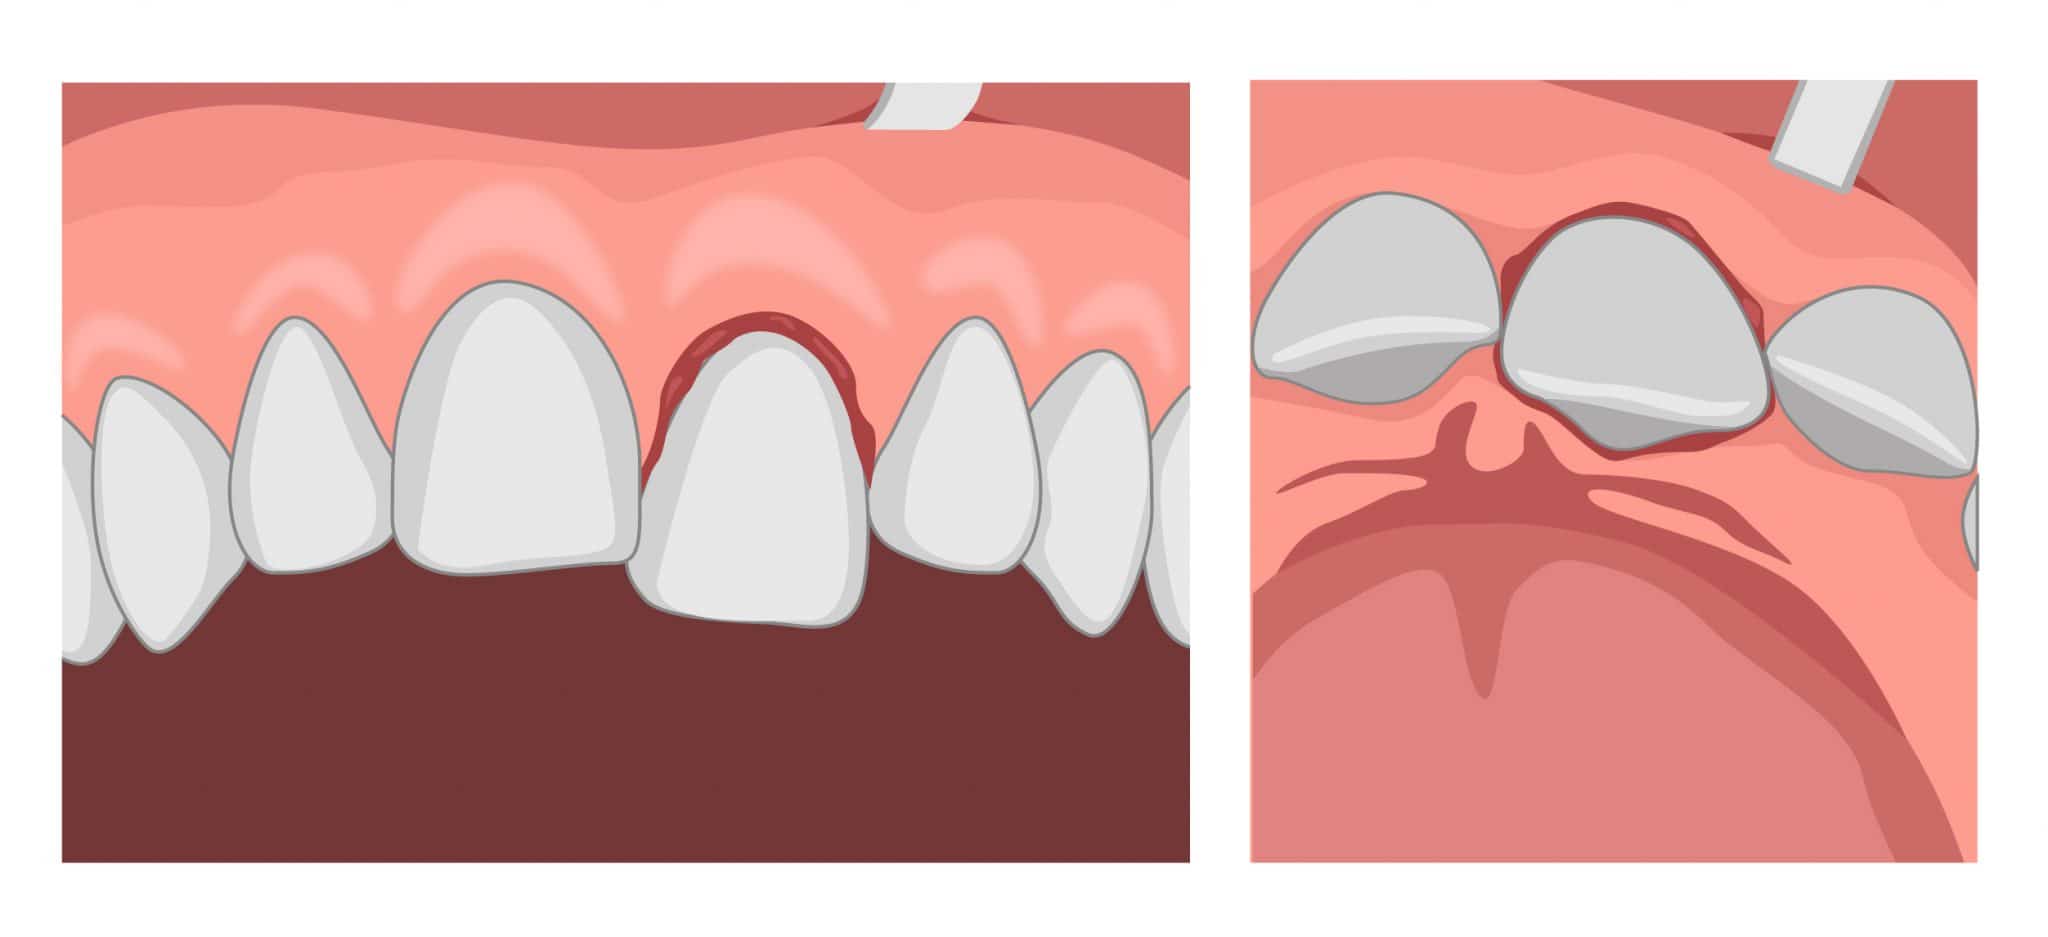
Lateral luxation5 ,7
Lateral luxation involves displacement of the tooth from its socket in any lateral direction, usually associated with an alveolar bone fracture.
Clinical findings
The tooth is displaced either buccally or palatally with a fractured alveolus; it is normally immobile and responds negatively to sensibility tests.
Radiographic findings
There is a widened periodontal ligament.
Management
Administer local anaesthetic before repositioning the tooth with digital pressure or with forceps to disengage it from its bony lock and gently reposition. It may require a surprising amount of force to reduce the tooth to its correct position, and a “click” noise is to be expected.
Once repositioned, a flexible splint should be applied and worn for FOUR weeks.
In teeth with mature apices, root canal treatment should be started SEVEN to TEN days after the injury.
Follow-up
The traumatised tooth should be reviewed TWO weeks after the initial injury and then again FOUR weeks after the initial injury to remove the splint.
The next review should take place at SIX to EIGHT weeks after the initial injury, followed by a 12-week review.
The traumatised tooth should then be reviewed SIX months after the initial injury and then again ONE year after the injury.
If there have been no changes, the tooth can then be reviewed FIVE years after the initial injury.
Intrusive luxation5,7
Intrusive luxation involves the displacement of the tooth from its socket in an apical direction into the alveolar bone.
Clinical findings
The tooth is displaced axially into the alveolar bone; it is normally immobile and responds negatively to sensibility tests.
Radiographic findings
The periodontal ligament may not be visible on the IOPA and the incisal level will be inferior to that of adjacent teeth.
Management
Immature apices
If mildly intruded (<3mm) or moderately intruded (3-6mm), the tooth can be left to erupt spontaneously.
If no movement after 2-3 weeks, the tooth can be orthodontically repositioned.
If the tooth is intruded more than 7mm, the tooth should be repositioned with forceps or orthodontically.
Mature apices
If intruded <3mm, the tooth can be left to erupt spontaneously.
If the tooth is intruded >3mm, administer a local anaesthetic before repositioning the tooth with forceps.
Once repositioned, a flexible splint should be applied and worn for FOUR weeks, a new trauma stamp and a new IOPA should be taken at this appointment.
In teeth with mature apices, that have been moderately severely intruded, root canal treatment should be started SEVEN to TEN days after the injury.
Follow-up
The traumatised tooth should be reviewed TWO weeks after the initial injury and then again FOUR weeks after the initial injury to remove the splint.
The next review should take place at SIX to EIGHT weeks after the initial injury, followed by a 12-week review.
The traumatised tooth should then be reviewed SIX months after the initial injury and then again ONE year after the injury.
If there have been no changes, the tooth can then be reviewed FIVE years after the initial injury.
Avulsion 5,7
Avulsion involves the complete displacement of the tooth from its socket.
Immediate management advice
Time is of the essence!
If a patient contacts your practice reporting an avulsion, you may be expected to provide first aid over the phone.
The following instructions should be provided (if you are sure it is a permanent tooth and if there are no medical contraindications):
- Locate the tooth (if unsure of location)
- Only handle it by the crown (“white part”) and avoid touching the root (“pointy bit”)
- If the tooth is dirty, wash it for a maximum of 10 seconds under cold running water and reposition it (try to encourage the patient/guardian to replant the tooth)
- Once the tooth is back in place, bite on a handkerchief to hold it in position
- If you are unable to do this, place the tooth in a glass of milk and bring it with the patient to the emergency clinic (other suitable storage mediums include saliva or the patient’s buccal sulcus – do not store in water!)
- Seek emergency dental treatment immediately
Definitive management 5,7,8
Treatment for avulsion injuries is dependent on both the extra-oral dry time and whether or not the tooth has an open or closed apex.
When an avulsion injury occurs, the tooth’s vascular supply is torn – revascularisation is possible in teeth with open apices whereas this is not possible in mature teeth.
It is important that the tooth is re-implanted quickly after the injury as after a dry time of 60 minutes, all periodontal ligament (PDL) cells are non‐viable and the prognosis worsens. For this reason, the dry time of the tooth, before it was replanted or placed in a storage medium, is very important to elicit from the patient’s history.
If the dry time of the tooth exceeds 60 minutes, re-implanting the tooth is still the first-line treatment of choice. The patient or parent should be advised that the tooth will have a poor long term prognosis and may require extracting in the future, however, the reimplanted tooth preserves the alveolar bone and space for implant placement in the future.
For paediatric patients, it is worth considering whether or not the patient will tolerate long term treatment and whether re-implantation is appropriate.
Closed apex – re-implanted at the scene 5,7,8
Management overview:
- Leave the tooth in place
- Clean the area with water or saline
- Suture any gingival lacerations if present; a resorbable suture (e.g. 3.0 Vicryl Rapide) is appropriate
- Verify the normal position of the replanted tooth both clinically and radiographically (asking the patient at this point can be very helpful to determine if the tooth is in the correct position – consider previous photographs the patient/parent may have to guide positioning)
- Apply a flexible splint for TWO weeks
- Prescribe systemic antibiotics (amoxicillin or penicillin unless contraindicated)
- Confirm tetanus status
- Give the patient post-operative oral care instructions (e.g. soft diet, avoid contact sport, excellent oral hygiene and chlorhexidine mouth rinses)
- Root canal treatment should be started SEVEN to TEN days after the injury
- Teeth should be monitored for pulpal devitalisation
Open apex avulsions can be treated using the same management steps as described above.
Closed apex – stored in physiological storage agent and extra-oral dry time <60 minutes 5,7,8
Management overview:
- Clean the root surface and apical foramen with a stream of saline and soak the tooth in saline for a couple of minutes
- Administer local anaesthesia
- Irrigate the socket with saline
- Examine the alveolar socket; if there is a fracture of the socket wall, reposition it digitally
- Replant the tooth with digital pressure
- Suture any gingival lacerations
- Verify the normal position of the replanted tooth both clinically and radiographically
- Apply a flexible splint for up to TWO weeks
- Prescribe systemic antibiotics (amoxicillin or penicillin unless contraindicated)
- Check tetanus immunisation
- Give the patient post-operative oral care instructions (e.g. soft diet, avoid contact sport, excellent oral hygiene and chlorhexidine mouth rinses)
- Root canal therapy should be started SEVEN to TEN days after the injury
Closed apex – extra-oral dry time >60 minutes
For teeth with closed apices that have had an extra-oral dry time >60 minutes, the prognosis is poor. An attempt should be made to re-implant the tooth but warn the patient that a replacement will be needed in the future. The PDL cells should be removed with gauze and root canal treatment can be initiated chairside.
Once re-implanted, a flexible splint should be worn for FOUR weeks.
Follow-up
The traumatised tooth should be reviewed TWO weeks after the initial injury and then again FOUR weeks after the initial injury to remove the splint.
The next review should take place at SIX to EIGHT weeks after the initial injury, followed by a 12-week review.
The traumatised tooth should then be reviewed SIX months after the initial injury and then again ONE year after the injury.
If there have been no changes, the tooth can then be reviewed FIVE years after the initial injury.

Infraction 5,7
An infraction involves an incomplete fracture within the enamel without loss of tooth structure.
Clinical findings
The tooth has an incomplete crack within the enamel without any tissue loss.
Radiographic findings
No changes radiographically.
Management
No active treatment is required but if a crack is noticeable, a resin sealant can be placed to seal the crack.
Follow-up
No review routinely required unless the patient is symptomatic.
Enamel fracture 5,7
An enamel fracture involves the enamel only with the loss of tooth tissue.
Clinical findings
A crown fracture confined to the enamel (the tooth should be symptom-free).
Radiographic findings
Visible fracture of the enamel, dentine not affected and no pulpal involvement.
Management
If minimal, can smooth the enamel.
If it is a larger fracture, can be restored using composite.
Follow-up
SIX to EIGHT weeks after the initial injury and if no changes, ONE year later.
Enamel-dentine-fracture (uncomplicated) 5,7
An uncomplicated enamel dentine fracture involves the enamel and dentine only with the loss of tooth tissue.
Clinical findings
A crown fracture involving the enamel and dentine with no pulpal exposure (uncomplicated fracture as no pulpal involvement) – the tooth may be sensitive to cold air due to the exposed dentine
Radiographic findings
A fracture involving the enamel and dentine (no pulpal involvement)
Management
The tooth should be restored with composite.
Follow-up
SIX to EIGHT weeks after the initial injury and if no changes, ONE year later.
Enamel-dentine-pulp (complicated) 5,7
A complicated enamel dentine fracture involves the enamel and dentine resulting in pulpal exposure.
Clinical findings
A crown fracture involving the enamel, dentine and pulp (complicated fracture as dental pulp involved) – the tooth may be sensitive to hot and cold due to exposed pulp
Radiographic findings
A fracture involving the enamel and dentine.
Management
Pulpal preservation is the goal for the initial treatment provided. This can be done with either a pulp cap or a partial pulpotomy.
The tooth can then be temporised with GIC and then restored with composite.
In teeth with closed apices, if there are signs of devitalisation, root canal treatment is required. The crown may then be restored as appropriate.
Follow-up
SIX to EIGHT weeks after the initial injury, THREE months, SIX months and ONE year later.
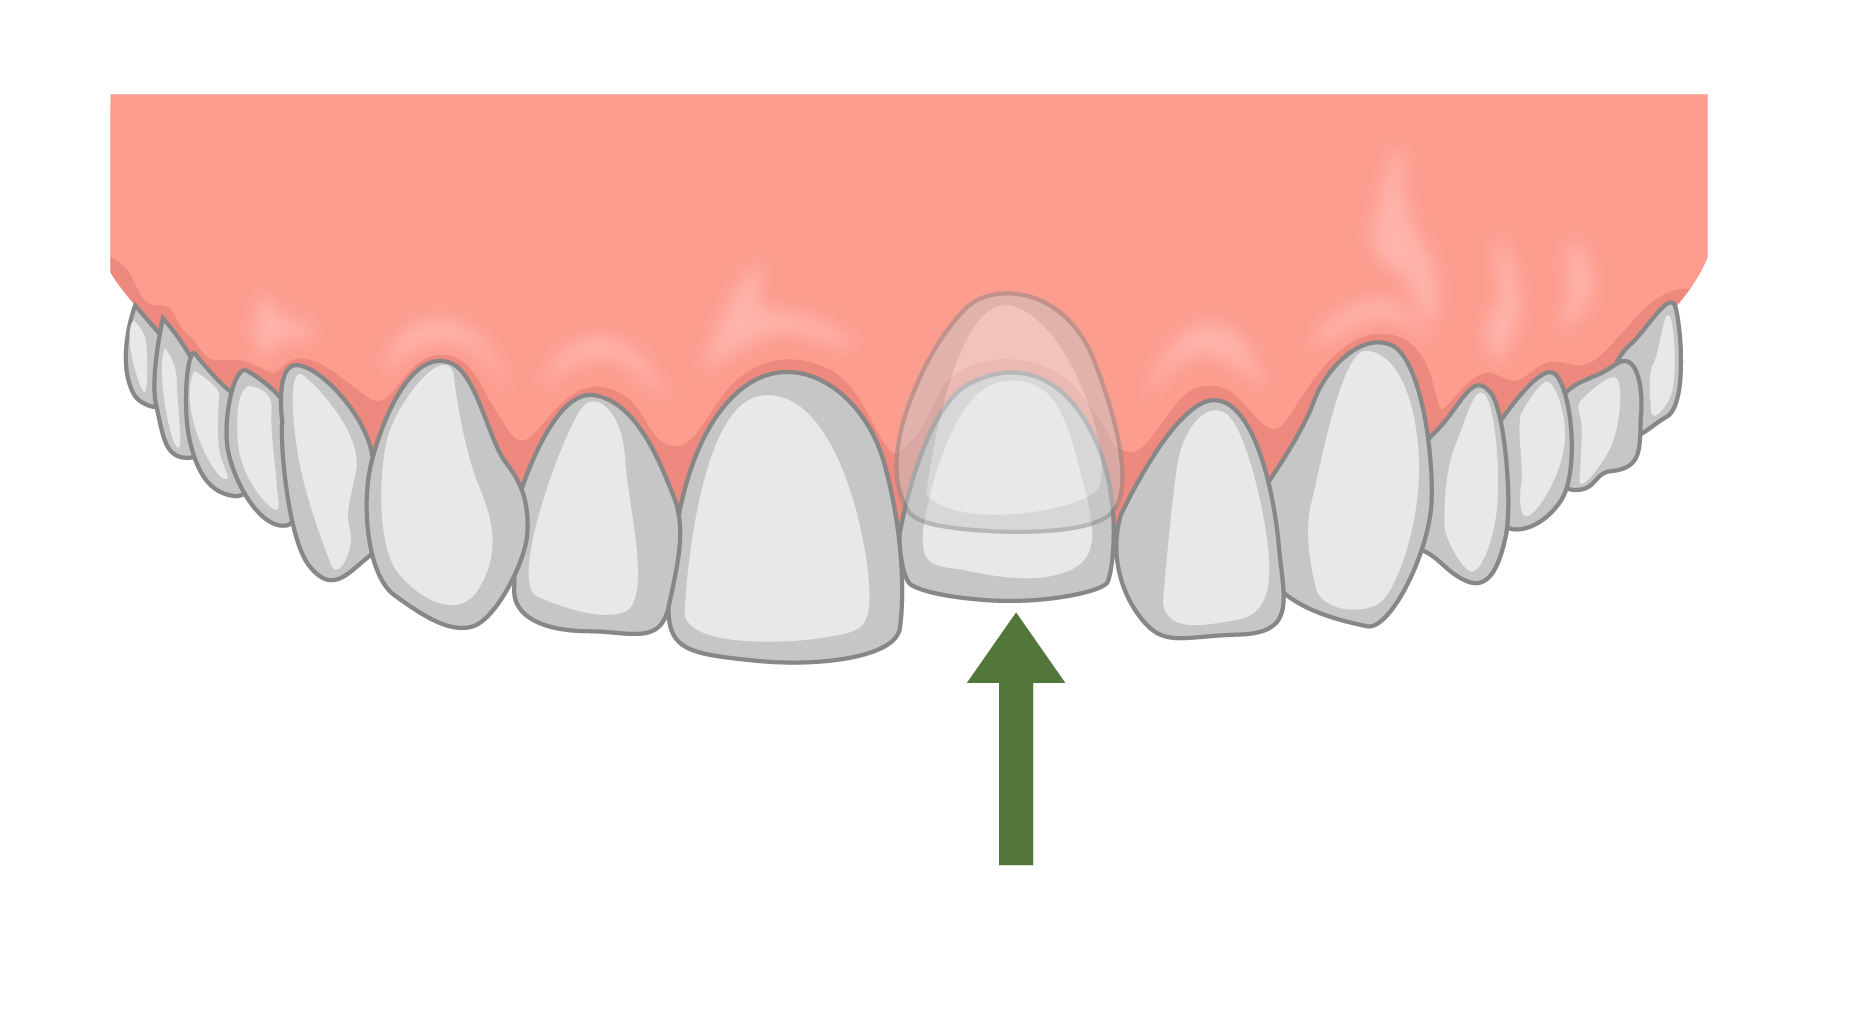
Crown-root fracture with no pulpal involvement 5,7
A crown fracture involving the enamel, dentine and cementum with no pulpal involvement.
Clinical findings
A crown fracture involving the enamel, dentine and cementum with no pulpal exposure – there will be increased mobility with the fracture extending below the gingival margin.
Radiographic findings
Difficult to identify radiographic changes
Management
In an emergency situation, the crown may be splinted to the adjacent tooth to reduce mobility.
Non-emergency treatment may include:
- Fragment removal only and coronal restoration
- Fragment removal and gingivectomy – root canal treatment indicated, and crown may be restored with a post-retained porcelain crown
- Surgical extrusion and removal of the coronal fragment
- Extraction of the tooth, with the space filled at a later date
Follow-up
ONE week, SIX to EIGHT weeks, THREE months, SIX months after the initial injury and if no changes, yearly for the next five years.
Crown-root fracture with pulpal involvement 5,7
A crown fracture involving the enamel, dentine and cementum with pulpal exposure.
Clinical findings
A crown fracture involving the enamel, dentine and cementum with pulpal exposure – there will be increased mobility with the fracture extending below the gingival margin.
Radiographic findings
Difficult to identify radiographic changes
Management
In an emergency situation, the crown may be splinted to the adjacent tooth to reduce mobility. In teeth with open apices, pulpal preservation is favoured, either through pulp capping procedure or partial pulpotomy. The mobile segment may be splinted to the adjacent tooth.
In teeth with mature apices long term treatment may include:
- Fragment removal and gingivectomy – root canal treatment indicated, and crown may be restored with a post retained porcelain crown
- Surgical extrusion and removal of the coronal fragment and root canal treatment
- Extraction of the tooth, with the space filled at a later date
Follow-up
ONE week, SIX to EIGHT weeks, THREE months, SIX months and then yearly for the next five years.

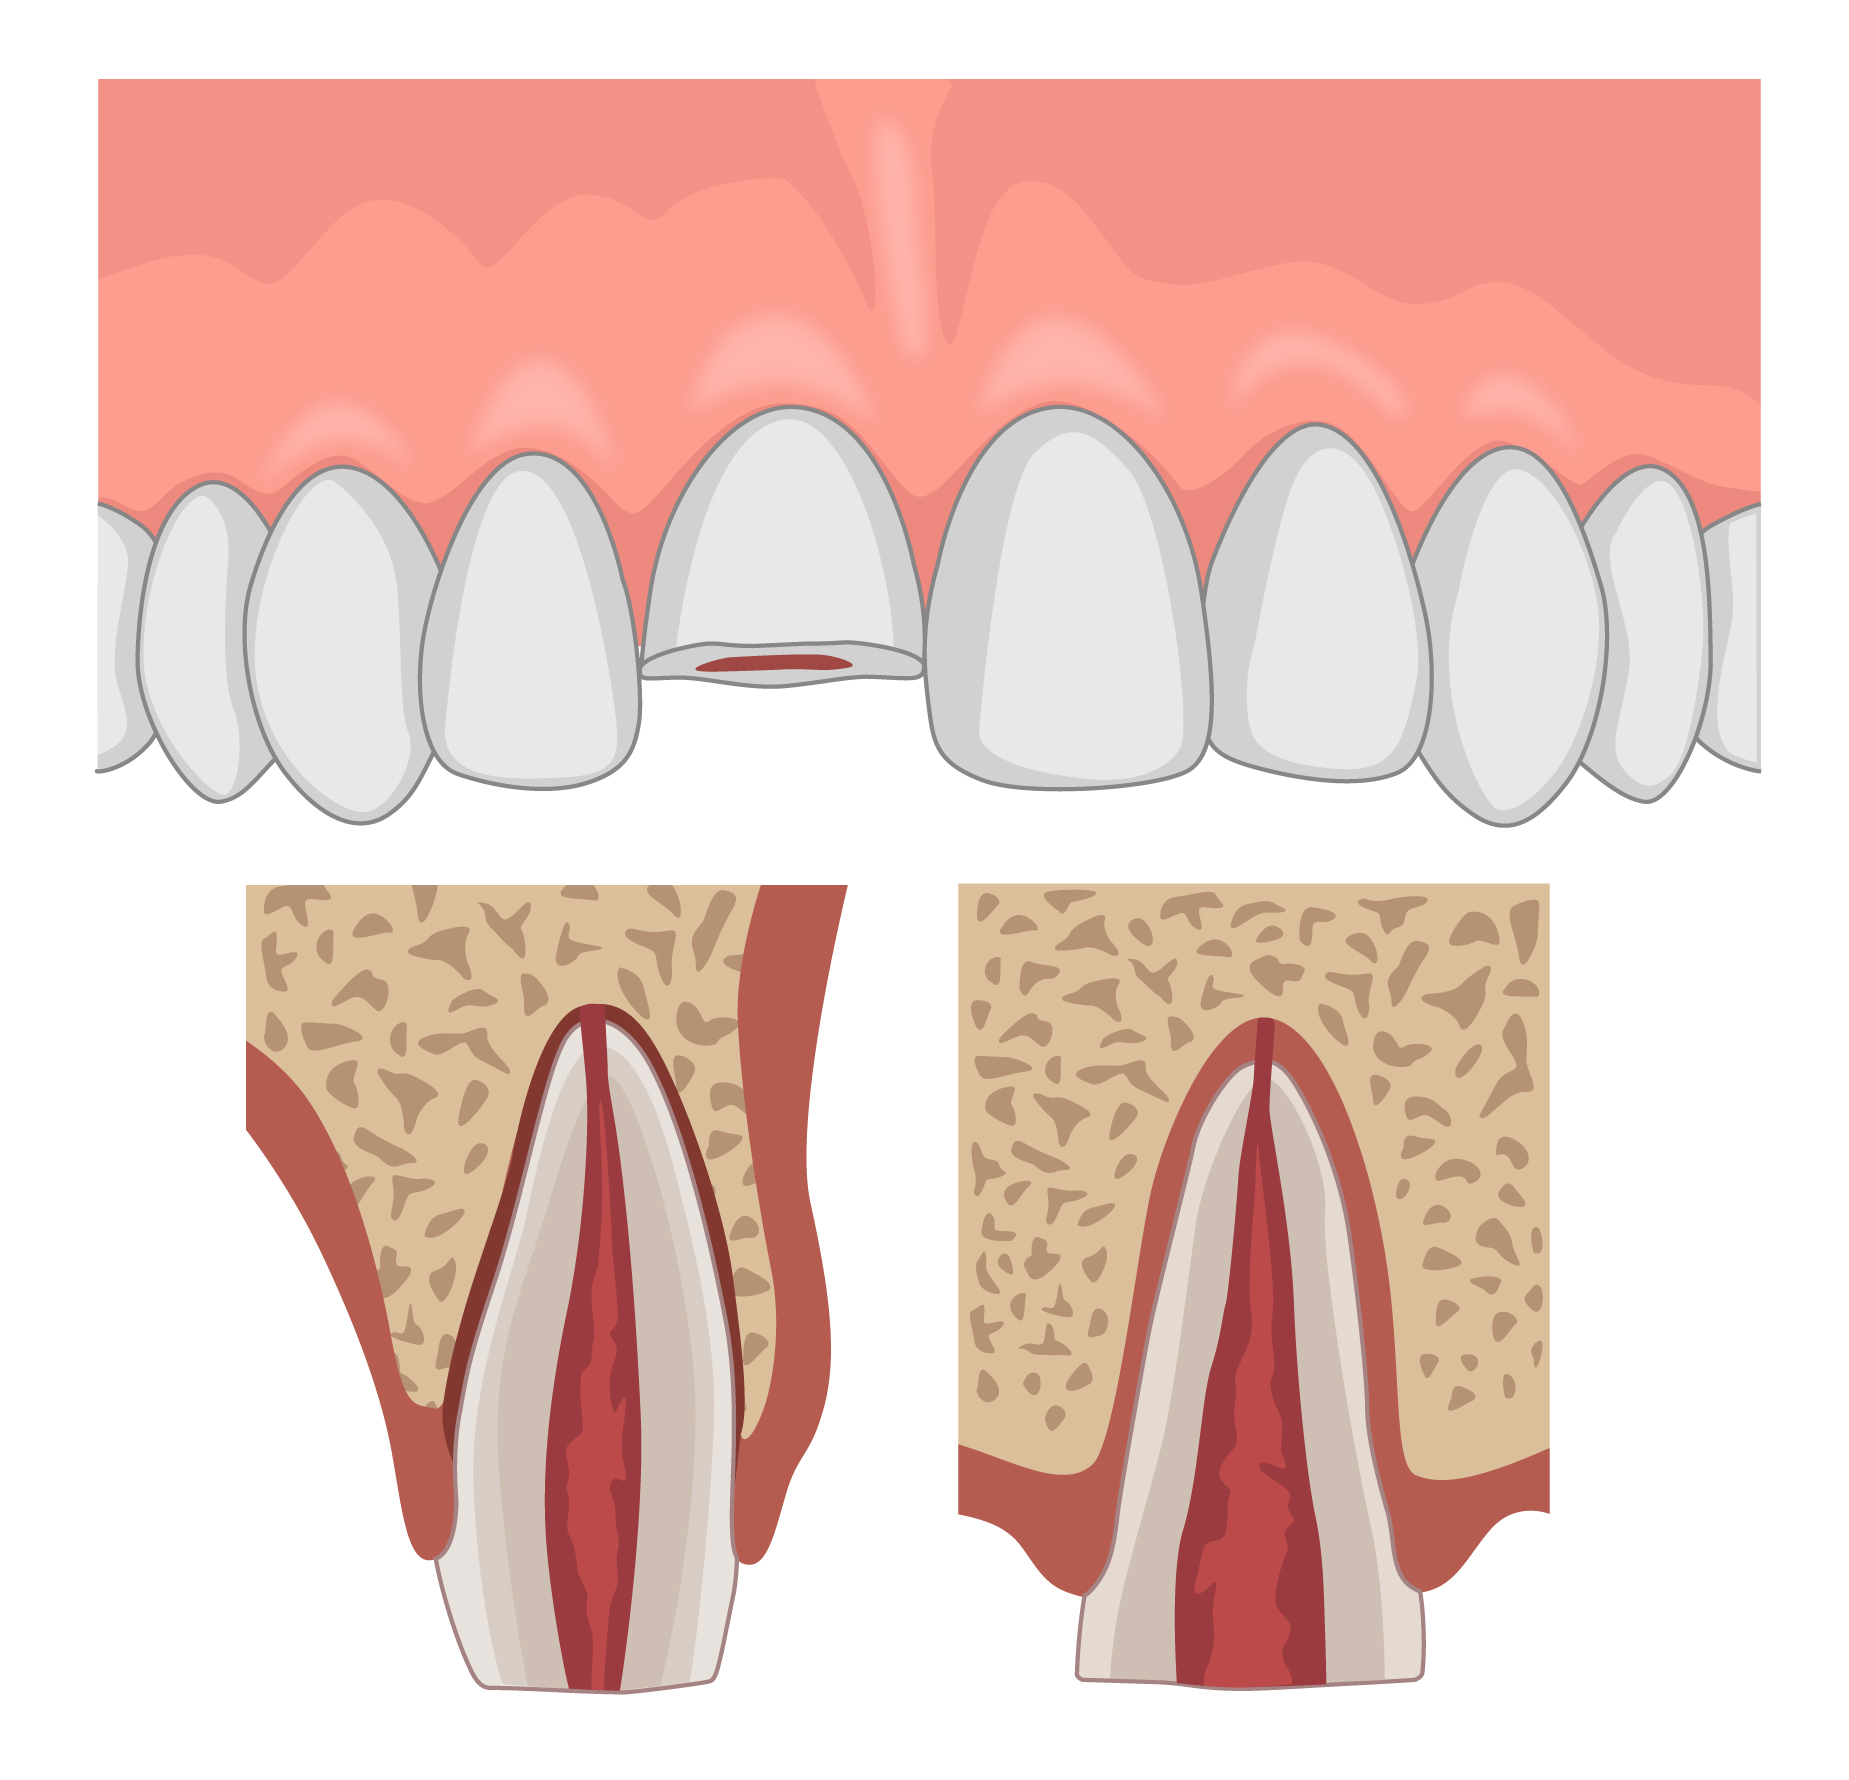
Root fracture 5,7
A fracture of the root involving dentine, pulp and cementum.
Clinical findings
The tooth is excessively mobile and there may be bleeding from the gingival sulcus.
Radiographic findings
Fracture is confined to the root – horizontal fracture line may be visible on an IOPA.
Management
Administer local anaesthetic before repositioning the tooth with digital pressure. It sometimes requires quite a lot of pressure so do not be alarmed if the tooth does not immediately return to its correct position and do not be alarmed by the ‘click’ noise when it returns to its correct position.
A flexible splint should then be applied; the length of time the splint is worn is dependent on the location of the fracture.
If the fracture is located in the mid or apical third of the root, a flexible splint should be worn for FOUR weeks; cervical third root fractures may require splinting for up to FOUR months to stabilise the tooth. A new trauma stamp and a new IOPA should be taken at the review appointments. Root canal treatment may be needed if the tooth shows signs of devitalisation.
Follow-up
FOUR weeks after the initial injury (and splint removal if necessary), SIX to EIGHT weeks and then FOUR months (splint removal if necessary).
The traumatised tooth should then be reviewed SIX months after the initial injury and then again ONE year after the injury.
If there have been no changes, the tooth can then be reviewed FIVE years after the initial injury.
Alveolar fracture 5,7
A fracture involving the alveolar bone which may extend into adjacent bones.
Clinical findings
Segment mobility and dislocation of several teeth moving together are commonly noted on examination
The alveolar fragment typically is very mobile and affected teeth may appear out of their correct position.
The patient may complain of changes in occlusion and there may be an intra-oral contusion.
Radiographic findings
Difficult to diagnose radiographically, however, fracture lines may be located at any level from the marginal bone to the root apex.
Treatment
Administer local anaesthetic before repositioning the fragment with digital pressure. It sometimes requires quite a lot of pressure so do not be alarmed if the fragment does not immediately return to its correct position and do not be alarmed by the ‘click’ noise when it returns to its correct position.
Once repositioned, a rigid splint should be applied and worn for FOUR weeks. Any gingival lacerations should be sutured.
Follow-up
The patient should next be reviewed FOUR weeks after the initial injury and then again at SIX to EIGHT weeks.
The patient should then be reviewed SIX months after the initial injury and then again ONE year after the injury.
If there have been no changes, the injury can then be reviewed FIVE years after the initial injury.
Editor
Dr Lewis Olsson
References
- Helen R Dodd. Decision- Making for children with traumatised permanent incisors: A holistic approach. Published in 2008. Available from: LINK
- FGDP-4 Dental Trauma. Published in 2016. Available from: LINK
- Severe head injury [Internet]. nhs.uk. 2020 [cited 31 December 2020]. Available from: LINK
- Charlotte L. Brown and Iain C. Mackie. Splinting of traumatised teeth in children. Published in 2003. Available from: LINK
- Dental Trauma Guide- Dental Trauma Guide Evidence Based Treatment Guide. Published in 2013. Available from: LINK
- Andreasen JO, Andreasen FM, Andersson L. Textbook and color atlas of traumatic injuries to the teeth.Oxford: Blackwell; 2007
- Bourguignon C, Cohenca N, Lauridsen E, Flores M, O’Connell A, Day P et al. International Association of Dental Traumatology guidelines for the management of traumatic dental injuries: 1. Fractures and luxations. Dental Traumatology. 2020;36(4):314-330
- Fouad A, Abbott P, Tsilingaridis G, Cohenca N, Lauridsen E, Bourguignon C et al. International Association of Dental Traumatology guidelines for the management of traumatic dental injuries: 2. Avulsion of permanent teeth. Dental Traumatology. 2020;36(4):331-342
