

- 📖 Geeky Medics OSCE Book
- ⚡ Geeky Medics Bundles
- ✨ 1300+ OSCE Stations
- ✅ OSCE Checklist PDF Booklet
- 🧠 UKMLA AKT Question Bank
- 💊 PSA Question Bank
- 💉 Clinical Skills App
- 🗂️ Flashcard Collections | OSCE, Medicine, Surgery, Anatomy
- 💬 SCA Cases for MRCGP
To be the first to know about our latest videos subscribe to our YouTube channel 🙌
Hip examination frequently appears in OSCEs and you’ll be expected to identify the relevant clinical signs using your examination skills. This hip examination OSCE guide provides a clear step-by-step approach to examining the hip, with an included video demonstration. Musculoskeletal examinations can be broken down into four key components: look, feel, move and special tests. This can be helpful as an aide-memoire if you begin to feel like you’ve lost your way during an OSCE.
Introduction
Wash your hands and don PPE if appropriate.
Introduce yourself to the patient including your name and role.
Confirm the patient’s name and date of birth.
Briefly explain what the examination will involve using patient-friendly language.
Ask if the patient has had a hip replacement (if so internal rotation, adduction and flexion greater than 90° should be avoided due to the risk of joint dislocation).
Gain consent to proceed with the examination.
Adequately expose the patient’s legs (typically this involves the patient wearing only their underwear) and provide a blanket to cover the patient when not being examined.
Position the patient standing for initial inspection of the lower limbs.
Ask the patient if they have any pain before proceeding with the clinical examination.
Look
General inspection
Clinical signs
Perform a brief general inspection of the patient, looking for clinical signs suggestive of underlying pathology:
- Body habitus: obesity is a significant risk factor for joint pathology due to increased mechanical load (e.g. osteoarthritis).
- Scars: may provide clues regarding previous lower limb surgery.
- Wasting of muscles: suggestive of disuse atrophy secondary to joint pathology or a lower motor neuron injury.
Objects or equipment
Look for objects or equipment on or around the patient that may provide useful insights into their medical history and current clinical status:
- Walking aids: the ability to walk can be impacted by a wide range of knee, hip and ankle pathology.
- Prescriptions: prescribing charts or personal prescriptions can provide useful information about the patient’s recent medications (e.g. analgesia).
Closer inspection of the hips
Ask the patient to stand and turn in 90° increments as you inspect the lower limbs from each angle for evidence of pathology.
Anterior inspection
Inspect the anterior aspect of the hip joints and lower limbs, noting any abnormalities:
- Scars: note the location of scars as they may provide clues as to the patient’s previous surgical history or indicate previous joint trauma.
- Bruising: suggestive of recent trauma or surgery.
- Swelling: note any evidence of asymmetry in the size of the hip joints that may suggest unilateral swelling (e.g. effusion, inflammatory arthropathy, septic arthritis).
- Quadriceps wasting: note any asymmetry in the bulk of the quadriceps muscles which may be due to disuse atrophy or a lower motor neuron lesion.
- Leg length discrepancy: may be congenital or acquired (e.g. fracture, degenerative joint disease, surgical removal of bone, trauma to the epiphyseal endplate prior to skeletal maturity).
- Pelvic tilt: lateral pelvic tilt can be caused by scoliosis, leg length discrepancy or hip abductor weakness.
Lateral inspection
Inspect the lateral aspect of the hip joints and lower limbs, noting any abnormalities:
- Flexion abnormalities: fixed flexion deformity at the hip joint may suggest the presence of contractures secondary to previous trauma, inflammatory conditions or neurological disease.
Posterior inspection
Inspect the posterior aspect of the hip joints and lower limbs, noting any abnormalities:
- Scars: again look for scars indicative of previous trauma or surgery.
- Muscle wasting: inspect for any asymmetry in the muscle bulk of the posterior compartment of the thigh and the gluteal region suggestive of disuse atrophy or a lower motor neuron lesion.
 Inspect the hip joint, pelvis and lower limbs.


Gait
Ask the patient to walk to the end of the examination room and then turn and walk back whilst you observe their gait paying attention to:
- Gait cycle: note any abnormalities of the gait cycle (e.g. abnormalities in toe-off or heel strike).
- Range of movement: often reduced in the context of chronic joint pathology (e.g. osteoarthritis, inflammatory arthritis).
- Limping: may suggest joint pain (i.e. antalgic gait) or weakness.
- Leg length: note any discrepancy which may be the cause or the result of joint pathology.
- Turning: patients with joint disease may turn slowly due to restrictions in joint range of movement or instability.
- Trendelenburg’s gait: an abnormal gait caused by unilateral weakness of the hip abductor muscles secondary to a superior gluteal nerve lesion or L5 radiculopathy.
- Waddling gait: an abnormal gait caused by bilateral weakness of the hip abductor muscles, typically associated with myopathies (e.g. muscular dystrophy).
- Assess the patient’s footwear: unequal sole wearing is suggestive of an abnormal gait.
- Observe the patient's gait
")
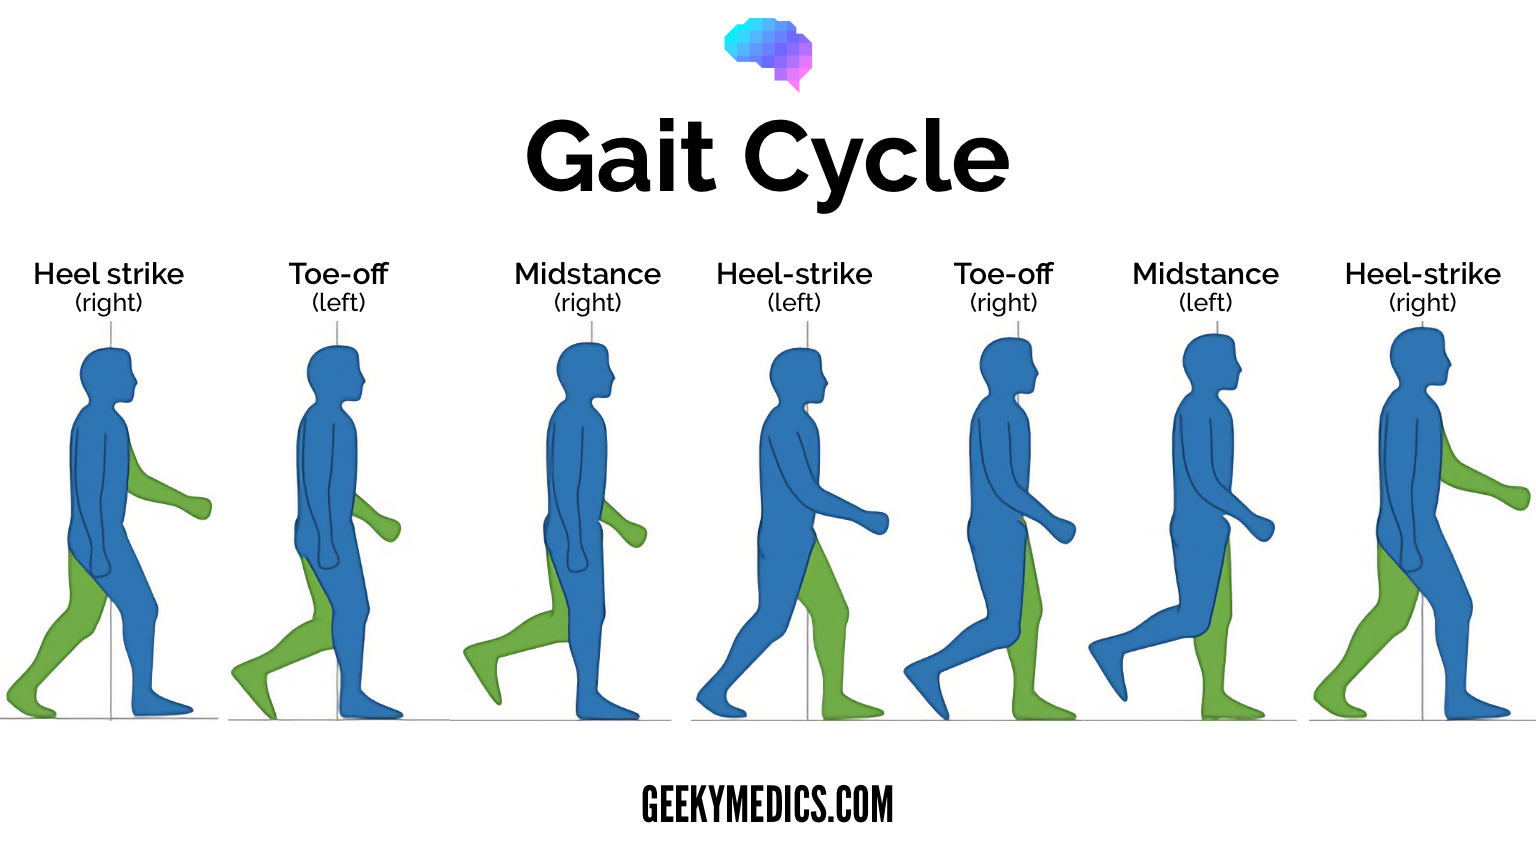
Gait cycle
The gait cycle has six phases:
- Heel-strike: initial contact of the heel with the floor.
- Foot flat: weight is transferred onto this leg.
- Mid-stance: the weight is aligned and balanced on this leg.
- Heel-off: the heel lifts off the floor as the foot rises but the toes remain in contact with the floor.
- Toe-off: as the foot continues to rise the toes lift off the floor.
- Swing: the foot swings forward and comes back into contact with the floor with a heel strike (and the gait cycle repeats).
Trendelenburg’s gait and waddling gait
During the leg lift and swing phase of the gait cycle, all of the body’s weight is placed on the limb that is still in contact with the ground. In this phase, the hip abductor muscles (gluteus medius and minimus) on the opposite side to the raised leg contract to prevent the pelvis from dropping on the side of the raised leg.
If a patient has unilateral hip abductor weakness, the pelvis will drop toward the contralateral side when the leg on that side leaves the ground (i.e. if there is left hip abductor weakness, the pelvis will drop towards the right whenever the right foot is lifted off the ground). It’s important to remember that the pelvis falls on the contralateral side to the weakness. This sagging of the pelvis secondary to hip abductor weakness is known as Trendelenburg’s sign. Unilateral hip abductor weakness is typically caused by a superior gluteal nerve lesion or L5 radiculopathy.
Trendelenburg’s gait refers to the gait in an individual with unilateral hip abductor weakness, which is typically described as ‘lurching’ in nature. As the pelvis sags towards the unaffected side, the trunk lurches towards the opposite side in an effort to maintain balance.
If an individual has bilateral hip abductor weakness, they typically present with a waddling gait, caused by the overuse of circumduction to compensate for gluteal weakness. Bilateral hip abductor weakness is typically associated with myopathies (e.g. muscular dystrophy).
Inspection with the patient on the bed
Ask the patient to lay down on the clinical examination couch for the next part of the assessment.
Briefly inspect the hip joints and lower limbs once more for abnormalities whilst the patient is lying down:
- Scars
- Swelling
- Bruising
- Quadriceps wasting
- Hip joint asymmetry
- Fixed flexion deformity
Feel
Temperature
With the patient still positioned supine on the clinical examination couch simultaneously assess and compare hip joint temperature using the back of your hands.
Increased temperature of a joint, particularly if also associated with swelling and tenderness may indicate septic or inflammatory arthritis.
Hip joint palpation
Palpate the greater trochanter of each leg for evidence of tenderness, which may suggest trochanteric bursitis.
Leg length assessment
Leg length should be formally assessed to differentiate between a true leg length discrepancy and an apparent discrepancy caused by other abnormalities (e.g. a leg appears shorter secondary to lateral pelvic tilt).
Apparent leg length
To assess apparent leg length, measure and compare the distance between the umbilicus and the tip of the medial malleolus of each limb.
True leg length
To assess true leg length, measure from the anterior superior iliac spine to the tip of the medial malleolus of each limb.
- Palpate the tissues surrounding the hip joint


Move
The hip joint of each leg should be assessed and compared.
If the patient is known to have an issue with a particular leg, you should assess the ‘normal’ leg first for comparison.
Active movement
Active movement refers to a movement performed independently by the patient. Ask the patient to carry out a sequence of active movements to assess joint function. As the patient performs each movement, note any restrictions in the range of the joint’s movement and also look for signs of discomfort.
It’s important to clearly explain and demonstrate each movement you expect the patient to perform to aid understanding.
Active hip flexion
Place your hand under the lumbar spine to detect masking of restricted hip joint movement by the pelvis and lumbar spine.
Normal range of movement: 120°
Instructions: Ask the patient to flex their hip as far as they are able – “Bring your knee as close to your chest as you can.”
Active hip extension
Normal range of movement: the leg should be able to lie flat (180°).
Instructions: Ask the patient to extend their leg, so that it is flat on the bed – “Straighten your leg out so that it is flat on the bed.”
Passive movement
Passive movement refers to a movement of the patient, controlled by the examiner. This involves the patient relaxing and allowing you to move the joint freely to assess the full range of joint movement. It’s important to feel for crepitus as you move the joint (which can be associated with osteoarthritis) and observe any discomfort or restriction in the joint’s range of movement.
Passive hip flexion
Normal range of movement: 120°
Instructions: Whilst supporting the patient’s leg, flex the hip as far as you are able, making sure to observe for signs of discomfort.
Passive hip internal rotation
Normal range of movement: 40°
Instructions: Flex the patient’s hip and knee joint to 90° and then rotate their foot laterally.
Passive hip external rotation
Normal range of movement: 45°
Instructions: Flex the patient’s hip and knee joint to 90° and then rotate their foot medially.
Passive hip ABduction
Normal range of movement: 45°
Instructions:
1. With the patient’s legs straight and flat on the bed, use one of your hands to hold the ankle of the hip being assessed and place your other hand over the contralateral iliac crest to stabilise the pelvis.
2. Move the patient’s ankle laterally to abduct the hip until the pelvis begins to tilt.
Passive hip ADduction
Normal range of movement: 30°
Instructions:
1. With the patient’s legs straight and flat on the bed, use one of your hands to hold the ankle of the hip being assessed and place your other hand over the contralateral iliac crest to stabilise the pelvis.
2. Move the patient’s ankle medially to adduct the hip until the pelvis begins to tilt.
- Figure 3. Hip flexion


Passive hip extension
Normal range of movement: 10-20°
Instructions:
1. Ask the patient to lie in a prone position.
2. Use one hand to hold the ankle of the leg being assessed and place the other hand on the ipsilateral pelvis.
3. Lift the leg to extend the hip joint and assess the range of hip joint extension.
- Figure 9. Hip extension

Special tests
Thomas’s test
Thomas’s test is used to assess for a fixed flexion deformity (i.e. an inability for the patient to fully extend their leg).
1. With the patient positioned flat on the bed, place a hand below their lumbar spine with your palm facing upwards (this helps to prevent the patient from masking a fixed flexion deformity by increasing lumbar lordosis).
2. Passively flex the hip of the unaffected leg as far as you are able to and observe the contralateral limb.
3. Repeat the assessment on the contralateral hip.
Interpretation
The test is positive (abnormal) if the affected thigh raises off the bed, indicating a loss of hip joint extension. This would suggest a fixed flexion deformity in the affected hip.
This test should not be performed on patients who have had a hip replacement as it can cause dislocation.
- Place hand under lumbar spine


Trendelenburg’s test
Trendelenburg’s test is used to screen for hip abductor weakness (gluteus medius and minimus).
1. With the patient upright, stand in front of them and ask them to place their hands on your forearms or shoulders for stability.
2. Position your fingers on each side of the patient’s pelvis at the iliac crest.
3. Ask the patient to stand on one leg and observe your fingers for evidence of lateral pelvic tilt.
4. Repeat the assessment with the patient standing on the other leg.
Interpretation
If the patient’s hip abductors are functioning normally the pelvis should remain stable or rise slightly on the side of the raised leg.
If the pelvis drops on the side of the raised leg it suggests contralateral hip abductor weakness (this is known as Trendelenburg’s sign).
- Trendelenburg's test


To complete the examination…
Explain to the patient that the examination is now finished.
Thank the patient for their time.
Dispose of PPE appropriately and wash your hands.
Summarise your findings.
Example summary
“Today I examined Mr Smith, a 32-year-old male. On general inspection, the patient appeared comfortable at rest, with no stigmata of musculoskeletal disease. There were no objects or medical equipment around the bed of relevance.
“Assessment of the lower limbs revealed a normal gait and hip joint appearance. The range of movement of both hip joints was also normal. There was no evidence of pelvic tilt or fixed flexion deformity of the hip. “
“In summary, these findings are consistent with a normal hip joint examination.”
“For completeness, I would like to perform the following further assessments and investigations.”
Further assessments and investigations
- Neurovascular examination of both lower limbs.
- Examination of the joints above and below (lumbar spine and knee joint).
- Further imaging if indicated (e.g. X-ray and MRI).
Reviewer
Mr Tejas Yarashi
Consultant Trauma & Orthopaedic Surgeon
References
- Heilstedt HA, Bacino CA. Adapted by Geeky Medics. Lateral pelvic tilt secondary to leg length discrepancy. Licence: CC BY.
- Adapted by Geeky Medics. BoH, CC BY-SA 4.0
