

- 📖 Geeky Medics OSCE Book
- ⚡ Geeky Medics Bundles
- ✨ 1300+ OSCE Stations
- ✅ OSCE Checklist PDF Booklet
- 🧠 UKMLA AKT Question Bank
- 💊 PSA Question Bank
- 💉 Clinical Skills App
- 🗂️ Flashcard Collections | OSCE, Medicine, Surgery, Anatomy
- 💬 SCA Cases for MRCGP
To be the first to know about our latest videos subscribe to our YouTube channel 🙌
This guide provides an overview of performing a lymphoreticular examination in an OSCE setting.
Examination of the lymphoreticular system is often performed when there is clinical suspicion of haematological malignancy. The purpose of the examination is to assess whether a patient has evidence of lymphadenopathy or hepatosplenomegaly which are common clinical features in conditions such as lymphoma and leukaemia.
Clinical features associated with haematological malignancy include:
- Fatigue, breathlessness and dizziness (anaemia)
- Easy bruising and bleeding (thrombocytopenia)
- Recurrent or atypical infections (impaired immune response)
- Weight loss, night sweats and pyrexia (known as “B-symptoms”)
Introduction
Wash your hands and don PPE if appropriate.
Introduce yourself to the patient including your name and role.
Confirm the patient’s name and date of birth.
Explain what the examination will involve using patient-friendly language.
Explain the need for a chaperone: “One of the ward staff members will be present throughout the examination, acting as a chaperone, would that be ok?”
Gain consent to proceed with the examination.
Adjust the head of the bed to a 45° angle.
Adequately expose the patient for the assessment.
Ask the patient if they have any pain before proceeding with the clinical examination.
General inspection
Clinical signs
Inspect the patient from the end of the bed whilst at rest, looking for clinical signs suggestive of underlying pathology:
- Bleeding or bruising/petechiae: may indicate underlying thrombocytopenia.
- Abdominal distention: may suggest the presence of underlying hepatosplenomegaly.
- Pallor: a pale colour of the skin that can suggest underlying anaemia (e.g. leukaemia).
- Cachexia: ongoing muscle loss that is not entirely reversed with nutritional supplementation. Cachexia is commonly associated with underlying malignancy (e.g. leukaemia and lymphoma).
Objects and equipment
Look for objects or equipment on or around the patient that may provide useful insights into their medical history and current clinical status:
- Vital signs: charts on which vital signs are recorded will give an indication of the patient’s current clinical status and how their physiological parameters have changed over time.
- Prescriptions: prescribing charts or personal prescriptions can provide useful information about the patient’s recent medications.
 General inspection


Lymph nodes
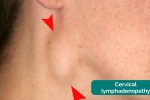
Lymphadenopathy (enlargement of lymph nodes) is a common feature of both lymphomas and leukaemias making a thorough clinical assessment of lymph nodes essential.
Assessing lymphadenopathy
It is important to examine for lymphadenopathy in a systematic manner. There are several chains that can be easily palpated on clinical examination. Remember, there are chains of lymph nodes which cannot be palpated on clinical examination such as mediastinal or mesenteric nodes (these can only be identified using CT/MRI scans).
For any palpable lymph node, it’s important to assess the following characteristics to help narrow the differential diagnosis:
- Site: assess the lymph node’s location in relation to other anatomical structures.
- Size: assess the size of the lymph node.
- Shape: assess the lymph node’s borders to determine if they feel regular or irregular.
- Consistency: determine if the lymph node feels soft, hard or rubbery.
- Tenderness: note if the lymph node is tender on palpation.
- Mobility: assess if the lymph node feels mobile or is tethered to other local structures.
- Overlying skin changes: note any overlying skin changes such as erythema.
Interpretation of lymph node findings
Benign lymph nodes: typically less than 1cm, smooth, rounded, non-tender and mobile.
Reactive lymph nodes: typically smooth, rounded, tender, mobile and associated with infective symptoms (e.g. fever).
Lymphadenopathy associated with haematological malignancy: widespread enlarged rubbery lymph nodes.
Lymphadenopathy associated with metastatic cancer: regional lymphadenopathy in lymph node groups draining the affected organ. Lymph nodes typically feel hard, firm, irregular and are often tethered to local structures.
Cervical lymph nodes
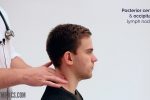
1. Position the patient sitting upright and examine from behind if possible. Ask the patient to tilt their chin slightly downwards to relax the muscles of the neck and aid palpation of lymph nodes. You should also ask them to relax their hands in their lap.
2. Inspect for any evidence of lymphadenopathy or irregularity of the neck.
3. Stand behind the patient and use both hands to start palpating the neck.
4. Use the pads of the second, third and fourth fingers to press and roll the lymph nodes over the surrounding tissue to assess the various characteristics of the lymph nodes. By using both hands (one for each side) you can note any asymmetry in size, consistency and mobility of lymph nodes.
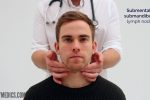
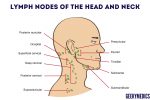
5. Start in the submental area and progress through the various lymph node chains. Any order of examination can be used, but a systematic approach will ensure no areas are missed:
- Submental
- Submandibular
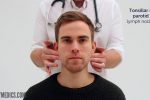
- Tonsillar
- Parotid
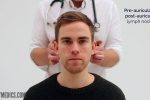
- Pre-auricular
- Post-auricular
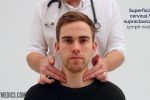
- Superficial cervical
- Deep cervical
- Posterior cervical
- Occipital
- Supraclavicular
Take caution when examining the anterior cervical chain that you do not compromise cerebral blood flow (due to carotid artery compression). It may be best to examine one side at a time here.
A common mistake is a “piano-playing” or “spider’s legs” technique with the fingertips over the skin rather than correctly using the pads of the second, third and fourth fingers to press and roll the lymph nodes over the surrounding tissue.
Example of a logical systematic examination of the lymph nodes
1. Start under the chin (submental lymph nodes), then move posteriorly palpating beneath the mandible (submandibular), turn upwards at the angle of the mandible (tonsillar and parotid lymph nodes) and feel anterior (preauricular lymph nodes) and posterior to the ears (posterior auricular lymph nodes).
2. Follow the anterior border of the sternocleidomastoid muscle (anterior cervical chain) down to the clavicle, then palpate up behind the posterior border of the sternocleidomastoid (posterior cervical chain) to the mastoid process.
3. Palpate over the occipital protuberance (occipital lymph nodes).
4. Ask the patient to tilt their head (bring their ear towards their shoulder) each side in turn, and palpate behind the posterior border of the clavicle in the supraclavicular fossa (supraclavicular and infraclavicular lymph nodes).
- Palpate the submental and submandibular lymph nodes


Axillary lymph nodes
1. Ensure the patient is positioned lying down on the examination couch at 45°.
2. Ask if the patient has any pain in either shoulder before moving the arm.
3. Begin by inspecting each axilla for evidence of scars, masses, or skin changes.
4. When examining the right axilla, hold the patient’s right forearm in your right hand and instruct them to relax it completely, allowing you to support the weight. This allows the axillary muscles to relax.
5. Palpation should then be performed with the left hand. The reverse is applied when examining the left axilla.
6. Examination of axilla should cover the pectoral (anterior), central (medial), subscapular (posterior), humoral (lateral), and apical groups of lymph nodes. An example of a systematic routine you could follow is listed below:
- With your palm facing towards you, palpate behind the lateral edge of the pectoralis major (pectoral/anterior).
- Turn your palm medially and with your fingertips at the apex of the axilla palpate against the wall of the thorax (central/medial) using the pulps of your fingers.
- Facing your palm away from you now, feel inside the lateral edge of latissimus dorsi (subscapular/posterior).
- Palpate the inner aspect of the arm in the axilla (humoral/lateral).
- Reach upwards into the apex of the axilla with fingertips (warn the patient this may be uncomfortable).
7. Repeat the assessment on the contralateral axilla.
- Palpate the lateral edge of pectoralis major


Epitrochlear lymph nodes
Epitrochlear lymphadenopathy is rare, but usually very obvious when present (the patient will often point this out).
To assess for epitrochlear lymphadenopathy:
1. Hold the wrist of the side to be examined with your corresponding hand (i.e. right to right).
2. Using your opposite hand, grasp behind the olecranon with your fingers. Your thumb should reach across the crease of the elbow to palpate the inner aspect of the arm just above the medial epicondyle of the humerus.
3. Assess for the presence of lymphadenopathy which can be associated with metastatic melanoma affecting the arm or conditions causing generalised lymphadenopathy.
- Palpate the epitrochlear lymph nodes


Inguinal lymph nodes
You are unlikely to be expected to perform an inguinal lymph node assessment in an OSCE, however, it is important to understand how to carry out the examination.
To assess for inguinal lymphadenopathy:
1. Ask your patient to lower their trousers and underwear to expose the inguinal region.
2. Instruct the patient to lay flat on the bed.
3. Inspect for any obvious swellings or irregularities.
4. Palpate immediately inferior to the inguinal ligament (which runs between the anterior superior iliac spine and pubic tubercle) to assess the horizontal group of superficial inguinal lymph nodes.
5. Position your fingers approximately 3cm lateral to the pubic tubercle and then palpate vertically downwards over the saphenous opening and the proximal portion of the great saphenous vein to assess the vertical group of superficial inguinal lymph nodes.
- Inguinal lymph nodes

Abdomen
Both lymphomas and leukaemias can cause hepatomegaly and splenomegaly, so a thorough abdominal examination is essential.
Preparation
Position the patient lying flat on the bed, with their arms by their sides and legs uncrossed for abdominal inspection and subsequent palpation.
Abdominal inspection
Inspect the patient’s abdomen:
- Abdominal distension: can be caused by a wide range of pathology, but in the context of a lymphoreticular examination, gross hepatosplenomegaly should be considered.
- Bruising/petechiae: in the context of a lymphoreticular examination, this may suggest low platelets.
- Striae (stretch marks): caused by tearing during the rapid growth or overstretching of skin (e.g. gross hepatosplenomegaly, intrabdominal mass).
- Inspect the abdomen


Abdominal palpation
Before beginning abdominal palpation:
- Ask the patient if they are aware of any areas of abdominal pain (if present, examine these areas last).
- Kneel beside the patient to carry out palpation and observe their face throughout the examination for signs of discomfort.
Light palpation of the abdomen
Lightly palpate each of the nine abdominal regions, assessing for clinical signs suggestive of gastrointestinal pathology:
- Tenderness: note the abdominal region(s) involved and the severity of the pain.
- Rebound tenderness: said to be present when the abdominal wall, having been compressed slowly, is released rapidly and results in sudden sharp abdominal pain. This is a non-specific, unreliable clinical sign that can, in some cases, be associated with peritonitis (e.g. appendicitis).
- Guarding: involuntary tension in the abdominal muscles that occurs on palpation associated with peritonitis (e.g. appendicitis, diverticulitis).
- Rovsing’s sign: palpation of the left iliac fossa causes pain to be experienced in the right iliac fossa. This sign is suggestive of peritonitis, however again it is not particularly reliable.
- Masses: large or superficial masses (e.g. hernias) may be noted on light palpation.
Deep palpation of the abdomen
Palpate each of the nine abdominal regions again, this time applying greater pressure to identify any deeper masses. Warn the patient this may feel uncomfortable and ask them to let you know if they want you to stop. You should also carefully monitor the patient’s face for evidence of discomfort (as they may not vocalise this).
If any masses are identified during deep palpation, assess the following characteristics:
- Location: note which of the nine abdominal regions the mass located within.
- Size and shape: assess the approximate size and shape of the mass.
- Consistency: assess the consistency of the mass (e.g. smooth, soft, hard, irregular).
- Mobility: assess if the mass appears to be attached to superficial or underlying structures.
- Pulsatility: note if the mass feels pulsatile, suggestive of vascular aetiology (e.g. abdominal aortic aneurysm).
- Perform light abdominal palpation


Palpate the liver
1. Begin palpation in the right iliac fossa, starting at the edge of the superior iliac spine, using the flat edge of your hand (the radial side of your right index finger).
2. Ask the patient to take a deep breath and as they begin to do this palpate the abdomen. Feel for a step as the liver edge passes below your hand during inspiration (a palpable liver edge this low in the abdomen suggests gross hepatomegaly).
3. Repeat this process of palpation moving 1-2 cm superiorly from the right iliac fossa each time towards the right costal margin.
4. As you get close to the costal margin (typically 1-2 cm below it) the liver edge may become palpable in healthy individuals.
If you are able to identify the liver edge, assess the following characteristics:
- Degree of extension below the costal margin: if greater than 2 cm this suggests hepatomegaly.
- Consistency of the liver edge: a nodular consistency is suggestive of cirrhosis.
- Tenderness: hepatic tenderness may suggest hepatitis or cholecystitis (as you may be palpating the gallbladder).
- Pulsatility: pulsatile hepatomegaly is associated with tricuspid regurgitation.
Causes of hepatomegaly
There is a wide range of possible causes of hepatomegaly including but not limited to:
- Hepatitis (infective and non-infective)
- Hepatocellular carcinoma
- Hepatic metastases
- Wilson’s disease
- Haemochromatosis
- Leukaemia
- Lymphoma
- Myeloma
- Glandular fever
- Primary biliary cirrhosis
- Tricuspid regurgitation
- Haemolytic anaemia
- Palpate the liver

Palpate the spleen
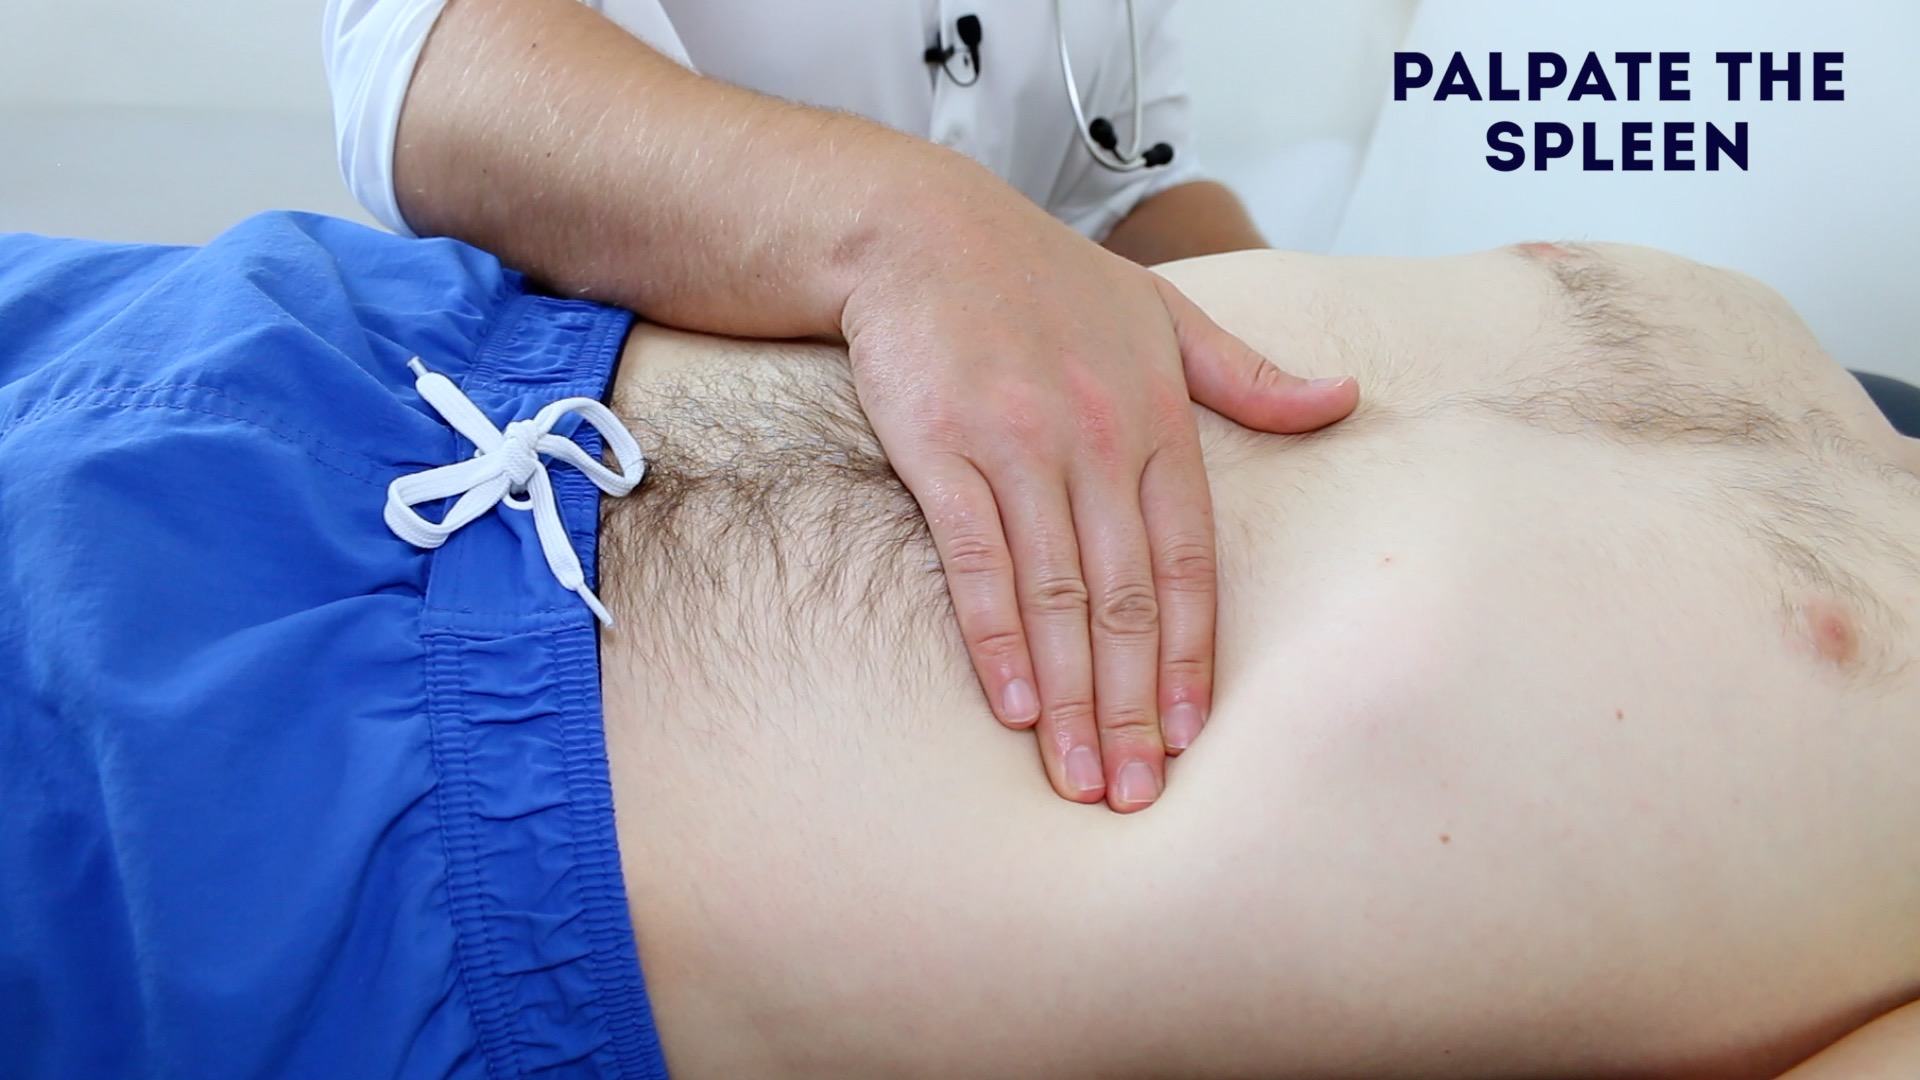
1. Begin palpation in the right iliac fossa, starting at the edge of the superior iliac spine, using the flat edge of your hand (the radial side of your right index finger).
2. Ask the patient to take a deep breath and as they begin to do this palpate the abdomen with your fingers aligned with the left costal margin. Feel for a step as the splenic edge passes below your hand during inspiration (the splenic notch may be noted).
3. Repeat this process of palpation moving 1-2 cm superiorly from the right iliac fossa each time towards the left costal margin.
In healthy individuals, you should not be able to palpate the spleen. A palpable spleen at the edge of the left costal margin would suggest splenomegaly (for the spleen to be palpable at this location it would need to be approximately three times its normal size).
Causes of splenomegaly
There is a wide range of possible causes of splenomegaly including but not limited to:
- Portal hypertension secondary to liver cirrhosis
- Haemolytic anaemia
- Leukaemia
- Lymphoma
- Congestive heart failure
- Splenic metastases
- Glandular fever
- Palpate the spleen
To complete the examination…
Explain to the patient that the examination is now finished.
Thank the patient for their time.
Dispose of PPE appropriately and wash your hands.
Summarise your findings.
Example summary
“Today I examined Mr Smith, a 64-year-old male. On general inspection, the patient appeared comfortable at rest, with no evidence of cachexia, pallor, rashes, bruising or bleeding.”
“Assessment of the cervical, axillary and inguinal lymph nodes did not reveal any evidence of lymphadenopathy.”
“Abdominal examination was unremarkable, with no evidence of hepatosplenomegaly.”
“In summary, these findings are consistent with a normal lymphoreticular examination.”
“For completeness, I would like to perform the following further assessments and investigations.”
Further assessments and investigations
- Full blood count, blood film and further imaging (e.g. chest X-ray, ultrasound, CT).
- Biopsy of a suspicious lymph node for histological diagnosis.
- If there were concerns that lymphadenopathy was due to metastatic spread then an examination of the relevant organs would be indicated. For example, detection of axillary lymphadenopathy in a patient would warrant a breast examination.
Co-authors
Samantha Ellis
Junior doctor and Teaching Fellow in Haematology
Chris Warner
Medical student at the University of Manchester
Illustrator
Aisha Ali
Medical student and illustrator
Reviewers
Dr Adam Gibb
Clinical Research Fellow in Lymphoma at The Christie Hospital
Dr Mark Rafferty
Haematology Registrar (ST7)
References
- Bromberg, M. 2017. Assessment of lymphadenopathy. BMJ Best Practice. Accessed Jan 2018. Available from: [LINK].
- Tidy, C. 2014. Generalised Lymphadenopathy. Patient UK. Accessed Jan 2018. Available from: [LINK].
- Rosenberg S. Lymph Node Exam Findings stanford.edu. Available from: [LINK].
- Besa E. Chronic Myelogenous Leukemia (CML) Clinical Presentation Available from: [LINK].
- James Heilman, MD. Adapted by Geeky Medics. Peripheral pallor. Licence: CC BY-SA.
- Mdscottis. Adapted by Geeky Medics. Oral petechiae. Licence: CC BY-SA.
- DrFO.Jr.Tn. Adapted by Geeky Medics. Petechial rash. Licence: CC BY-SA.
- Adapted by Geeky Medics. Coronation Dental Specialty Group. Lymphadenopathy. Licence: CC BY-SA.
- Anandselvam85. Adapted by Geeky Medics. Hepatomegaly. Licence: CC BY-SA.
- Stefania Leoni, Dora Buonfrate, Andrea Angheben, Federico Gobbi, Zeno Bisoffi. Adapted by Geeky Medics. Splenomegaly. Licence: CC BY 4.0.
- PanaromicTiger. Adapted by Geeky Medics. Striae. Licence: CC BY-SA.
