- 📖 Geeky Medics OSCE Book
- ⚡ Geeky Medics Bundles
- ✨ 1300+ OSCE Stations
- ✅ OSCE Checklist PDF Booklet
- 🧠 UKMLA AKT Question Bank
- 💊 PSA Question Bank
- 💉 Clinical Skills App
- 🗂️ Flashcard Collections | OSCE, Medicine, Surgery, Anatomy
- 💬 SCA Cases for MRCGP
To be the first to know about our latest videos subscribe to our YouTube channel 🙌
This paediatric basic life support (BLS) OSCE guide aims to provide an overview of performing paediatric cardiopulmonary resuscitation (CPR) in a hospital setting. The guide is based on the Resuscitation Council (UK) guidance and is intended only for students preparing for their OSCE exams and not for patient care.
Definitions
According to the Resuscitation Council UK guidelines:1
- An infant is under 1 year old
- A child is between 1 year and 18 years of age
Chain of survival
The chain of survival concept emphasises key interventions that, if optimised, maximise the chance of survival.2
The four links the chain of survival consist of are:
- Early recognition and call for help
- Early CPR
- Early defibrillation
- Early advanced cardiac life support
It should be noted that the causes of cardiorespiratory arrest in children and infants are most commonly due to decompensated respiratory arrest (or circulatory failure causing hypoxia).
Ensure personal safety
First, check for danger. Look at the patient’s surroundings before approaching. If you are injured you cannot help the patient!
Put on gloves (and other personal protective equipment) as soon as possible.
Be careful with sharps during resuscitation.
Checking for a response
The first step is to assess for a response.
In a child gently shake the patient’s shoulders or in an infant gently stimulate their chest and ask loudly “Hello can you hear me?” or “Are you alright?”.
If they respond, leave the child in the same position (if safe) and arrange an urgent medical review with a full ABCDE assessment.
No response from the patient
Get help
If the child doesn’t respond, shout for help.
Commence assessment of breathing and circulation and perform interventions. If still no response after one minute, then activate the emergency services if no one else has done so (unlike in adults when you go to activate emergency services immediately).
If there is a second rescuer, they should contact emergency medical services outside of the hospital (e.g. 999 in the UK) or the resuscitation team in an NHS hospital (e.g 2222).
Position the patient and inspect the airway
Position the patient on their back and open the airway.
Inspect the airway for obvious obstruction. Only remove obstructions that are visible and accessible (do not perform a blind finger sweep).
Head-tilt chin-lift manoeuvre
Open their airway using a head-tilt chin-lift manoeuvre:
- Place one hand on the patient’s forehead and gently tilt the head back.
- Place your fingertips under the child’s chin and lift.
Jaw thrust
If the patient is a child with suspected significant trauma (with potential spinal involvement) perform a jaw-thrust rather than a head-tilt chin-lift manoeuvre:
- Identify the angle of the mandible.
- With the index and other fingers placed behind the angle of the mandible, apply steady upwards and forward pressure to lift the mandible.
- Using the thumbs, slightly open the mouth by downward displacement of the chin.
Assess for signs of life
With the airway held open (using the head-tilt and chin-lift manoeuvre), position your head looking down towards the chest, with your cheek above the patient’s mouth.
In paediatric life support, the assessment of breathing and other signs of life are more reliable than a pulse check. You can assess pulse, but this must be done simultaneously with the breathing assessment.
Assess breathing
Look, listen and feel to assess if the patient is breathing for 10 seconds.
Expose the patient’s chest if possible:
- Look at the chest for rising and falling
- Listen for any evidence of breath sounds
- Feel for air blowing against your cheek
Look for any other signs of life (e.g. movement).
Infrequent and noisy gasps do not count as normal breathing (this may occur in the first few minutes after cardiac arrest).
Pulse check
The location of the pulse check depends on the age of the patient:
- In an infant, check for femoral pulses
- In a child, check for carotid pulses
Place two fingers over the artery to assess for a pulse at the same time.
Note that a pulse <60bpm in a child is treated the same as no pulse.
The child is breathing normally
Place the child in the recovery position and maintain an open airway and call for help.
Continue to reassess.
The child’s breathing is abnormal or absent
Commence basic life support with five initial rescue breaths.
No signs of life
Call the resuscitation team (2222)
If there are no signs of life, or you are unsure then you should start basic life support and call the resuscitation team (if not already done).
In an NHS hospital, call 2222 to request urgent input from the resuscitation team. You should state:
- Your location (e.g. ward)
- Type of cardiac arrest (e.g. infant or child)
If you are alone, commence one minute of CPR before calling for help. If you are not alone, one person should commence CPR whilst the other gets help.
Five initial rescue breaths
If the child isn’t breathing, the first step is to deliver five rescue breaths.
If there is immediate access to a bag valve mask (for example, in a hospital), this should be used. If not, a pocket mask might be more useful in an older child.
If there is no immediate access to medical equipment, provide manual rescue breaths.
Positioning of the child’s head
The ideal position of the head varies depending on age.
For an infant:
- Place an infant’s head in the neutral position (avoid over-extension)
- Take a breath, cover the mouth and nose of the infant with your mouth and blow steadily for 1 second (ensuring a good seal by looking for chest rise).
For a child:
- Place a child’s head in the ‘sniffing position’
- Take a breath, cover the mouth of the child with your mouth and pinch the nose. Blow steadily for 1 second (ensuring a good seal by looking for chest rise).
Repeat this sequence four times. If after five attempts to achieve effective breaths, you are unsuccessful, move on.
If you are confident you have detected signs of life following five initial rescue breaths, place the child in the recovery position, maintain the airway and seek urgent medical help.
If no signs of life are present, commence chest compressions.
Perform chest compressions
Delivery of chest compressions: 15 chest compressions followed by 2 ventilations and repeat.
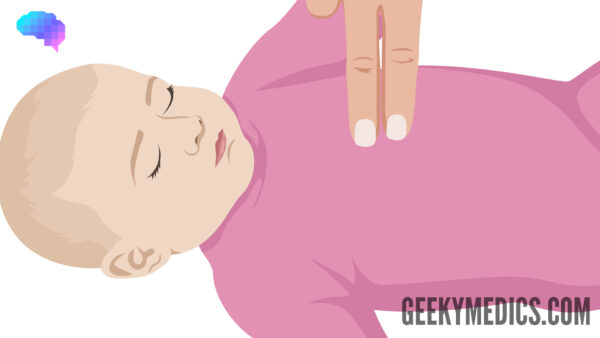
For an infant (single rescuer)
Use the two-finger technique (Figure 1). Compress the lower sternum with the tips of your two fingers (index and middle).
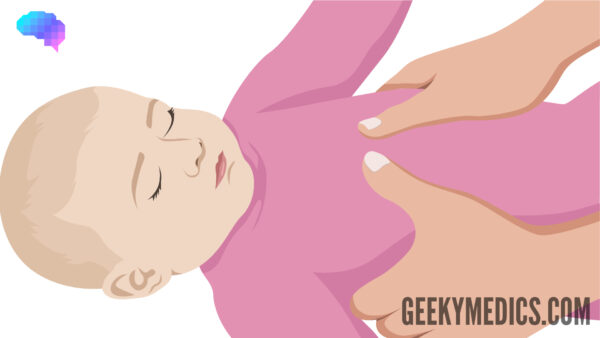
For an infant (two rescuers)
Use the encircling technique (Figure 2):
- Place both thumbs flat, side-by-side, on the lower half of the sternum, with the tips pointing towards the infant’s head. Spread the rest of both hands to encircle the infant’s ribcage; the tips of the fingers support the infant’s back.
- Press down on the lower sternum with your two thumbs to depress it. For very small infants, the thumbs may overlap.
For a child over one year
The technique will depend on the size of the child:
- For a small child, place the heel of one hand over the lower half of the sternum. Do not apply pressure over the child’s ribs; lift your fingers.
- For a larger child, you may use two hands with your fingers interlocked (as per adult basic life support)
Position yourself vertically over the child’s chest. Your arm should be straight (do not bend at the elbow with each compression).
If more than one person is present, alternate the person performing chest compressions at 2-minute intervals.
High-quality chest compressions
Requirements for high-quality chest compressions:
- Position: on a flat, hard surface
- Rate: 100-120bpm
- Depth: depress 1/3 of the anterior-posterior dimension of the chest. In an infant, this is roughly 4cm and in a child is roughly 5cm.
- Location: lower ½ sternum
- Allow for adequate recoil of the chest after each compression
- It is essential to minimise interruptions to chest compressions.
Ventilating the patient
Using the same airway manoeuvres as for the five rescue breaths, open the airway.
If available, use a pocket mask or a bag-valve-mask (BVM) and place it over the child’s nose and mouth. If unavailable, place your mouth tightly over the patient’s mouth (and nose if an infant).
Deliver 2 breaths. You should squeeze the bag or blow for approximately 1 second.
It is important to get a good seal; watch the chest to ensure it rises.
Then perform the next cycle of 15 chest compressions.
As soon as available, use supplementary oxygen.
Mouth-to-mouth ventilation
If there are clinical reasons to avoid mouth-to-mouth ventilation (e.g. to avoid infectious disease transmission), perform chest compressions until help and airway equipment arrives.
Advanced life support would be commenced once the resuscitation team arrives.
Defibrillation using an AED
Attach the AED
In public places look for an automated external defibrillator (AED). It is important to attach the 2 self-adhesive pads immediately to the patient’s chest.
There will be a diagram explaining where to put the pads on a child. This is different for a small child compared to an adult; a positioning known as anterior-posterior (AP).
- ADHESIVE PAD 1: typically on the front of the upper chest; between the nipples (anterior)
- ADHESIVE PAD 2: typically on the upper back; between shoulder blades (posterior).
Turn on the AED
Turn on the AED and follow the audio-visual instructions (these may not be the same for every AED so listen carefully):
- Typically, the AED will ask you to pause chest compressions whilst it performs a rhythm check.
- It will then indicate if the rhythm is shockable or non-shockable. If it is shockable, it will instruct you to deliver a shock.
- If a shock needs to be delivered, ensure you and no one else is in contact with the patient and press the deliver shock button on the AED.
- Re-commence CPR after the shock is delivered.
- Follow any further instructions from the AED.
Advanced life support would be commenced once the resuscitation team arrives.
Cessation of resuscitation
You should continue resuscitation with 15:2 compressions and ventilation breaths until one of three things happen:
- There are signs of life (e.g. coughing, movement)
- The arrival of further qualified help
- You become exhausted
Signs of life or response to treatment
Urgent medical assessment
A child with a return of spontaneous circulation (ROSC) requires immediate medical attention.
An urgent medical assessment by a dedicated medical emergency team is required. This may be the resuscitation team for cardiac arrest or a dedicated paediatric medical emergency team.
Assess ABCDE
Re-assess the patient using a structured ABCDE approach:
- Airway: ensure the airway is patent.
- Breathing: administer oxygen and monitor SpO2 using pulse oximetry.
- Circulation: record blood pressure, obtain venous access and attach ECG monitoring.
- Disability: assess AVPU/pGCS and check the patient’s capillary blood glucose.
- Exposure: inspect for evidence of trauma or other pathology (e.g. rash, temp or bleeding).
Handover
Handover to the attending medical teams (e.g. the resuscitation team) using an SBAR handover.
Reviewer
Consultant paediatric anaesthetist
Editor
Dr Chris Jefferies
References
- Resuscitation Council UK. Paediatric basic life support Guidelines. 2021. Available from: [LINK]
- J Nolan, J Soar, H Eikeland. The chain of survival. 2006. Available from: [LINK]


