

- 📖 Geeky Medics OSCE Book
- ⚡ Geeky Medics Bundles
- ✨ 1300+ OSCE Stations
- ✅ OSCE Checklist PDF Booklet
- 🧠 UKMLA AKT Question Bank
- 💊 PSA Question Bank
- 💉 Clinical Skills App
- 🗂️ Flashcard Collections | OSCE, Medicine, Surgery, Anatomy
- 💬 SCA Cases for MRCGP
To be the first to know about our latest videos subscribe to our YouTube channel 🙌
pGALS examination (paediatric gait, arms, legs and spine), is often used as a quick screening tool to detect locomotor abnormalities and functional disability in a child. This pGALS examination OSCE guide provides a clear step-by-step approach to performing the assessment, with an included video demonstration (showing adult GALS).
Differences between pGALS and adult GALS exam
The pGALS examination sequence is much the same as the adult GALS assessment with some additional manoeuvres and amendments.
Further assessment of the foot and ankle: the child is asked to walk on their heels and then on their tiptoes.
Assessment of the temporomandibular joints: the child is asked to insert three of their fingers into their mouth.
Assessment of the elbow: the child is asked to “reach up and touch the sky”.
Assessment of the cervical spine: the child is asked to look up at the ceiling.
Introduction
Wash your hands and don PPE if appropriate.
Introduce yourself to the parents and child including your name and role.
Confirm the child’s name and date of birth.
Briefly explain what the examination will involve using child-friendly language.
Gain consent from the parents and child to proceed with the examination.
Adequately expose the child (ideally the child should wear only shorts and undergarments).
Position the child standing.
Throughout the pGALS assessment, you should adopt a “copy me” approach, where you first demonstrate what you want the child to do and then ask them to copy you. This is easier for the child to follow than a sequence of verbal instructions.
Look for non-verbal clues of discomfort (e.g. grimacing) throughout the assessment.
Screening questions
Part of the pGALS assessment involves asking three screening questions to identify potential joint pathology, fine motor impairment and gross motor deficits.
Questions
First question
“Do you have any pain or stiffness in your muscles, joints or back?”
This question screens for common symptoms present in most forms of joint pathology (e.g. osteoarthritis, rheumatoid arthritis, ankylosing spondylitis).
Second question
“Do you have any difficulty getting yourself dressed without any help?”
This question screens for evidence of fine motor impairment and significant restriction joint range of movement.
Third question
“Do you have any problem going up and down the stairs?”
This question screens for evidence of impaired gross motor function (e.g. muscle wasting, lower motor neuron lesions) and general mobility issues (e.g. restricted range of movement in the joints of the lower limb).
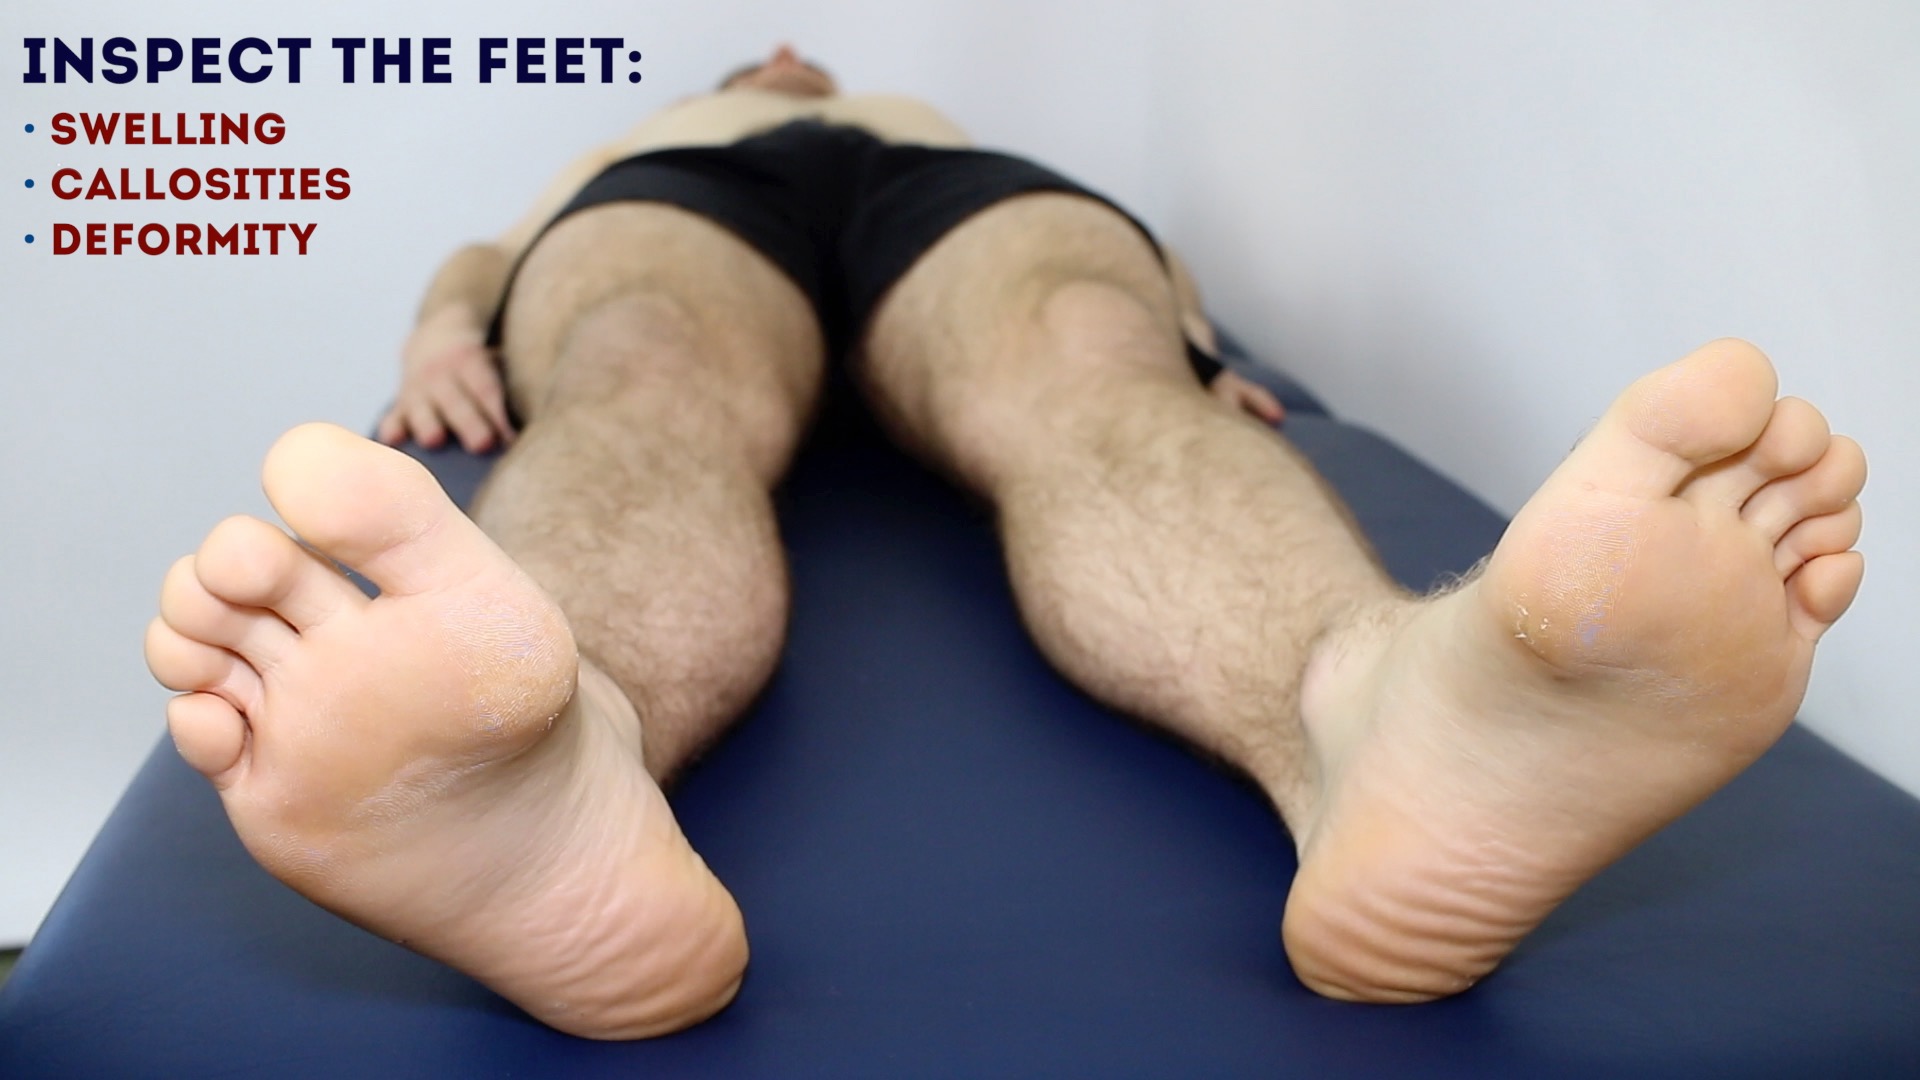
Inspection
General inspection
Clinical signs
Perform a brief general inspection of the child, looking for clinical signs suggestive of underlying pathology:
- Body habitus: obese children at a higher risk of developing slipped capital femoral epiphysis and thin malnourished children are at risk of osteomalacia.
- Scars: may provide clues regarding previous surgery.
- Wasting of muscles: suggestive of disuse atrophy secondary to joint pathology or a lower motor neuron injury.
- Psoriasis: typically presents with scaly salmon coloured plaques on extensor surfaces (associated with psoriatic arthritis).
Objects or equipment
Look for objects or equipment on or around the child that may provide useful insights into their medical history and current clinical status:
- Aids and adaptations: examples include support slings, splints, walking aids and wheelchairs.
- Prescriptions: prescribing charts or personal prescriptions can provide useful information about the child’s recent medications (e.g. analgesia).
Closer inspection
Ask the child to stand in the anatomical position and turn in 90° increments as you inspect from each angle for evidence of pathology.
Anterior inspection
Inspect the child from the front noting any abnormalities:
- Posture: note any asymmetry which may indicate joint pathology or scoliosis.
- Scars: note the location of any scars as they may provide clues as to the child’s previous surgical history and/or indicate previous joint trauma.
- Leg length discrepancy: may be congenital or secondary to joint pathology (e.g. Legg-Calve-Perthes, slipped capital femoral epiphysis and developmental dysplasia of the hip).
- Joint swelling: note any evidence of asymmetry in the size of joints that may suggest unilateral swelling (e.g. effusion, inflammatory arthropathy, septic arthritis).
- Joint erythema: suggestive of active inflammation (e.g. inflammatory arthropathy or septic arthritis).
- Muscle bulk: note any asymmetry in upper and lower limb muscle bulk (e.g. deltoids, pectorals, biceps brachii, quadriceps femoris). Asymmetry may be caused by disuse atrophy (secondary to joint pathology) or lower motor neuron injury. Quadriceps hypertrophy is associated with Osgood-Schlatter disease.
- Elbow extension: inspect the child’s carrying angle which should be between 5-15°. An increased carrying angle is known as cubitus valgus. Cubitus valgus is typically associated with previous elbow joint trauma or congenital deformity (e.g. Turner’s syndrome). A decreased carrying angle is known as cubitus varus or ‘gunstock deformity’. Cubitus varus typically develops after supracondylar fracture of the humerus.
- Valgus joint deformity: the bone segment distal to the joint is angled laterally. In valgus deformity of the knee, the tibia is turned outward in relation to the femur, resulting in the knees ‘knocking’ together.
- Varus joint deformity: the bone segment distal to the joint is angled medially. In varus deformity of the knee, the tibia is turned inward in relation to the femur, resulting in a bowlegged appearance.
- Pelvic tilt: lateral pelvic tilt can be caused by scoliosis, leg length discrepancy or hip abductor weakness.
- Fixed flexion deformity of the toes: subtypes include hammer-toe and mallet-toe.
- Big toe: note any evidence of lateral (hallux valgus) or medial (hallux varus) angulation.
 Inspect from the front


Lateral inspection
Inspect the child from the side noting any abnormalities:
- Cervical lordosis: hyperlordosis is associated with chronic degenerative joint disease (e.g. osteoarthritis).
- Thoracic kyphosis: the normal amount of thoracic kyphosis is typically between 20-45º. Hyperkyphosis is associated with Scheuermann’s disease (congenital wedging of the vertebrae).
- Lumbar lordosis: loss of normal lumbar lordosis suggests sacroiliac joint disease (e.g. ankylosing spondylitis).
- Knee joint hyperextension: causes include ligamentous damage and hypermobility syndrome.
- Foot arch: inspect for evidence of flat feet (pes planus) or an abnormally raised foot arch (pes cavus).
- Inspect from the side


Posterior inspection
Inspect the child from the behind noting any abnormalities:
- Muscle bulk: note any asymmetry in upper and lower limb muscle bulk (e.g. deltoid, trapezius, triceps brachii, gluteal muscles, hamstrings, calves). Asymmetry may be caused by disuse atrophy (secondary to joint pathology) or lower motor neuron injury.
- Spinal alignment: inspect for lateral curvature of the spine suggestive of scoliosis.
- Iliac crest alignment: misalignment may indicate a leg length discrepancy or hip abductor weakness.
- Popliteal swellings: possible causes include a Baker’s cyst or popliteal aneurysm (typically pulsatile).
- Achille’s tendon thickening: associated with Achille’s tendonitis.
- Valgus joint deformity: the bone segment distal to the joint is angled laterally. In valgus deformity of the ankle, the foot is turned outward in relation to the tibia.
- Varus joint deformity: the bone segment distal to the joint is angled medially. In varus deformity of the ankle, the foot is turned inward in relation to the tibia.
- Inspect from behind


Gait
Standard gait assessment
Ask the child to walk to the end of the examination room and then turn and walk back whilst you observe their gait paying attention to:
- Gait cycle: note any abnormalities of the gait cycle (e.g. abnormalities in toe-off or heel strike).
- Range of movement: often reduced in the context of chronic joint pathology (e.g. osteoarthritis, inflammatory arthritis).
- Limping: may suggest joint pain (i.e. antalgic gait) or weakness.
- Leg length: note any discrepancy which may be the cause or the result of joint pathology.
- Turning: children with joint disease may turn slowly due to restrictions in joint range of movement or instability.
- Trendelenburg’s gait: an abnormal gait caused by unilateral weakness of the hip abductor muscles secondary to a superior gluteal nerve lesion or L5 radiculopathy.
- Waddling gait: an abnormal gait caused by bilateral weakness of the hip abductor muscles, typically associated with myopathies (e.g. muscular dystrophy).
- Assess the child’s footwear: unequal sole wearing is suggestive of an abnormal gait.
Heel and tiptoe walking
Ask the child to walk across the examination room again but this time using their heels and then again using their tiptoes.
Note the presence (or absence) of the longitudinal arches of the feet when the child is on their tiptoes. The presence of flat feet (pes planus) is normal in young children, but the medial longitudinal arches of the foot should be visible when the child stands on their tiptoes.
Assessing gait in this way screens for pathology in the ankles joints, subtalar joints, midtarsal joints and the smaller joints of the feet and toes.
- Observe gait 12


Gait cycle
The gait cycle has six phases:
- Heel-strike: initial contact of the heel with the floor.
- Foot flat: weight is transferred onto this leg.
- Mid-stance: the weight is aligned and balanced on this leg.
- Heel-off: the heel lifts off the floor as the foot rises but the toes remain in contact with the floor.
- Toe-off: as the foot continues to rise the toes lift off the floor.
- Swing: the foot swings forward and comes back into contact with the floor with a heel strike (and the gait cycle repeats).

Arms
Compound movements
Hands behind head
Ask the child to put their hands behind their head and point their elbows out to the side:
- This compound movement assesses shoulder abduction and external rotation in addition to elbow flexion.
- Restricted range of movement is suggestive of shoulder or elbow pathology (e.g. osteoarthritis).
- Excessive range of movement indicates hypermobility.
Hands held out in front with palms facing down
Ask the child to hold their hands out in front of them, with their palms facing down and fingers outstretched:
- This compound movement assesses forward flexion of the shoulders, elbow extension, wrist extension and extension of the small joints of the fingers.
Inspect the dorsum the hands for asymmetry, joint swelling and deformity.
Inspect the nails for signs associated with psoriasis (e.g. nail pitting).
Hands held out in front with palms facing up
Ask the child to turn their hands over (demonstrating supination):
- This compound movement assesses wrist and elbow supination.
- Restriction of supination is suggestive of wrist or elbow pathology (e.g. osteoarthritis).
Inspect the thenar and hypothenar eminences for evidence of muscle wasting.
Making a fist
Ask the child to make a fist whilst observing hand function:
- This movement assesses flexion of the small joints of the fingers as well as overall hand function.
- The child may be unable to make a fist if they have joint swelling (e.g. inflammatory arthritis or joint infection) or if they have other deformities of the small joints of the hands.
Precision grip
Ask the child to touch each finger in turn to their thumb (known as ‘precision grip’):
- This sequence of movements assesses co-ordination of the small joints of the fingers and thumbs.
- It also assesses overall manual dexterity (which should be interpreted in the context of the child’s age).
- Reduced manual dexterity may suggest inflammation or joint contractures of the small joints of the hand.
Hands together palm to palm
Ask the child to put their hands together palm to palm:
- This movement assesses extension of the small joints of the fingers and wrists, in addition to flexion of the elbows.
- Restriction or asymmetry of movement is suggestive of joint pathology.
- An excessive range of movement suggests hypermobility.
Hands together back to back
Ask the child to put their hands together back to back:
- This movement assesses flexion of the wrist joints and elbow joints.
- Restriction or asymmetry of movement suggests joint pathology.
- An excessive range of movement suggests hypermobility.
Reaching upwards
Ask the child to reach upwards as far as they are able (as if trying to touch the sky), whilst keeping their arms straight:
- This movement assesses elbow extension, wrist extension and shoulder abduction.
- Restriction or asymmetry of movement suggests joint pathology.
- An excessive range of movement suggests hypermobility.
Looking upwards
Ask the child to look up at the ceiling:
- This movement assesses cervical extension.
- Restriction of movement suggests joint pathology.
Metacarpophalangeal joint squeeze
Gently squeeze across the metacarpophalangeal (MCP) joints and observe for verbal and non-verbal signs of discomfort. Tenderness is suggestive of active inflammatory arthropathy.
- Ask the child to put their hands behind their neck 1


Legs
Position the child lying down on the examination couch for further assessment of the lower limbs.
Active movement
Ask the child to bring each heel in turn towards their bottom:
- This movement assesses active knee flexion.
Ask the child to straighten out each leg on the bed:
- This movement assesses active knee extension.
Passive movement
Passive movement refers to a movement of the child, controlled by the examiner. This involves the child relaxing and allowing you to move the joint freely to assess the full range of joint movement. It’s important to feel for crepitus as you move the joint (which can be associated with osteoarthritis) and observe any discomfort or restriction in the joint’s range of movement.
Passive knee flexion
Normal range of movement: 0-140°
Instructions: Whilst supporting the child’s leg, flex the knee as far as you are able, making sure to observe for signs of discomfort.
Passive knee extension
If the child is able to lay their legs flat on the bed, they are already demonstrating a normal range of movement for knee extension. To assess for hyperextension:
1. On the leg being assessed, hold above the ankle joint and gently lift the leg upwards.
2. Inspect the knee joint for evidence of hyperextension, with less than 10° being considered normal. Excessive knee hyperextension may suggest pathology affecting the integrity of the knee joint’s ligaments or hypermobility.
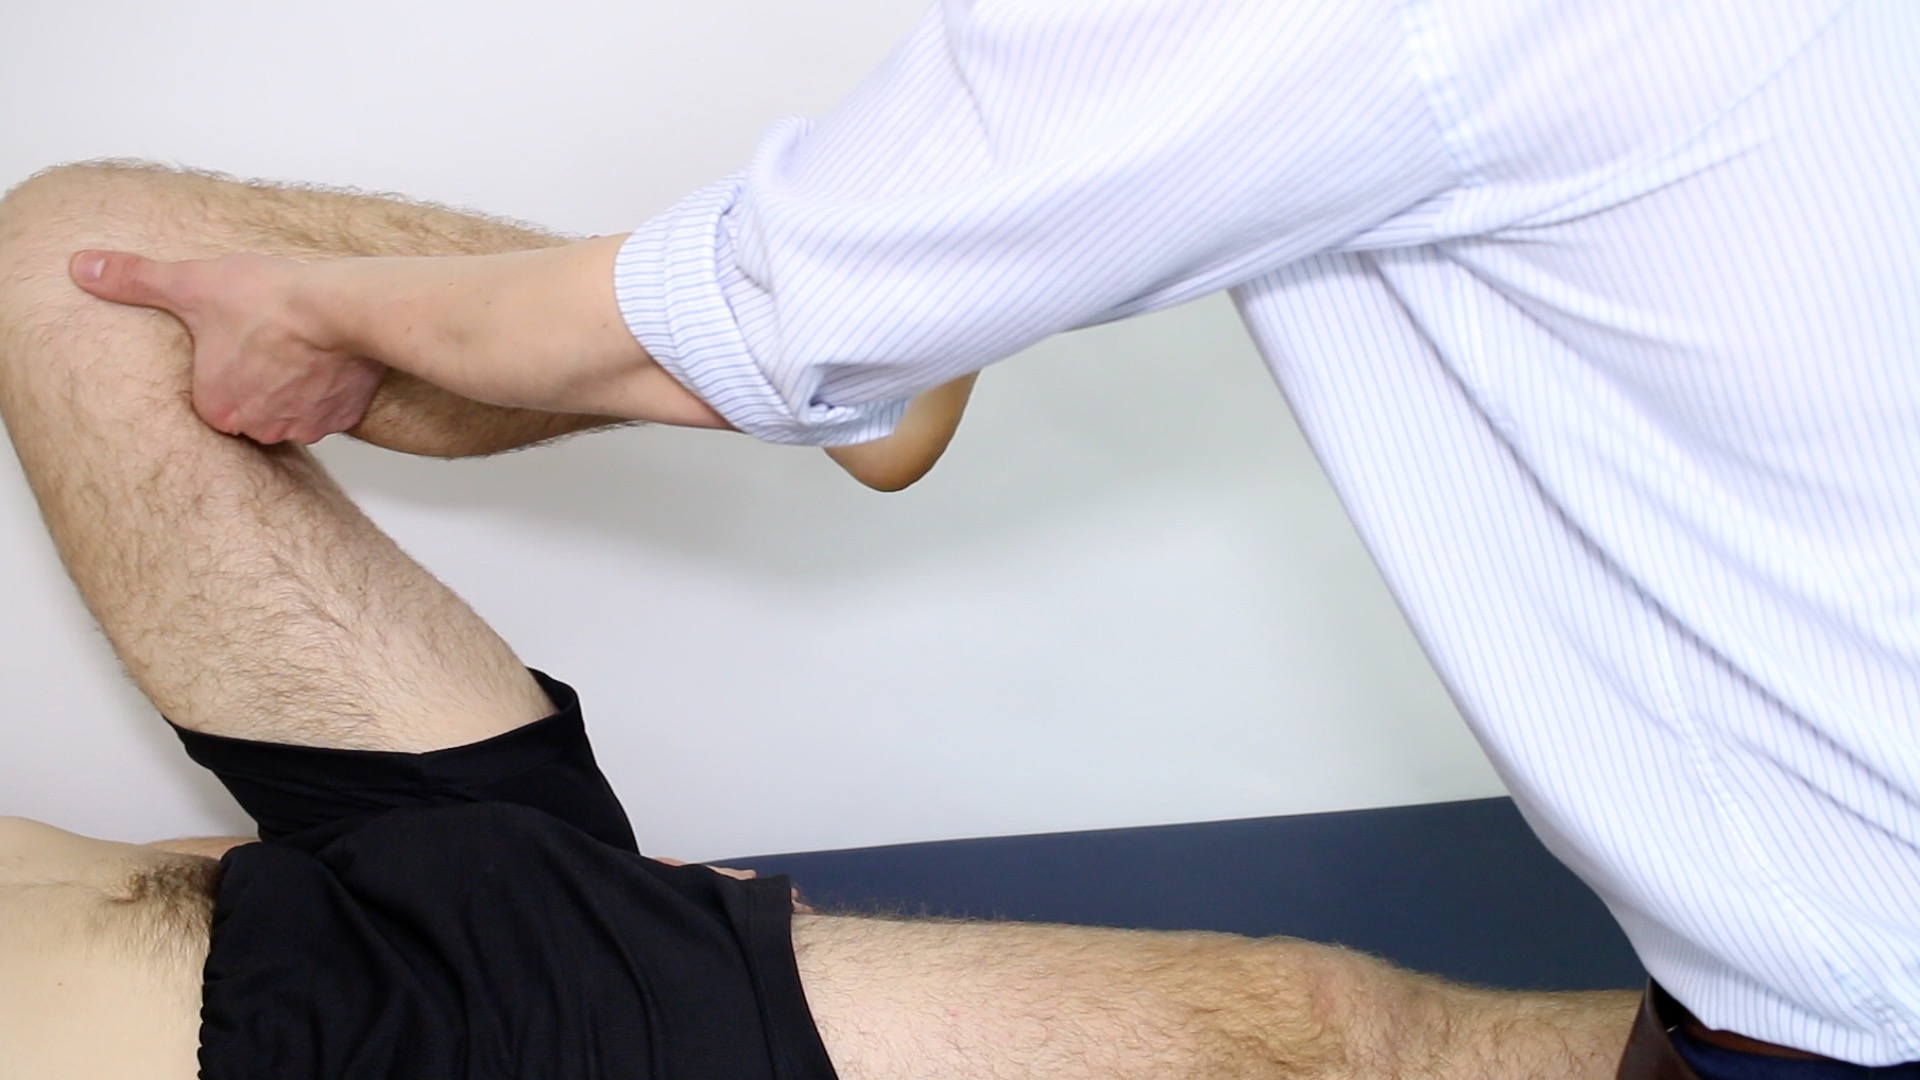
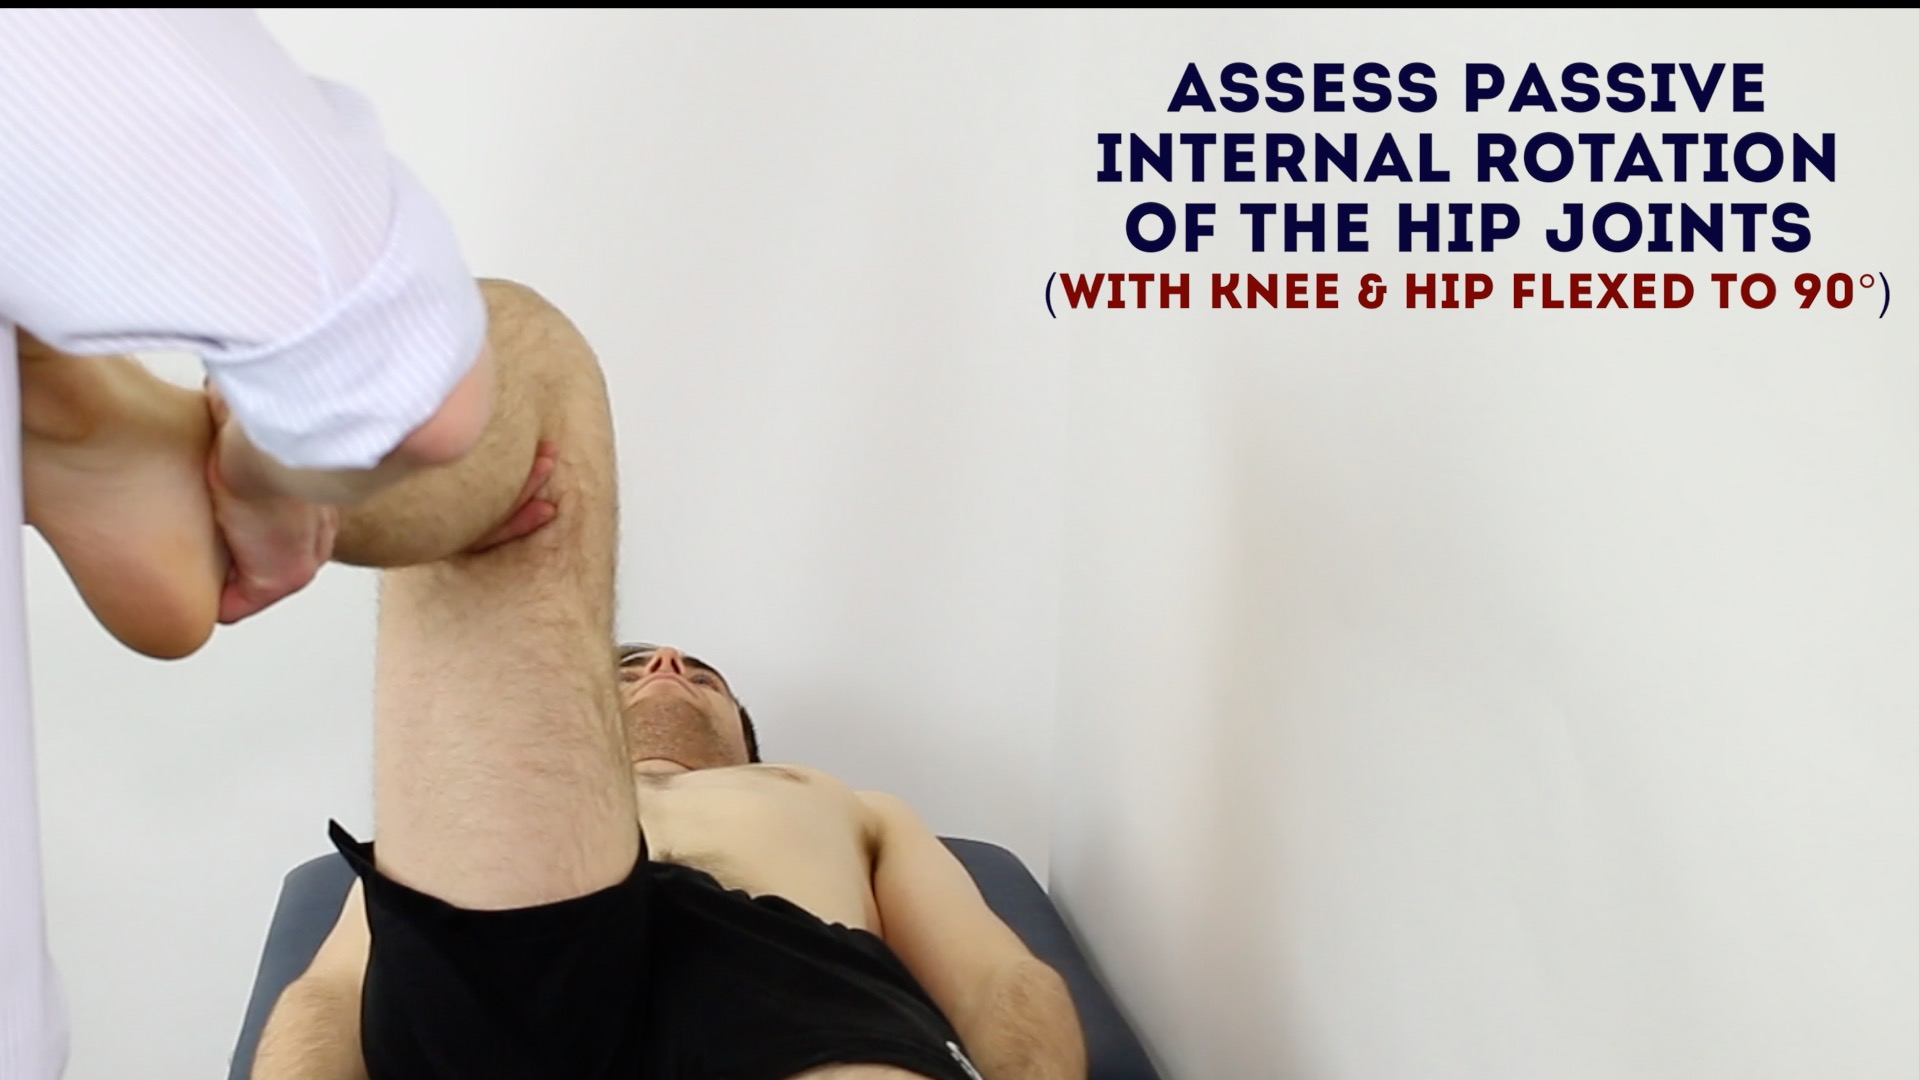
Passive internal rotation of the hip
Normal range of movement: 40°
Instructions: Flex the child’s hip and knee joint to 90° and then rotate their foot laterally.
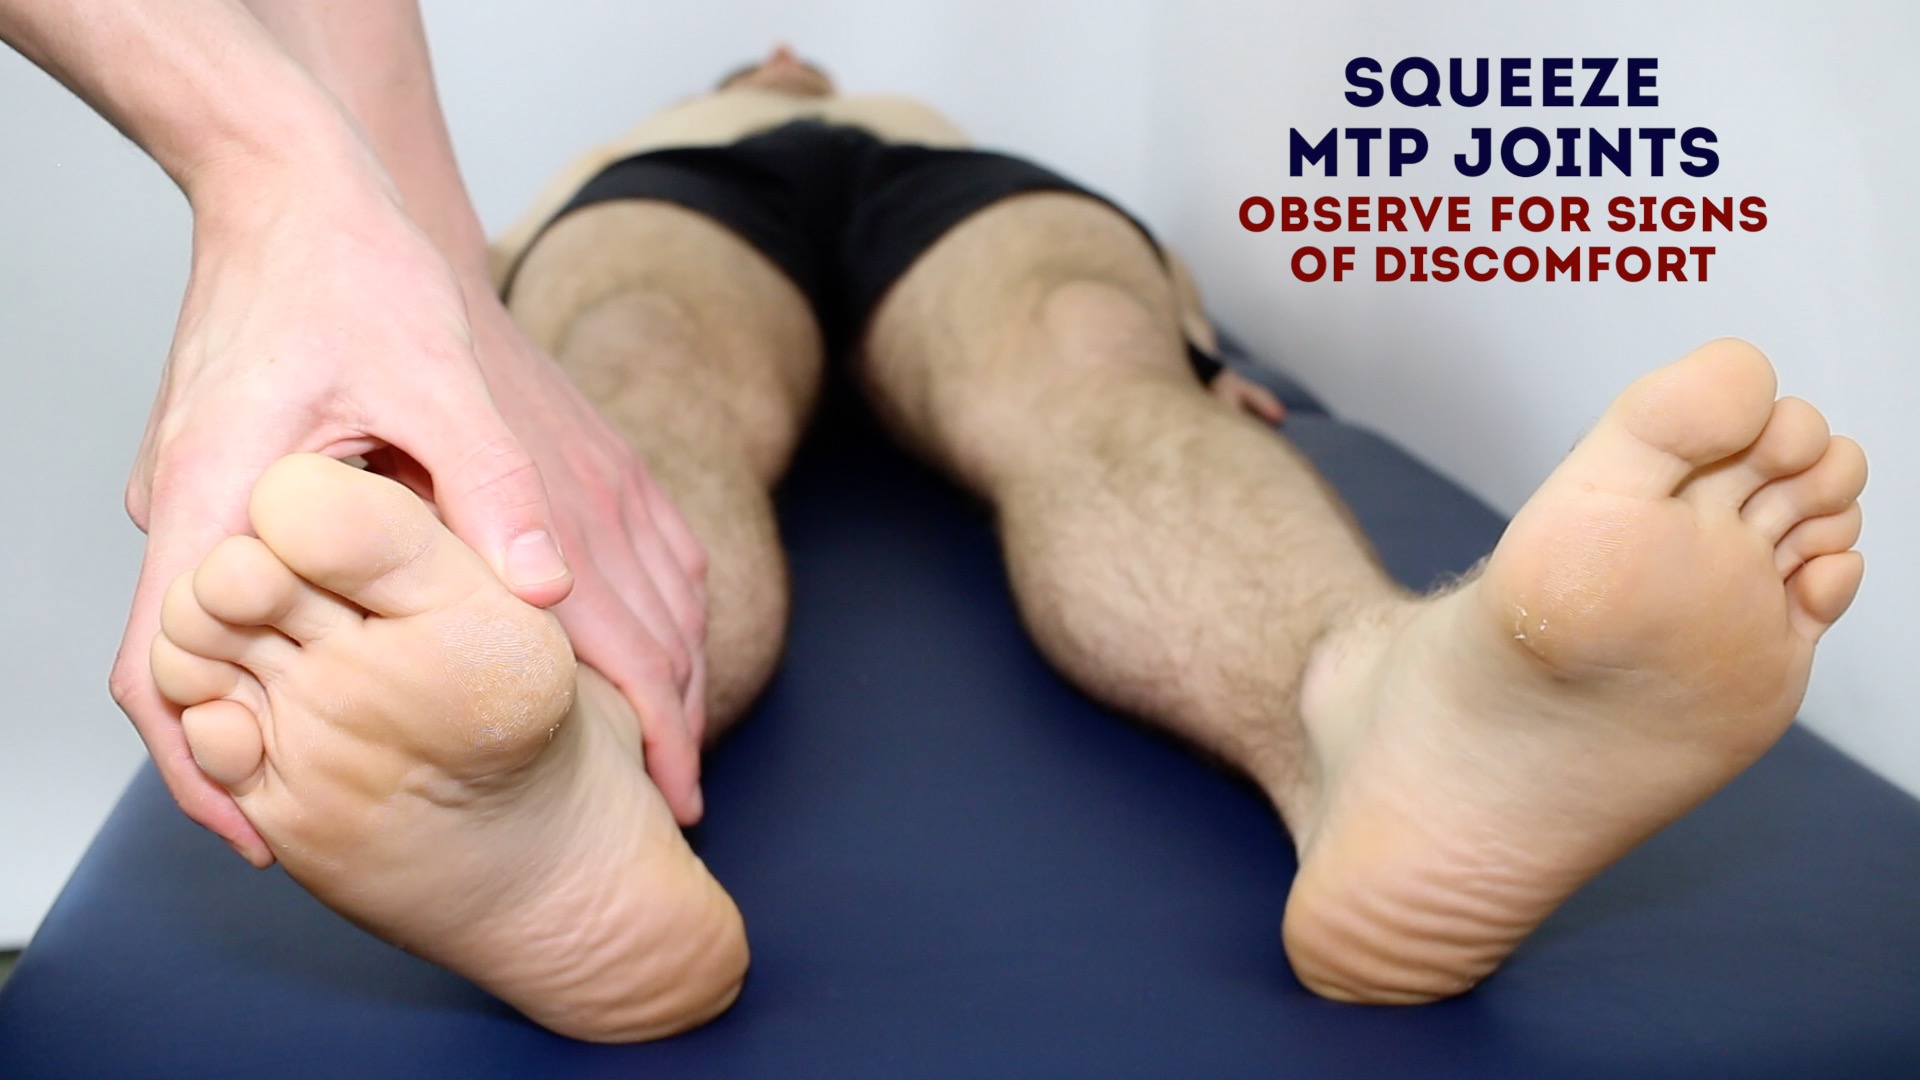
Metatarsophalangeal joint squeeze
Gently squeeze across the metatarsophalangeal (MTP) joints and observe for verbal and non-verbal signs of discomfort. Tenderness is suggestive of active inflammatory arthropathy.
- Passive knee flexion
Patellar tap
Joint effusion can be caused by ligament rupture (e.g. anterior cruciate ligament), septic arthritis, inflammatory arthritis and osteoarthritis.
The patellar tap test can be used to screen for the presence of a moderate-to-large knee joint effusion.
1. With the child’s knee fully extended, empty the suprapatellar pouch by sliding your left hand down the thigh to the upper border of the patella.
2. Keep your left hand in position and use your right hand to press downwards on the patella with your fingertips.
3. If there is fluid present you will feel a distinct tap as the patella bumps against the femur.
- Perform patellar tap

Spine
Ask the child to stand upright for this part of the assessment. Inspection of the spine does not need to be repeated if already performed.
Cervical lateral flexion
Assess lateral flexion of the cervical spine by asking the child to tilt their head to each side, moving their ear towards their shoulder: “Try and touch your shoulder to your ear on each side.”
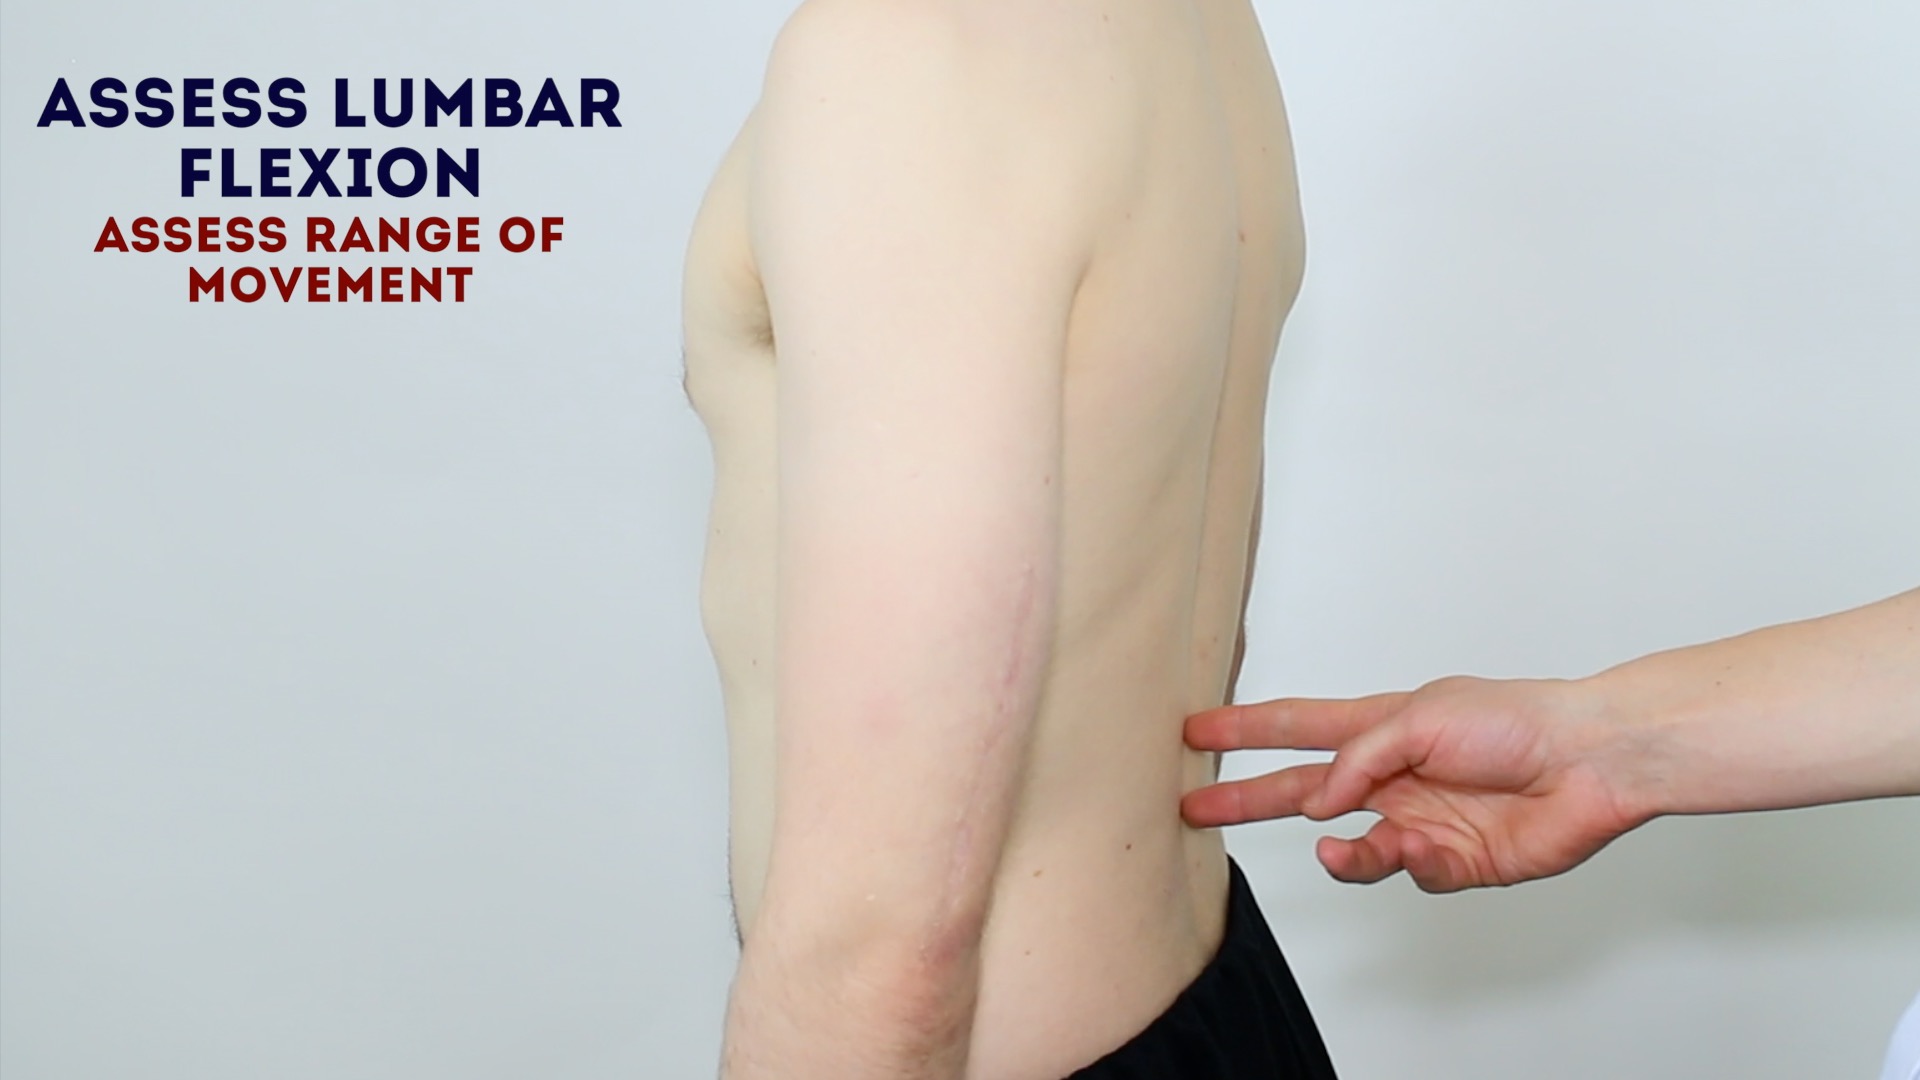
Lumbar flexion
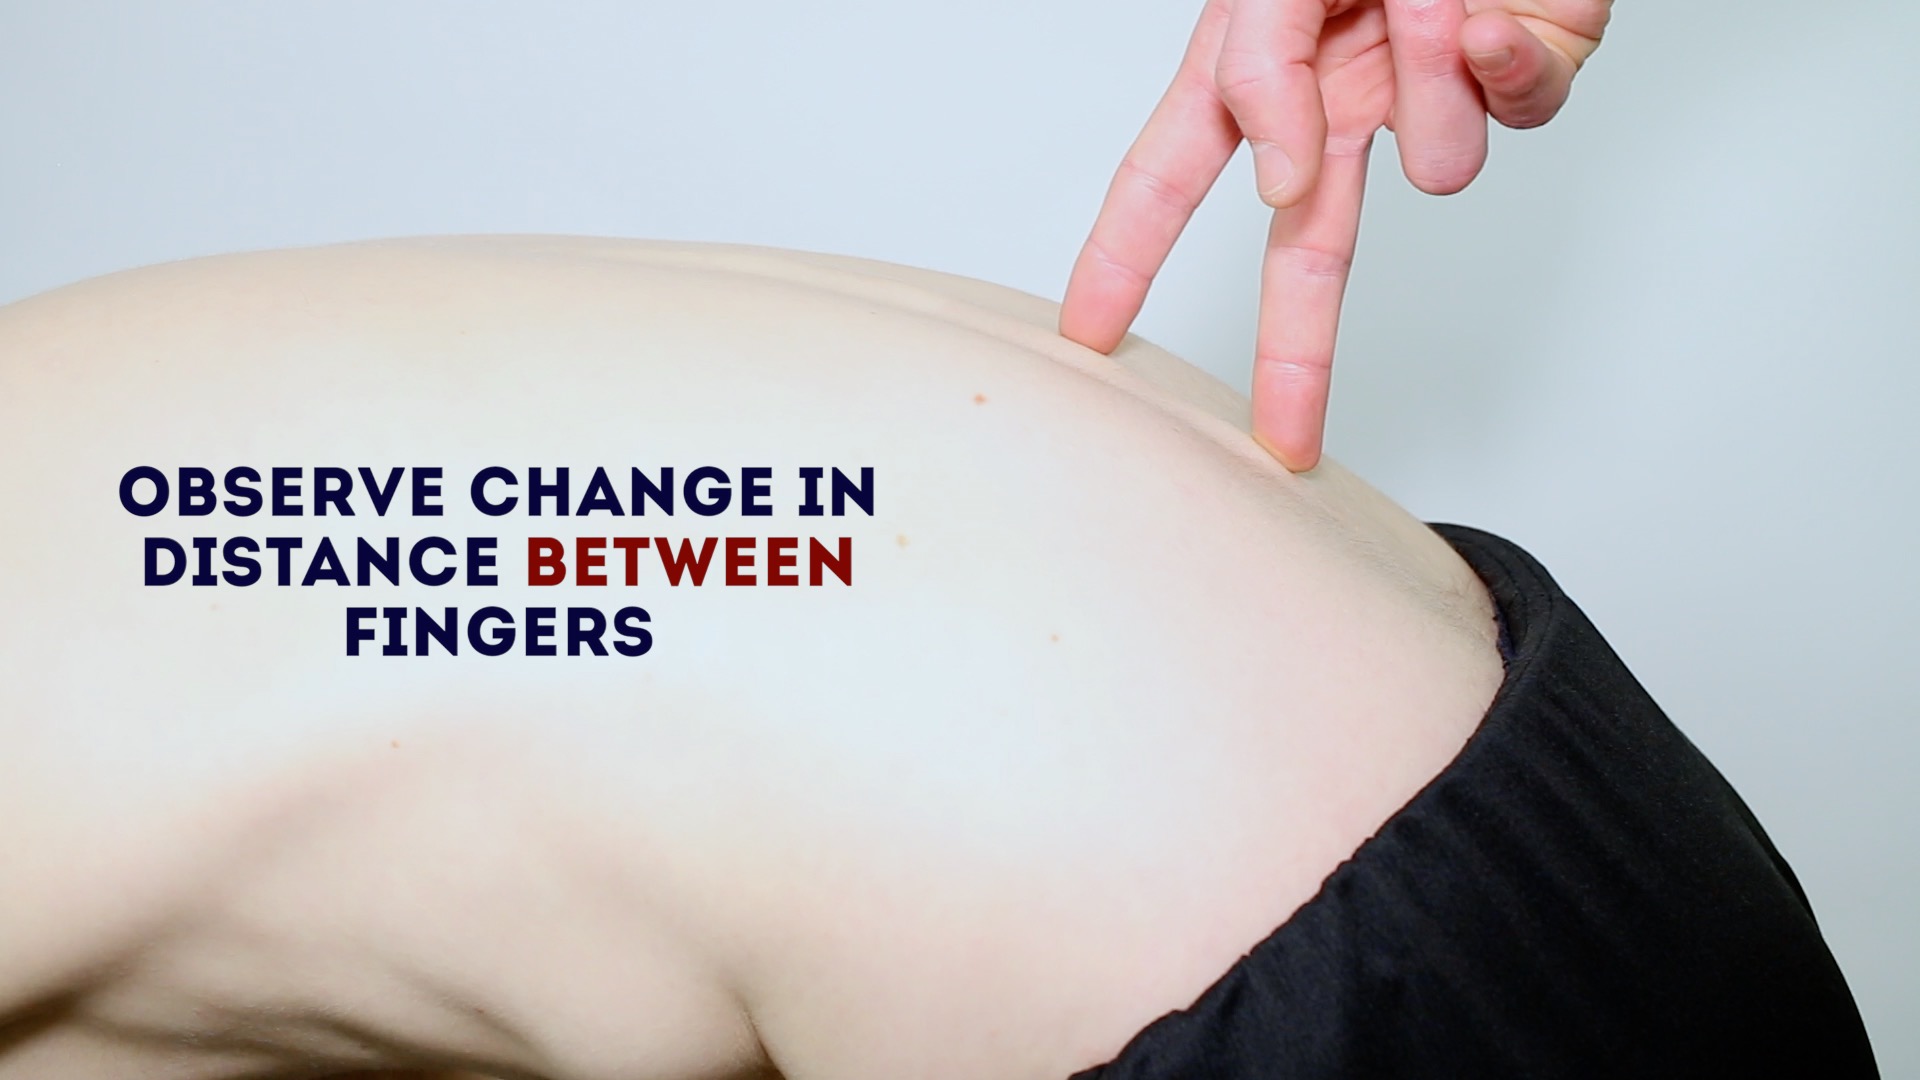
Assess the range of lumbar flexion using your fingers to palpate for a normal range of movement of the lumbar vertebrae (loss of lumbar flexion can be masked by good hip flexion, making inspection without palpation less reliable):
1. Place two of your fingers on the lumbar vertebrae approximately 5-10cm apart.
2. Ask the child to bend forwards and touch their toes.
3. Observe your fingers as the child’s lumbar spine flexes (they should move apart).
4. Observe your fingers as the child extends their spine to return to a standing position (your fingers should move back together).
If the child is able to place their hands flat on the floor it suggests joint hypermobility.
- Cervical flexion

Temporomandibular joint
To assess the temporomandibular joint (TMJ) ask the child to open their mouth wide and put three of their own fingers into their mouth (you can demonstrate using your own fingers and mouth).
This manoeuvre assesses the temporomandibular joint’s range of movement and screens for deviation of jaw movement.
Restricted jaw opening may be due to temporomandibular joint disease.
- Assess TMJ function

To complete the examination…
Explain to the child that the examination is now finished.
Thank the child and parents for their time.
Dispose of PPE appropriately and wash your hands.
Summarise your findings.
Example summary
“Today I examined John, an 11-year-old boy. On general inspection, the patient appeared comfortable at rest, with no stigmata of musculoskeletal disease. There were no objects or medical equipment around the bed of relevance.
“Assessment of the patient’s gait, arms, legs and spine were unremarkable. TMJ function was also normal.”
“In summary, these findings are consistent with a normal pGALS examination.”
“For completeness, I would like to perform the following further assessments and investigations.”
Further assessments and investigations
- A focused examination of joints with suspected pathology.
- Further imaging if indicated (e.g. X-ray and MRI).
Reviewer
Professor Helen Foster
Professor of Paediatric Rheumatology
Newcastle University, UK
Twitter: @NcleUniHFoster and @pmmonlineorg
Illustrator
Aisha Ali
Medical student and illustrator
Recommended reading
- Check out this excellent free pGALS app, produced by Paediatric Musculoskeletal Matters (PMM). It provides a comprehensive step-by-step guide to the examination, including images of relevant pathology.
- You can also see the full written guide by Paediatric Musculoskeletal Matters (PMM) here.
- Want to learn more about the pGALS assessment? Check out the free eModule produced by Professor Helen Foster in collaboration with Newcastle University.
References
- Siegertmarc. Adapted by Geeky Medics. Clavicular fracture repair. Licence: CC BY.
- James Heilman, MD. Adapted by Geeky Medics. Knee effusion. Licence: CC BY-SA.
- Mikael Häggström. Adapted by Geeky Medics. Cubitus valgus and varus. Licence: CC0.
- BioMed Central. Adapted by Geeky Medics. Valgus deformity. Licence: CC BY.
- Heilstedt HA, Bacino CA. Adapted by Geeky Medics. Lateral pelvic tilt secondary to leg length discrepancy. Licence: CC BY.
- Richard Huber. Adapted by Geeky Medics. Hammer toe. Licence: CC BY-SA.
- Lamiot. Adapted by Geeky Medics. Hallux valgus. Licence: CC BY-SA.
- Gzzz. Adapted by Geeky medics. Hallux varus. Licence: CC BY-SA.
- James Heilman, MD. Adapted by Geeky Medics. Psoriasis plaque. Licence: CC BY-SA.
- Benefros. Adapted by Geeky Medics. Pes cavus. Licence: CC BY-SA.
- Weiss HR. Adapted by Geeky Medics. Scoliosis. Licence: CC BY.
- Professor Helen Foster (Professor of Paediatric Rheumatology). Paediatric Musculoskeletal Matters (PMM) Online. Guide to pGALS assessment. Images used with permission.
- BoH. Adapted by Geeky Medics. License: CC BY-SA 4.0
