

- 📖 Geeky Medics OSCE Book
- ⚡ Geeky Medics Bundles
- ✨ 1300+ OSCE Stations
- ✅ OSCE Checklist PDF Booklet
- 🧠 UKMLA AKT Question Bank
- 💊 PSA Question Bank
- 💉 Clinical Skills App
- 🗂️ Flashcard Collections | OSCE, Medicine, Surgery, Anatomy
- 💬 SCA Cases for MRCGP
To be the first to know about our latest videos subscribe to our YouTube channel 🙌
Shoulder X-rays are common investigations in every Emergency Department, typically in the context of trauma, with shoulder dislocations being the most common pathology.
An important distinction to note is what we mean when we request a “shoulder X-ray”. In most clinical scenarios this refers to a radiograph of the glenohumeral joint. However, for the purposes of this guide, we will also include the clavicle and the acromioclavicular joint in order to form a more complete “shoulder girdle X-ray” interpretation guide.
Confirm the details
Begin by confirming you have the correct patient and the correct radiograph by assessing the following:
- Patient details (name, date of birth, unique identification number)
- Date and time the radiograph was taken
If previous radiographs are available, these should also be reviewed to provide a point of reference. This is especially important in the context of dislocations, where a history of recurrent dislocation may indicate the need for operative intervention.
Acquire all necessary views
Ideally, a shoulder radiograph series will provide adequate views of the clavicle, acromioclavicular joint (ACJ), glenohumeral joint (GHJ) and the scapula. However, it is worth being aware that if you are unable to get an adequate view of the clavicle or the scapula, more specific dedicated radiographs can be requested (e.g. an AP cephalic view of the clavicle). Whether or not these views are required will largely be dictated by the patient’s history and the findings on clinical examination.
Typical shoulder X-ray views include:
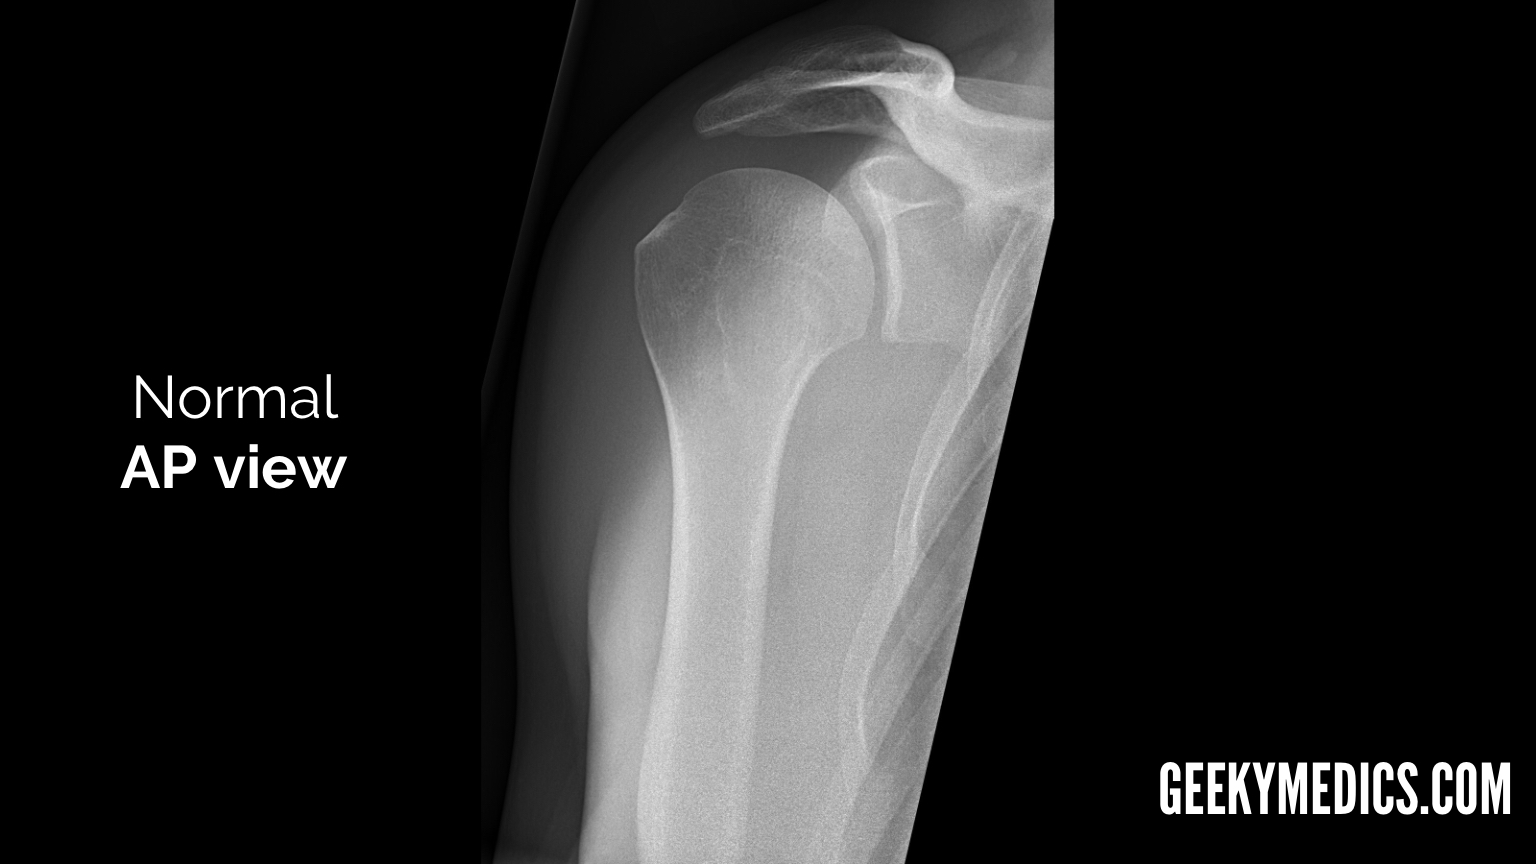
- Antero-posterior (AP) view
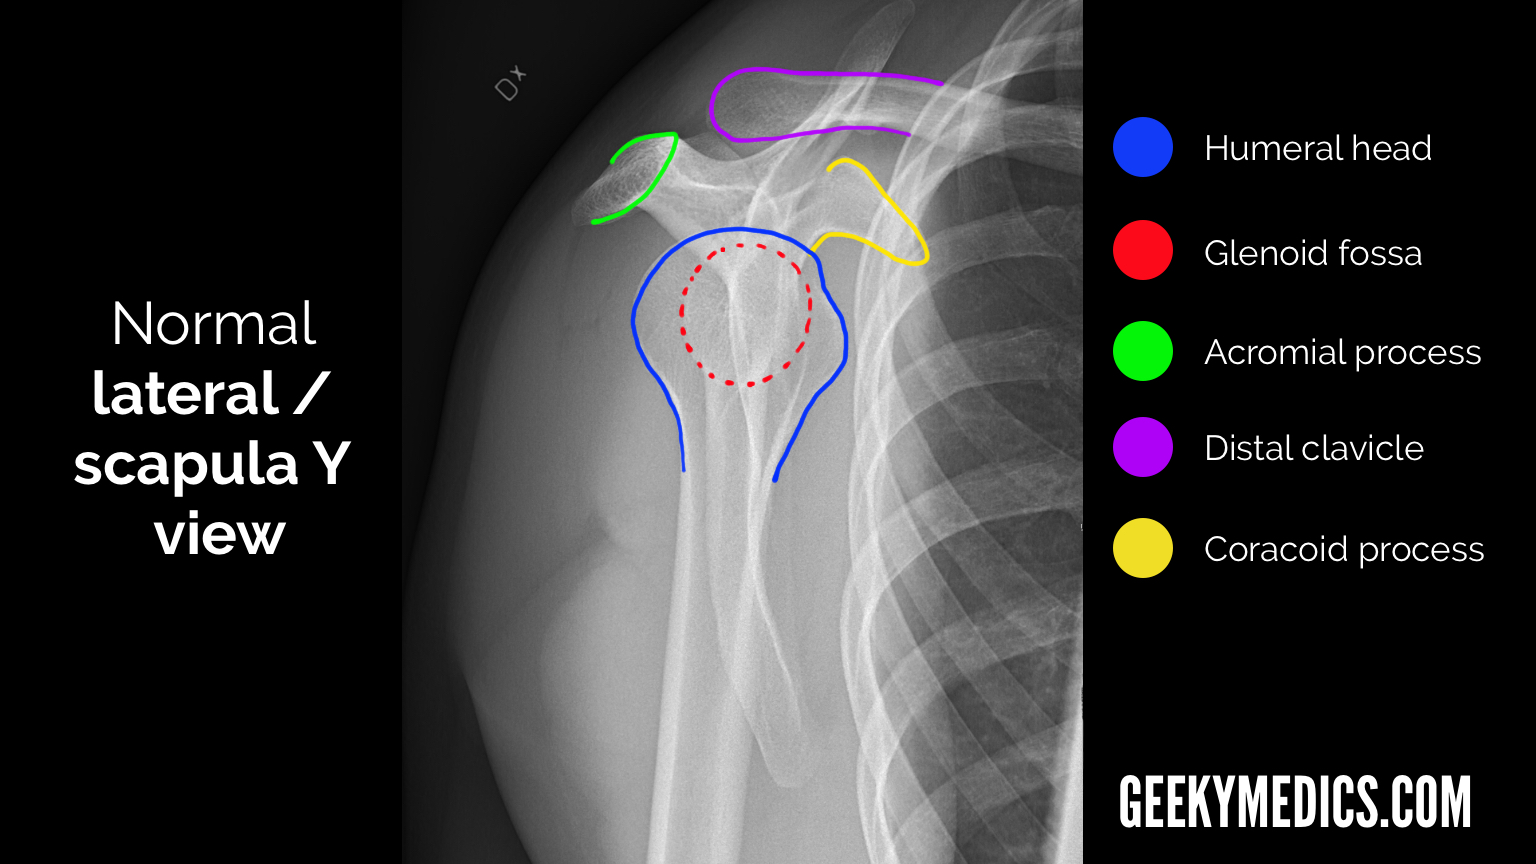
- Lateral/scapula Y view (named due to the “Y” shape of the scapula in this view)
An axial view can also be used as an alternative to the scapula Y view if the patient is unable to tolerate the positioning required to obtain this view.

Interpretation
A structured approach to shoulder X-ray interpretation is discussed below.
Adequacy
Check the radiograph’s adequacy to ensure you are able to clearly see all relevant structures.
Alignment
Given that the most common reason a shoulder X-ray is requested is to look for dislocation or successful subsequent relocation, being familiar with alignment is arguably the most important part of shoulder X-ray interpretation.
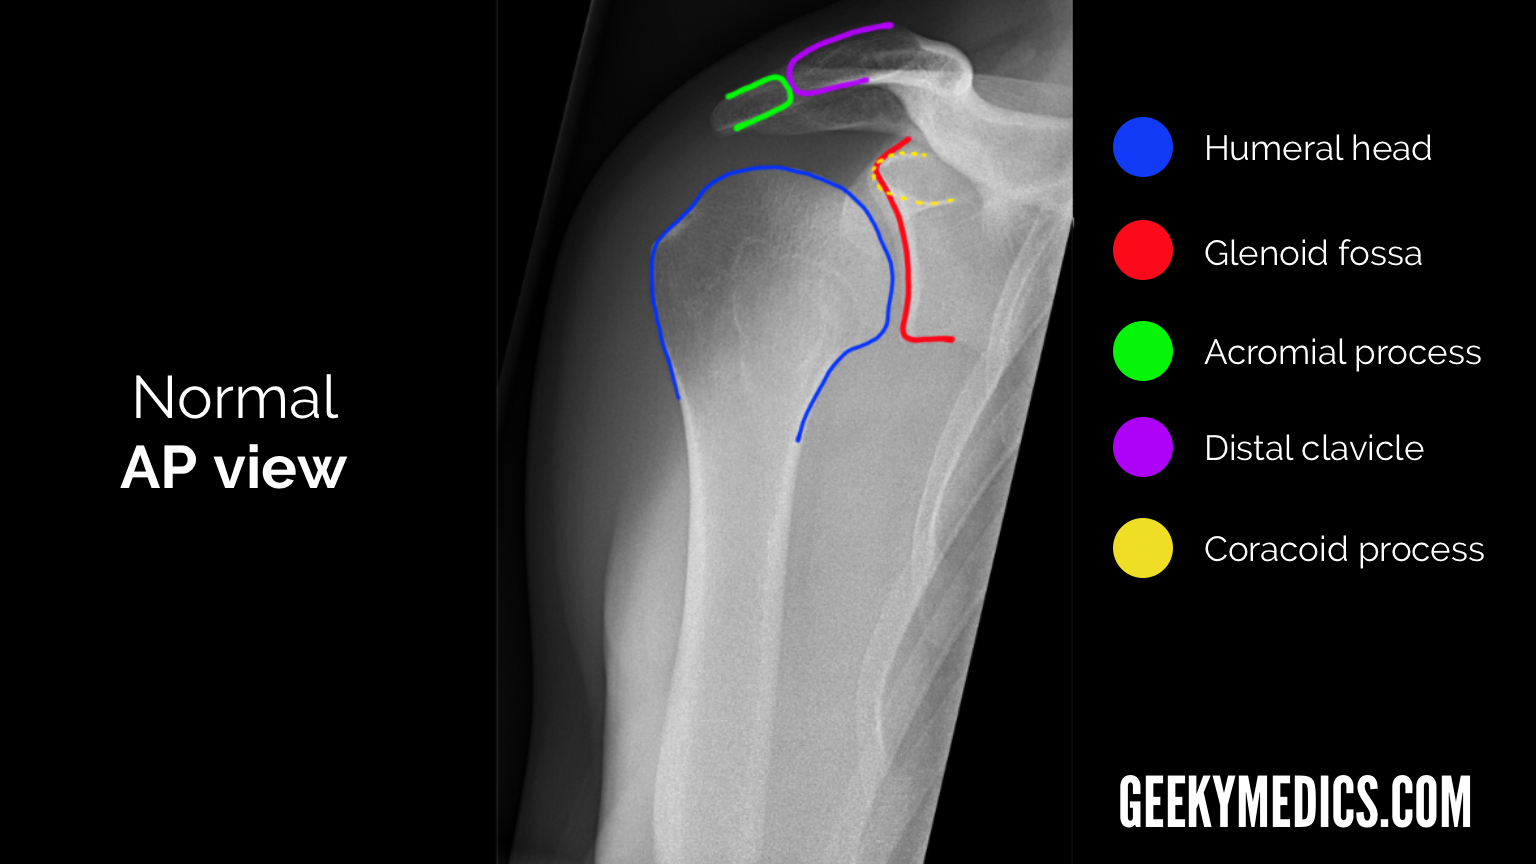
AP view
When looking at the GHJ, the glenoid fossa (the “socket”) should be visible as a concavity medial to the humeral head (the “ball”).
Scapular Y/lateral view
The humeral head lies on top of the glenoid fossa, with the coracoid process anterior to it (the side of the ribcage represents anterior in this view).
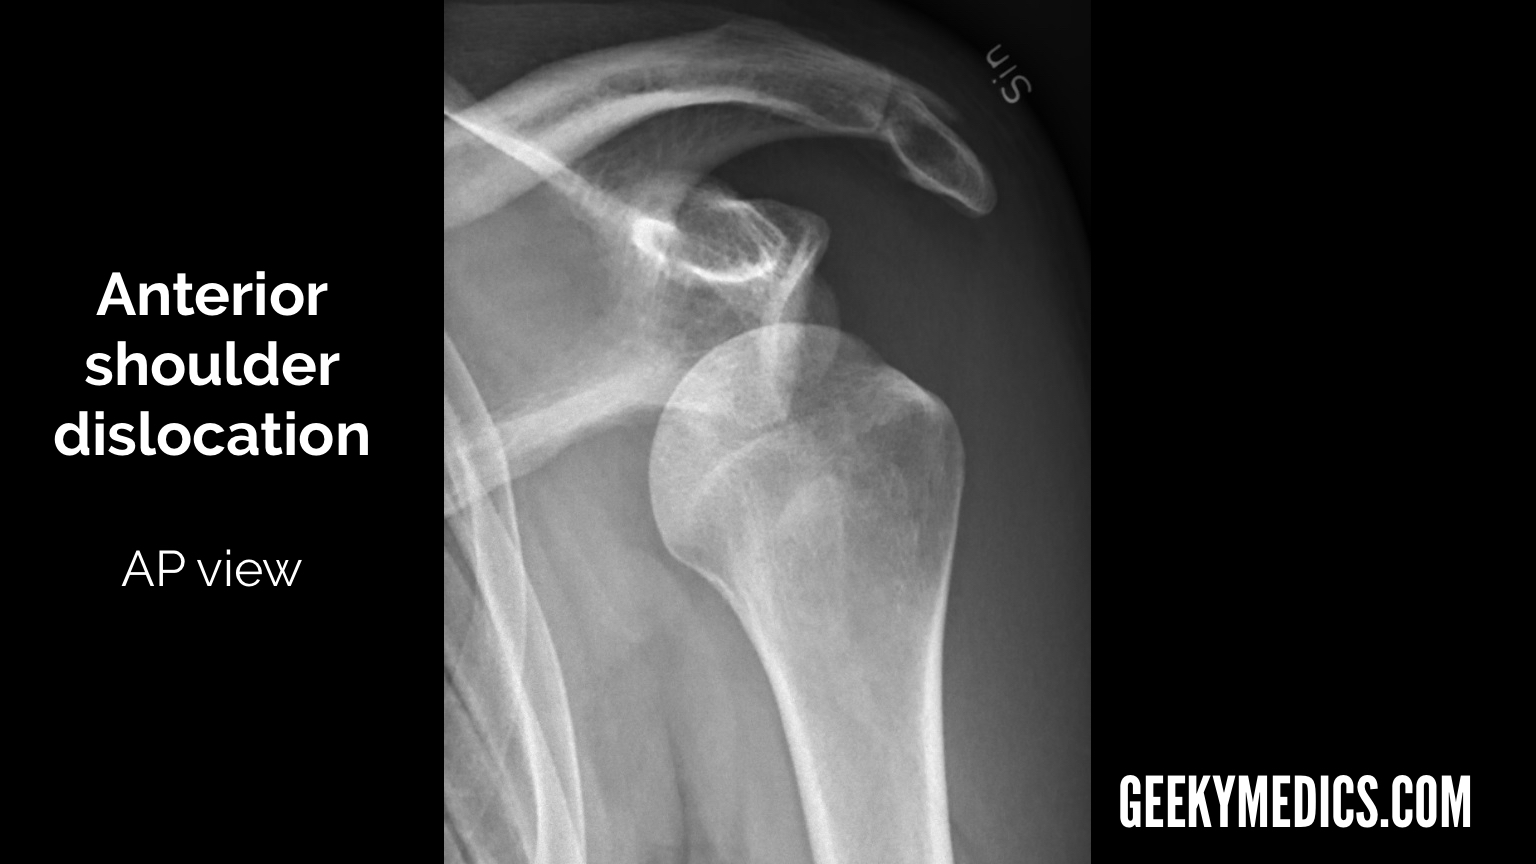
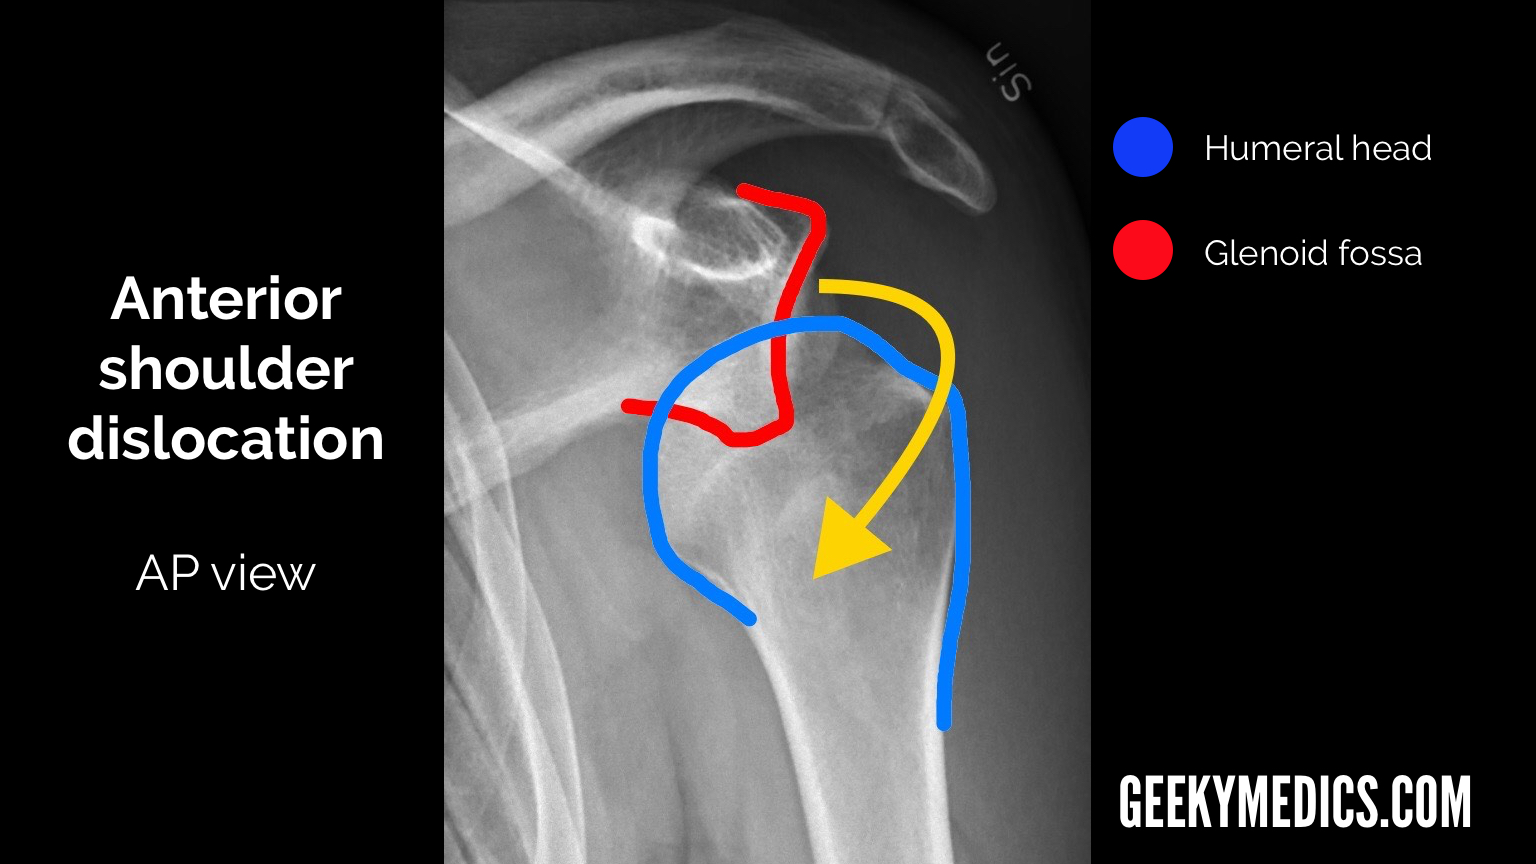
Anterior shoulder dislocation
Anterior shoulder dislocation is significantly more common than posterior dislocation, representing >95% of all shoulder dislocations.
Typical X-ray findings in anterior shoulder dislocation include:
- AP view: the humeral head will lie medial and inferior to the glenoid fossa.
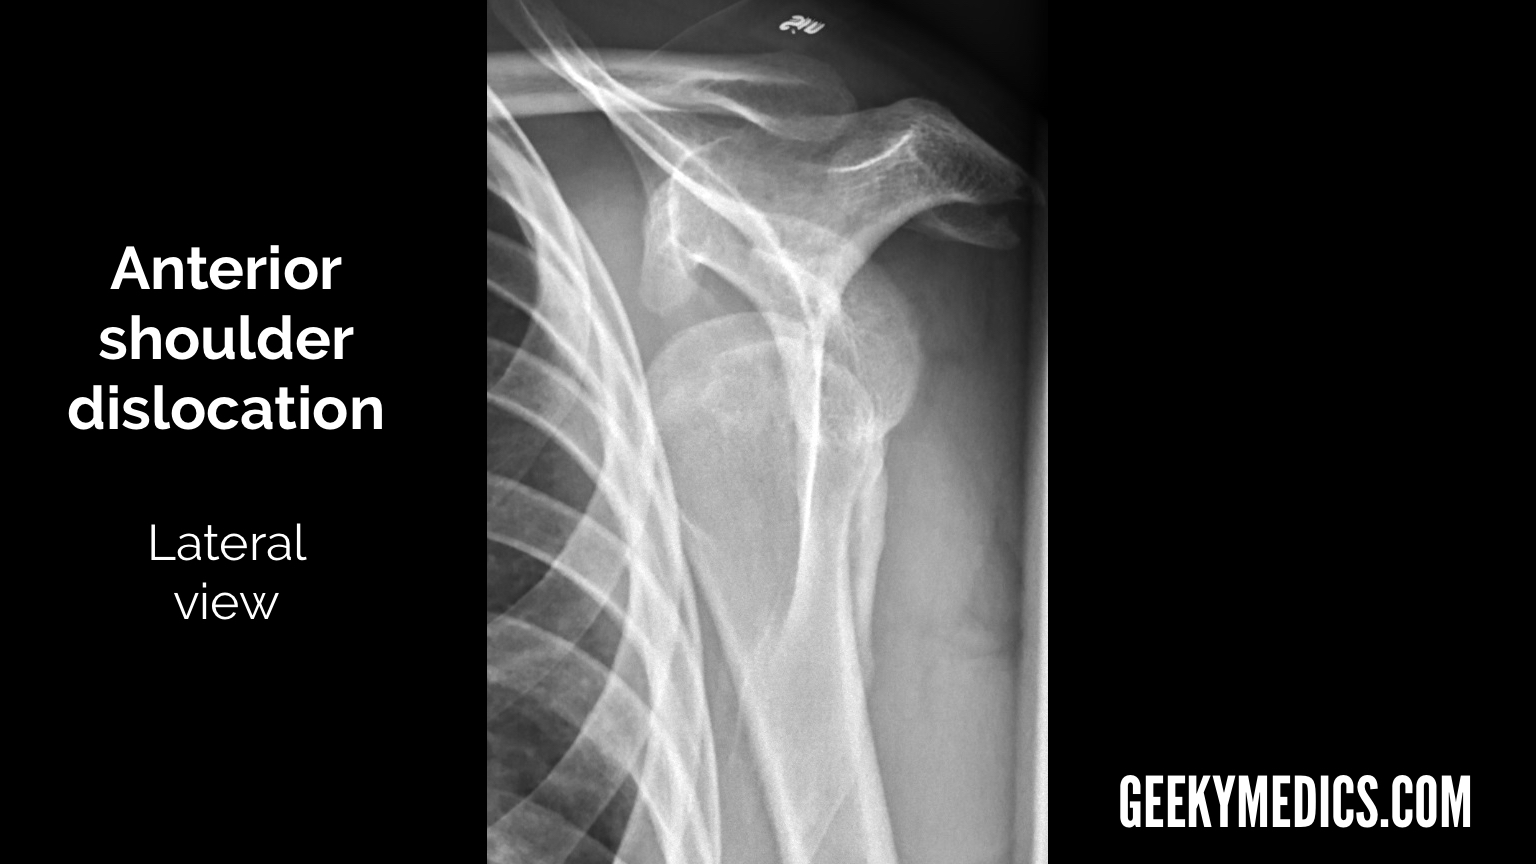
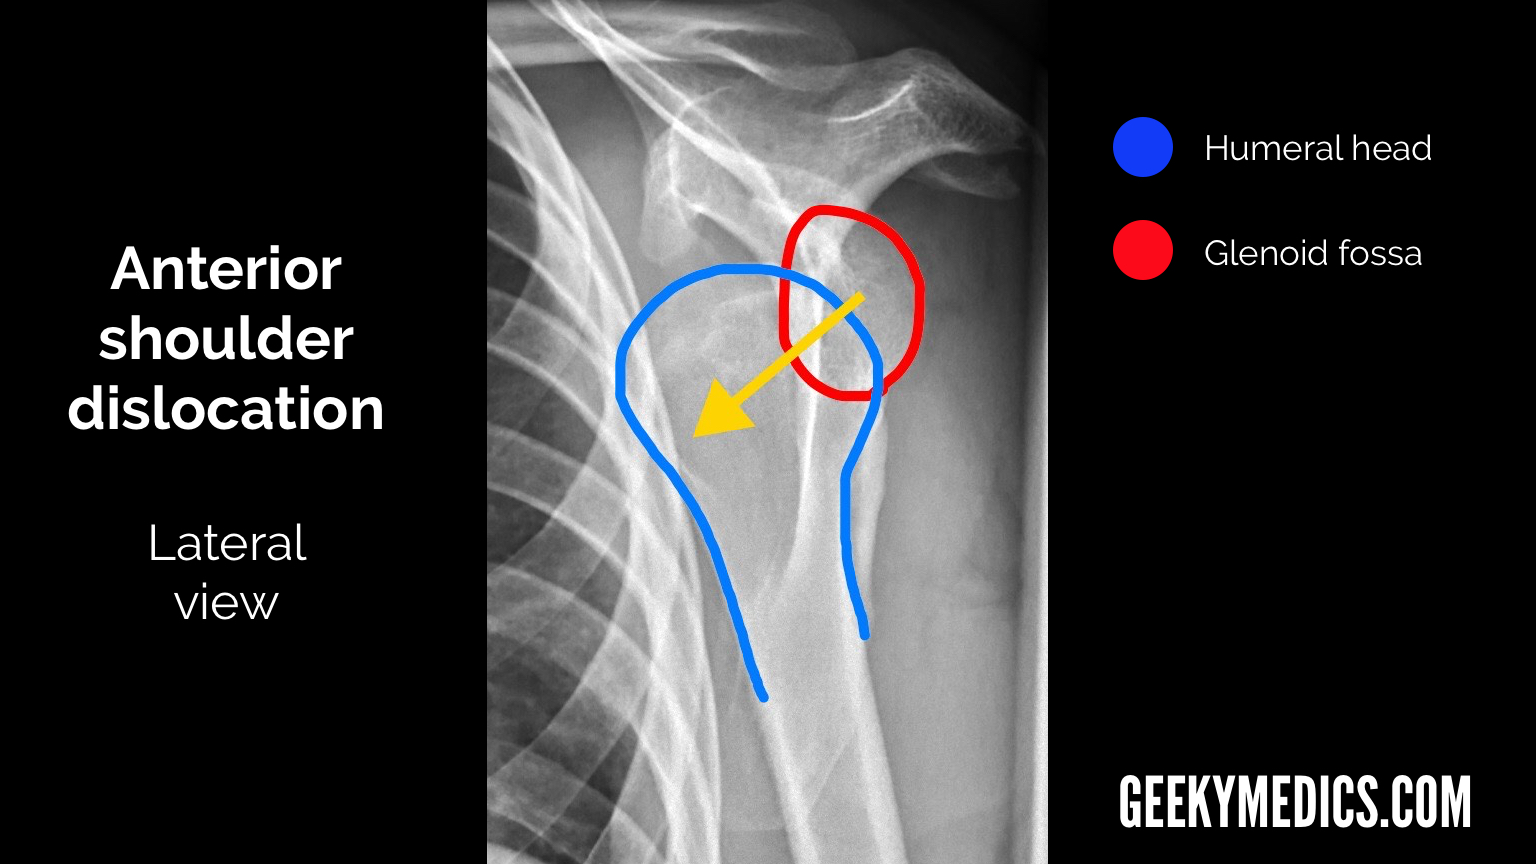
- Lateral view: the humeral head will lie anterior and inferior to the glenoid fossa.
- The humeral head will also lie inferior to the coracoid process and this is typically most obvious in the lateral view.
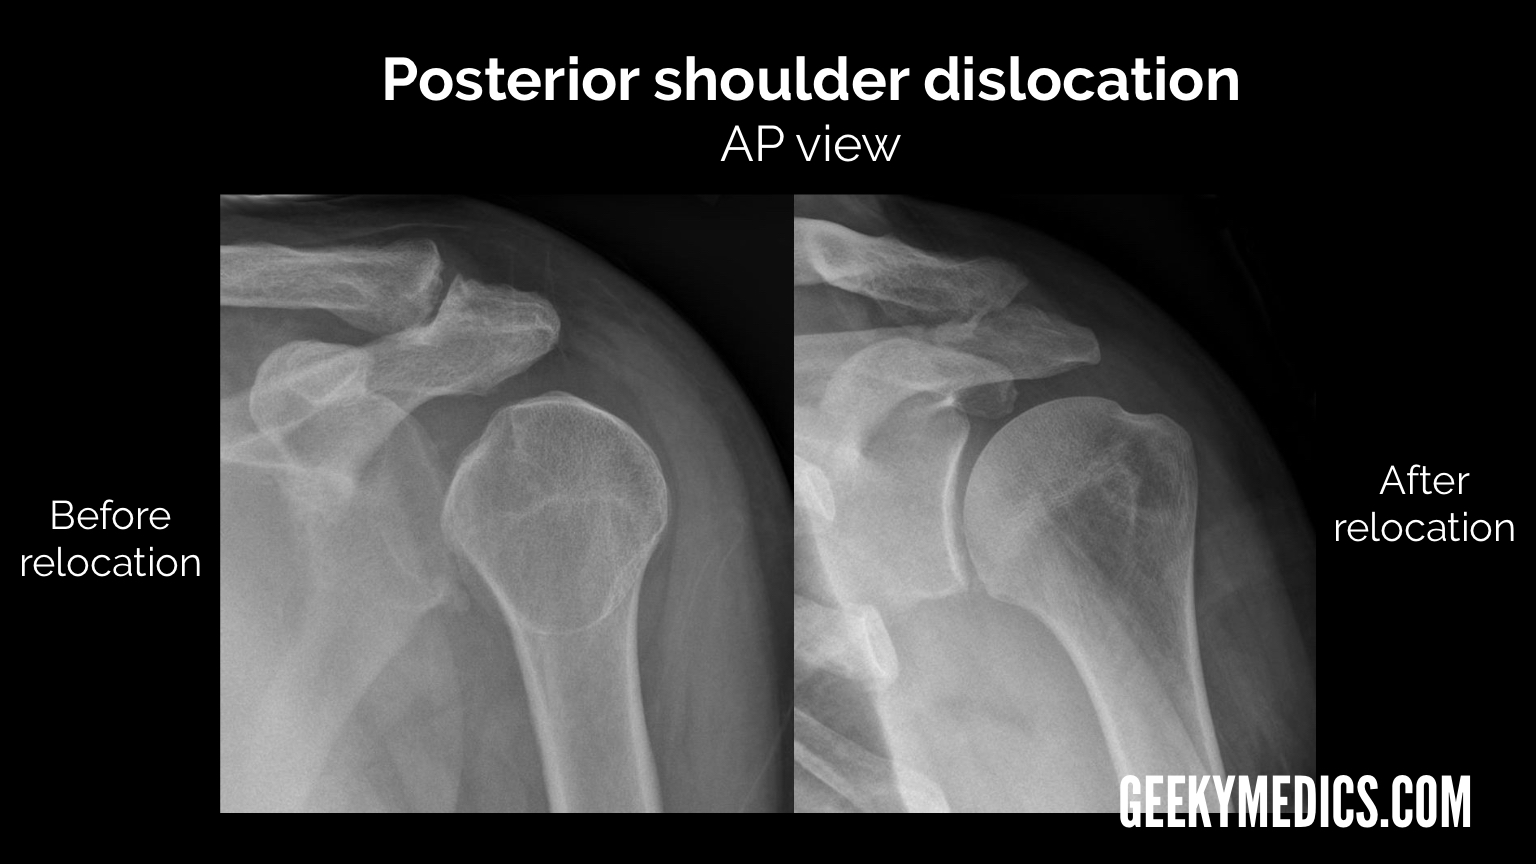
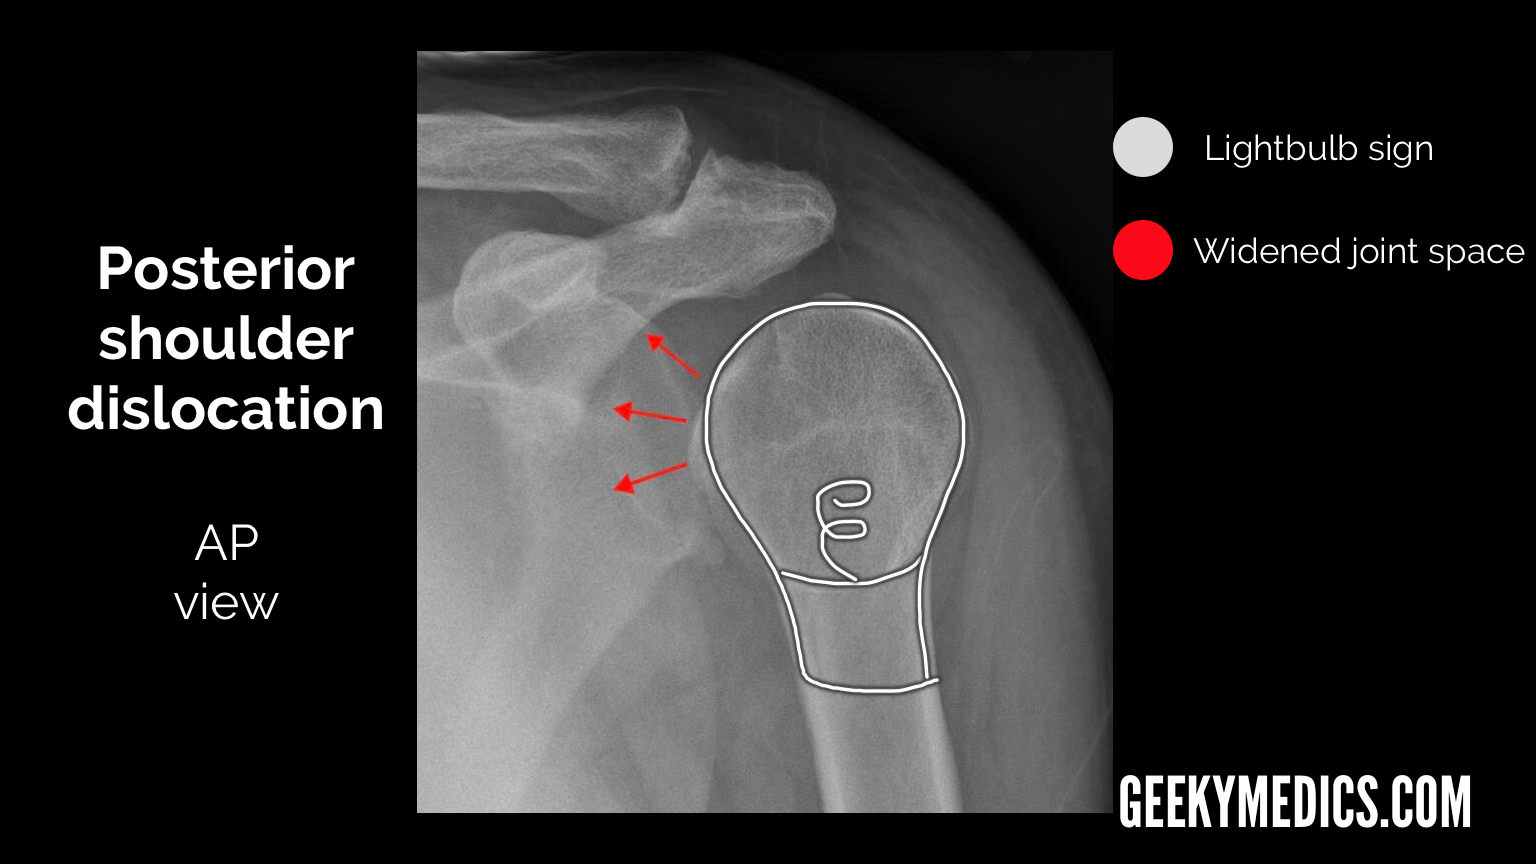
Posterior shoulder dislocation
Posterior shoulder dislocation is both significantly less common and significantly harder to spot than anterior dislocation. As previously mentioned, if X-ray findings don’t correlate with the clinical findings, consider alternate X-ray views or a different imaging modality (e.g. CT).
Typical X-ray findings in posterior shoulder dislocation include:
- AP view: the glenohumeral joint will be widened and the humeral head will take on a classic “light bulb” appearance due to forced internal rotation of the humerus.
- Lateral view: the humeral head will lie posterior to the glenoid fossa.
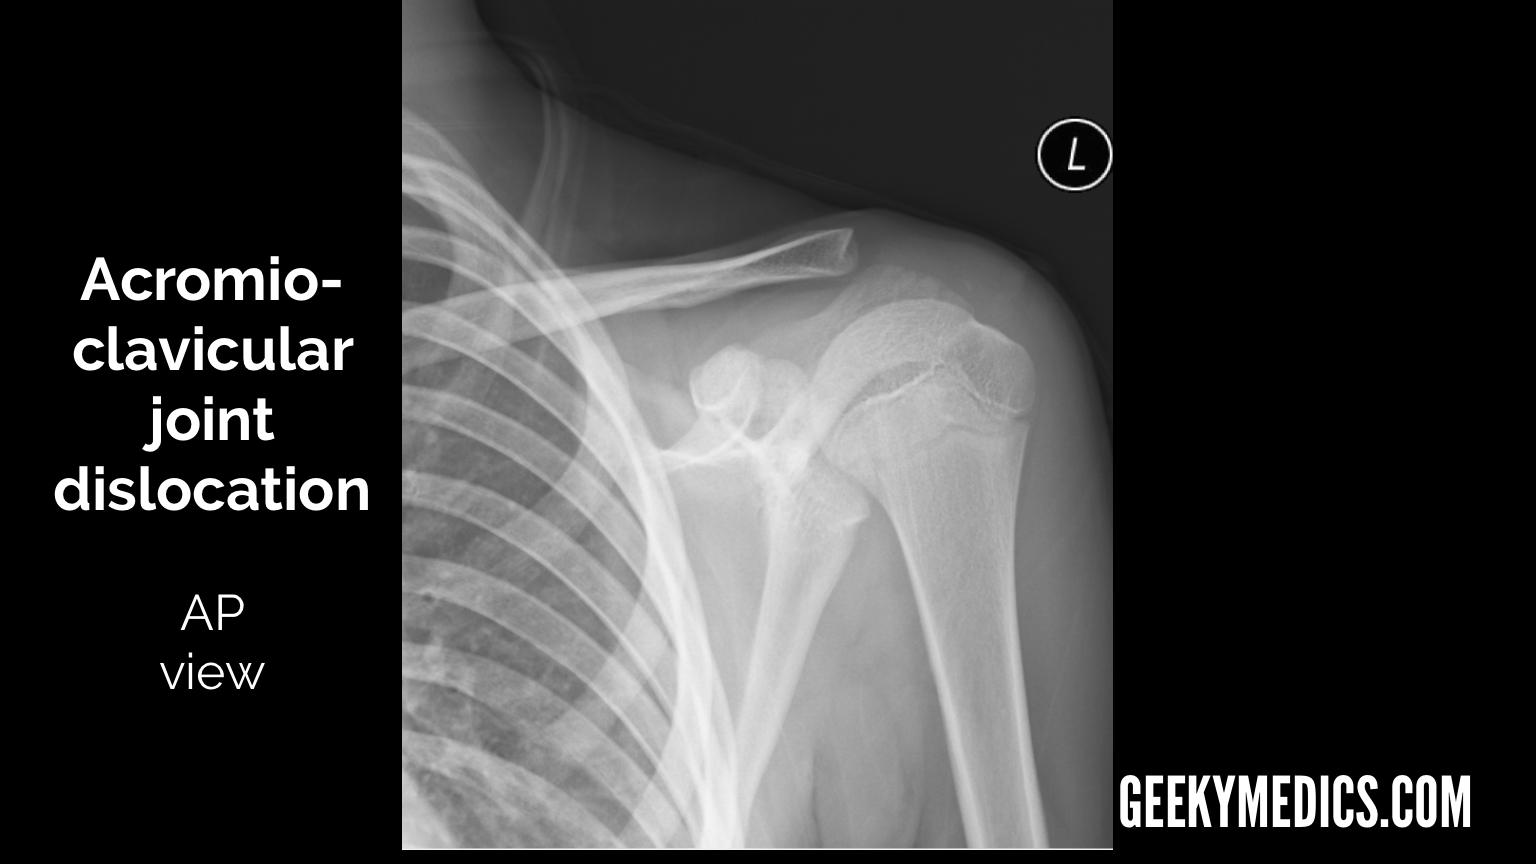
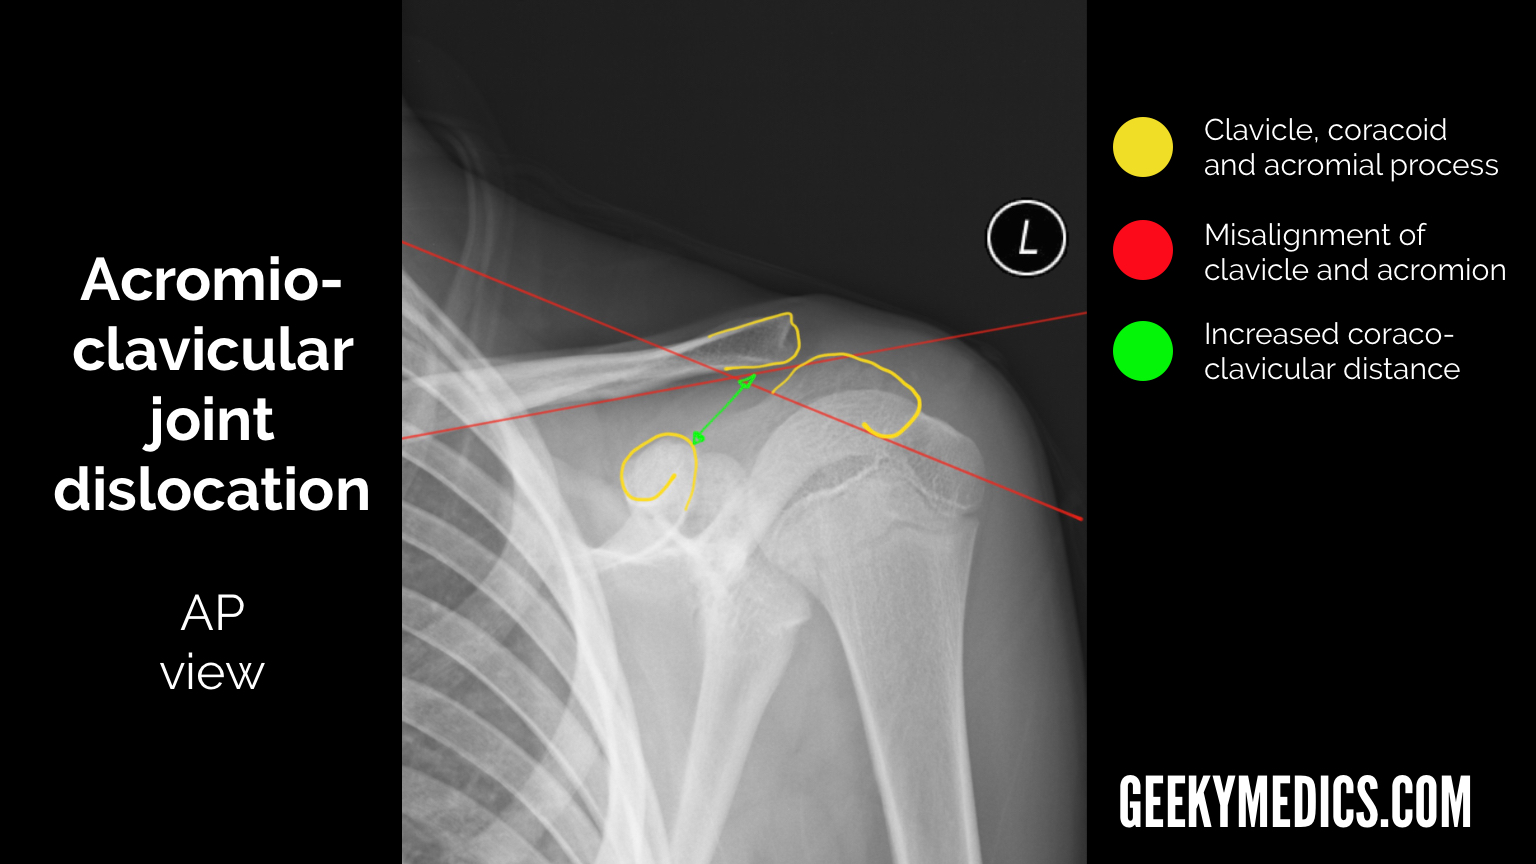
Acromioclavicular joint dislocation
The AC joint is visible in all views and is probably best assessed in the AP view. In this view, you should see the inferior borders of the acromion and the clavicle line up in a healthy individual.
If they don’t, you should look closely at the distance between:
- the acromion and the clavicle
- the clavicle and the coracoid process
Widening of the gap between the acromion and clavicle may indicate pathology affecting the acromioclavicular ligament (e.g. a tear).
Widening of the gap between the clavicle and the coracoid process may indicate pathology affecting the coracoclavicular ligament (e.g. a tear).
A note on “normal” distances
When assessing for joint disruption (especially AC joint) you will need to be familiar with commonly measured distances at the shoulder joint.7
The acromioclavicular distance should be between 5-8mm:
- >8mm = injury to the acromioclavicular ligament
The coracoclavicular distance should be between 11-13mm:
- >13mm = injury to the coracoclavicular ligament
The acromiohumeral distance should be between 7-12mm:
- <7mm = possible supraspinatus tendon tear (a common rotator cuff injury)
- >12mm = joint widening (e.g. due to effusion)

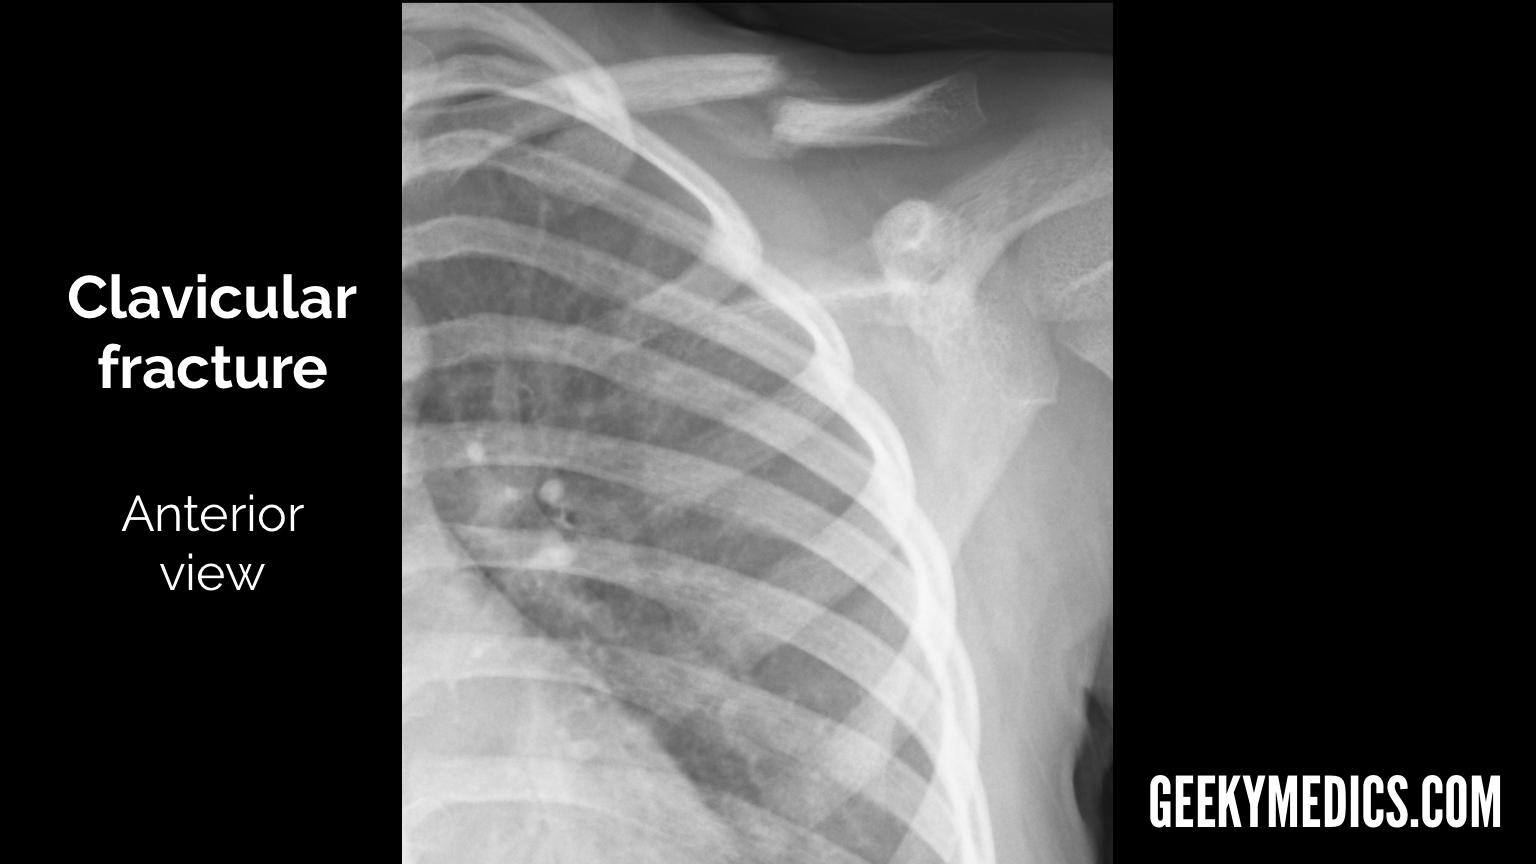
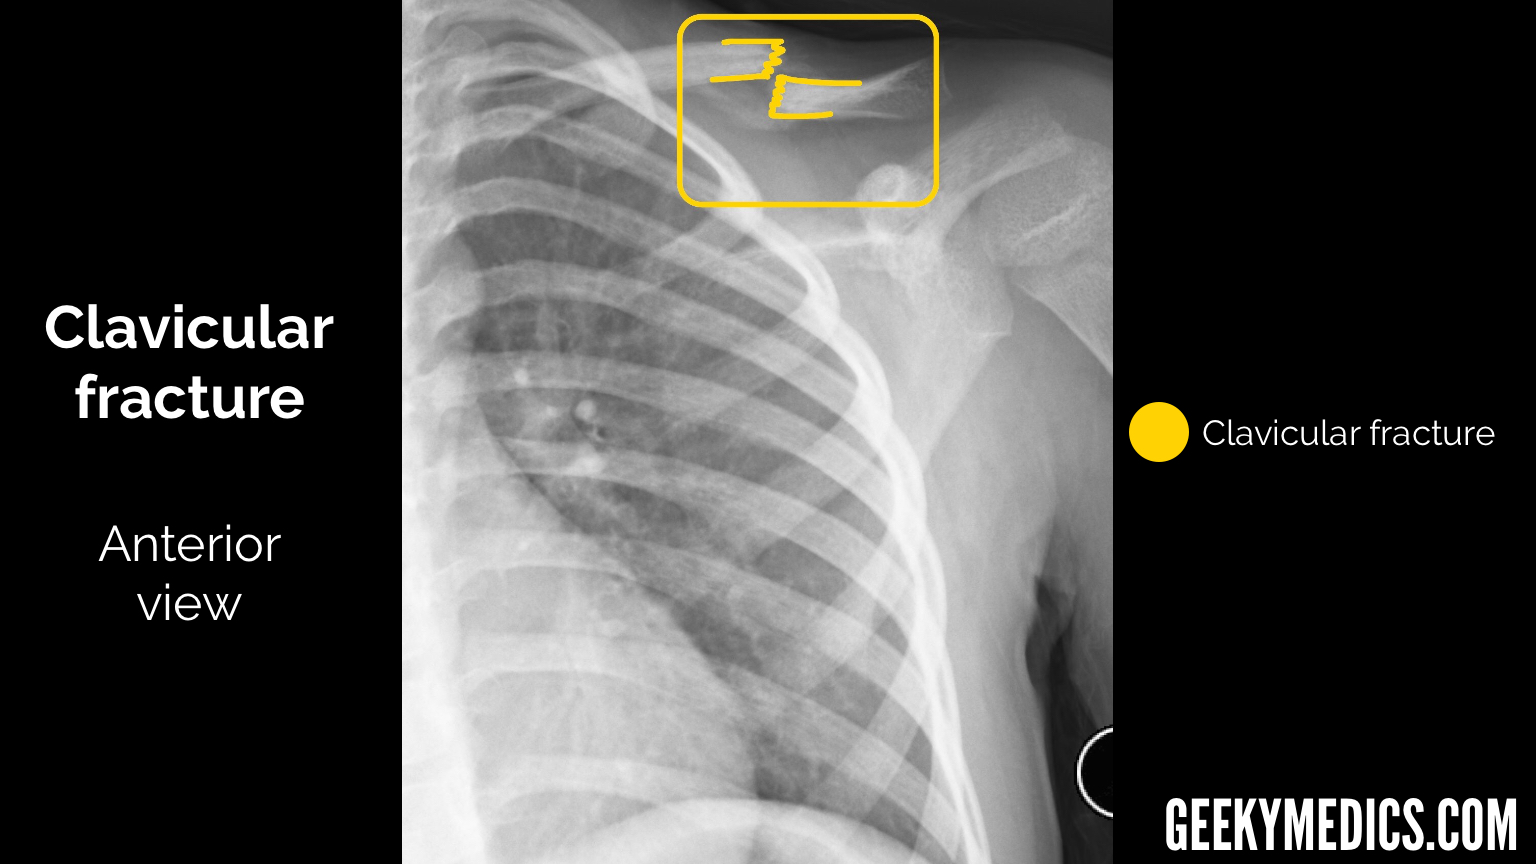
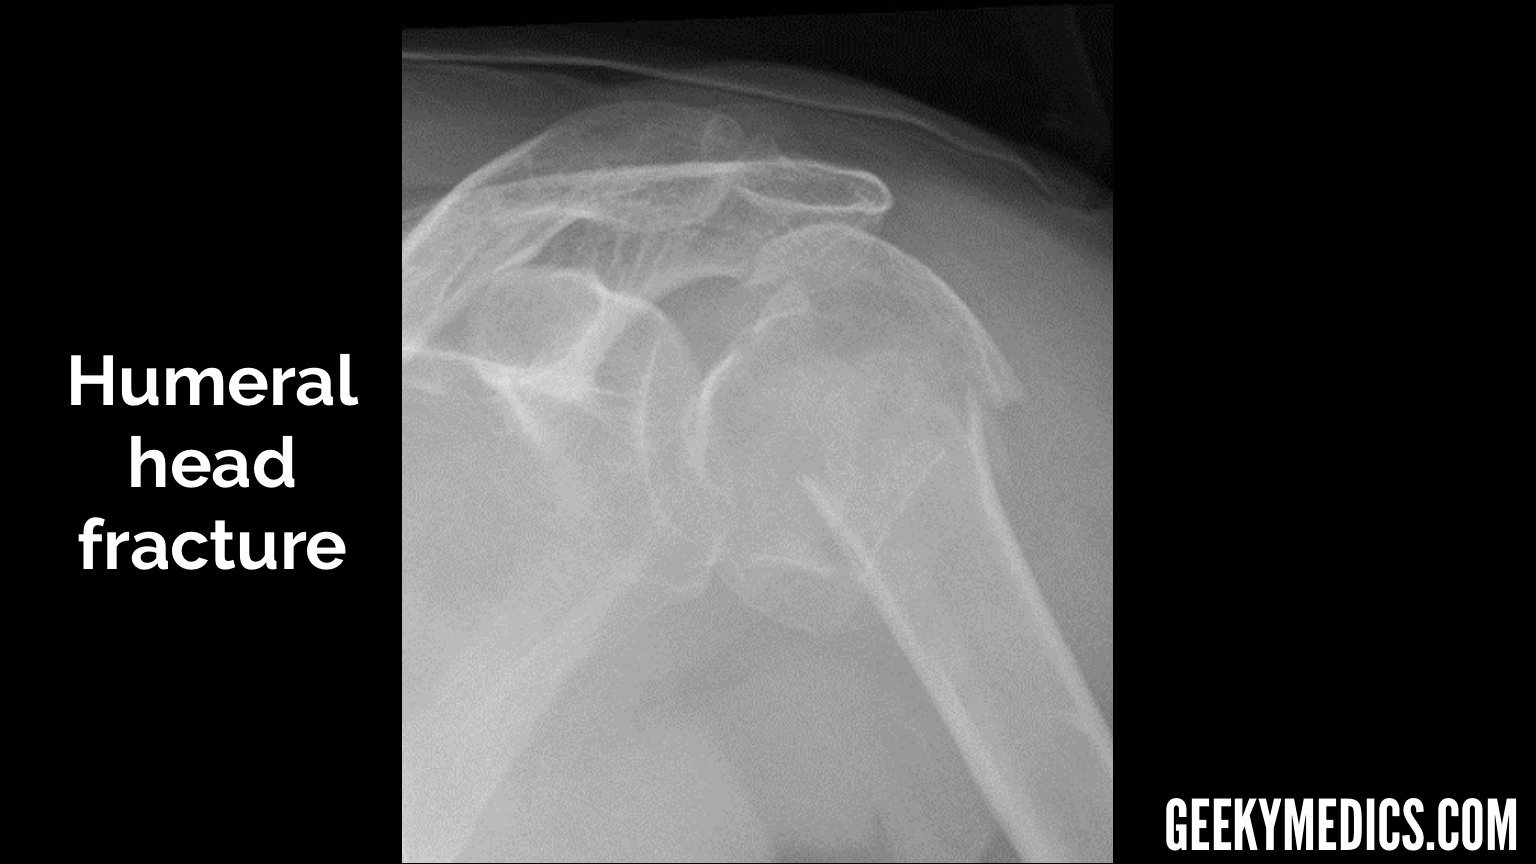
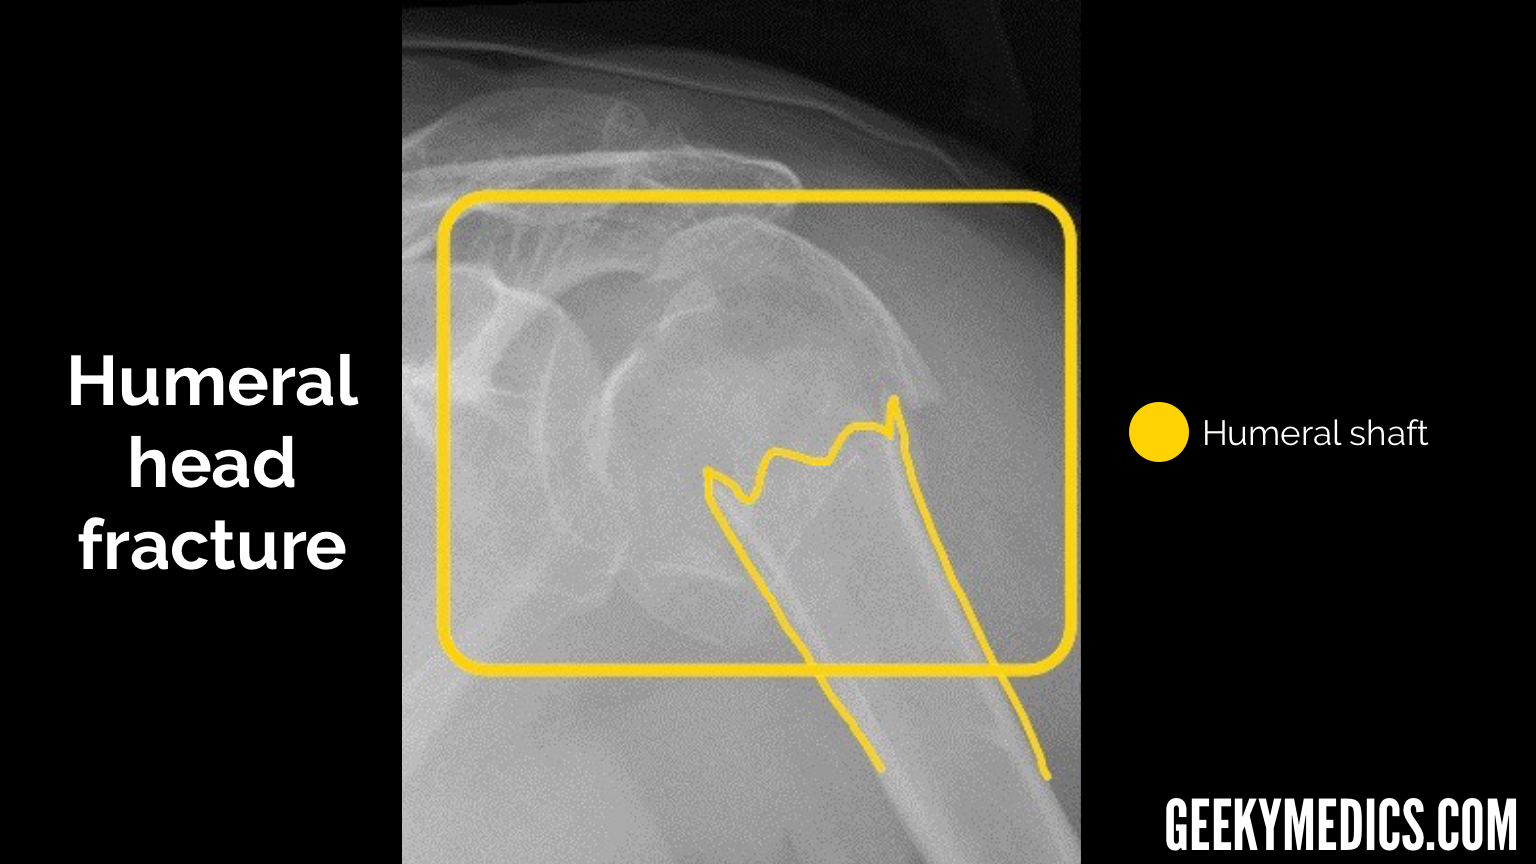
Bones
In all views, follow the outline of the cortex (outer white edge) of each bone, not forgetting to look at the ribs as well. This is doubly true in the context of trauma, as rib fractures and the subsequent complications may be missed by a distracting injury like a fractured humerus or dislocated shoulder. As with all radiographs, make sure you don’t stop looking once you have found a fracture or the specific abnormality you requested the investigation for (the presence of an obvious shoulder dislocation doesn’t rule out the possibility of other bony injuries). This can sometimes be difficult and is an easy heuristic trap that can be prevented by being thorough and having a framework or system to follow.
Soft tissue
Look around the bones and joints for any signs of darkening/fluid levels that may represent blood or fat (lipohaemarthrosis), which suggests a fracture even if one cannot be seen.
You can also sometimes see calcification of tendons around the shoulder joint on X-ray, which can be a sign of chronic impingement (although this is unlikely to be the reason for a shoulder X-ray request in an Emergency Department setting).

Review areas
Even though you requested a shoulder X-ray, due to the nature of the imaging technique you will be given an image that contains more than just the shoulder girdle. It is incredibly easy to get “tunnel vision” and focus entirely on the shoulder.
Special care should be taken to review the rest of the radiograph, especially the lungs and the ribs, as well as any other areas included in the image. In the context of trauma, rib fractures and pneumothoraces are common and may not be noticed if the patient’s main complaint is shoulder pain.
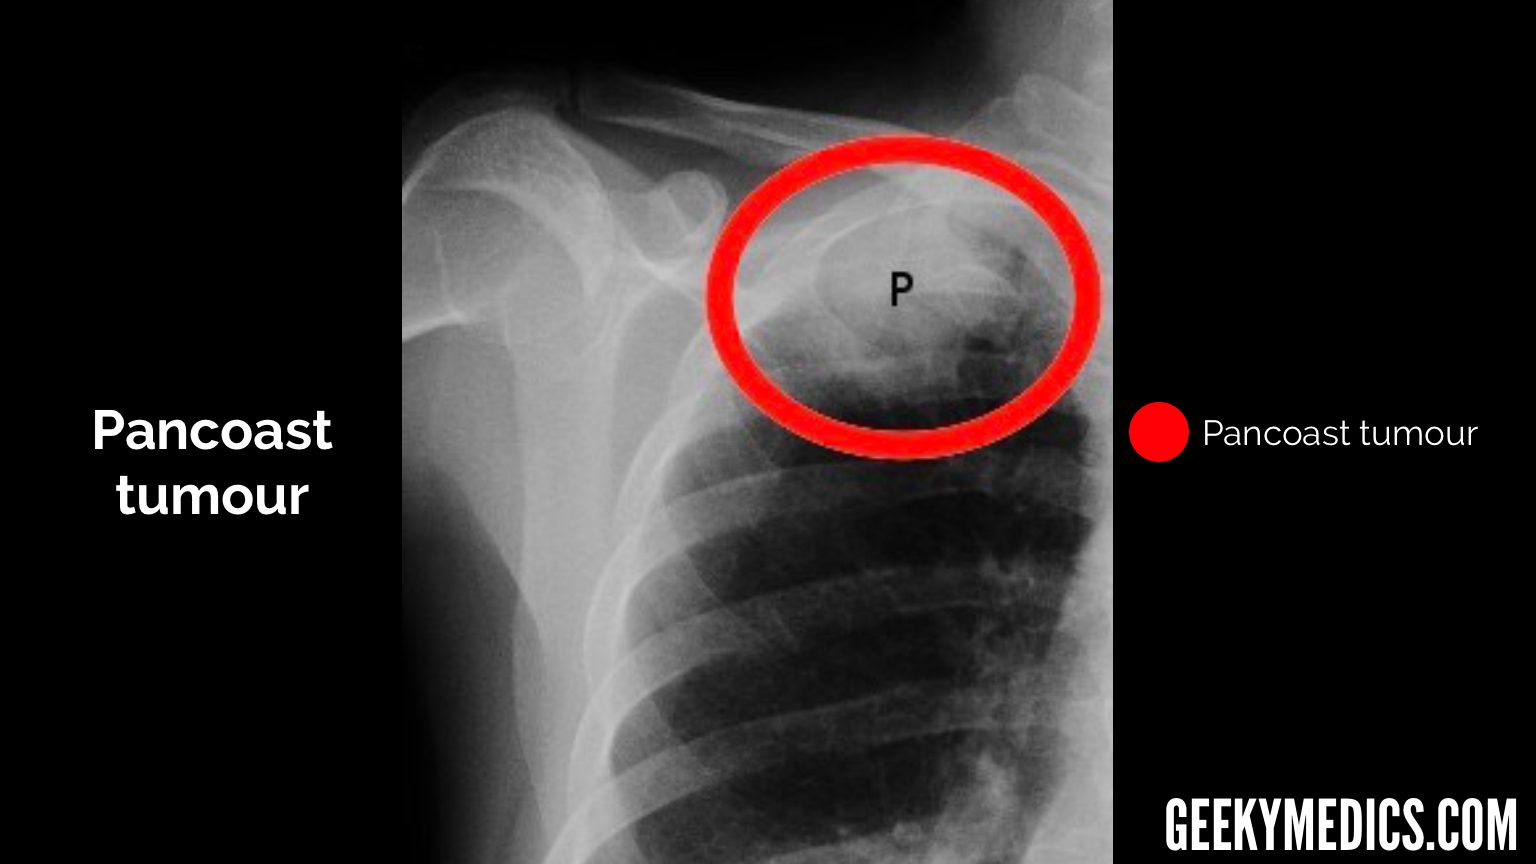
Although much less common, it is also important to check the lungs for malignancy, as a Pancoast tumour may be visible in the apex of the lung.
Summary
When interpreting a shoulder X-ray, begin by confirming the patient’s details, reviewing the clinical history and ensuring the radiographs are adequate.
- Alignment: assign the alignment of the bones of the shoulder girdle (e.g. GHJ and ACJ dislocations).
- Bones: assess the cortex of bones of the shoulder girdle, inspecting for irregularities (e.g. fracture).
- Soft tissue: inspect the soft tissues surrounding the shoulder joint for abnormalities (e.g. lipohaemarthrosis, calcification).
- Review other areas visible in the radiographs including the ribs and lungs.
Reviewer
Dr Jonny Hacking
Radiology Registrar
References
- Geeky Medics. Adapted from an original image by Mikael Häggström.
- Geeky Medics. Adapted from an original image by Mikael Häggström.
- Geeky Medics. Adapted from an original image by Mikael Häggström.
- Geeky Medics. Adapted from an original image by Mikael Häggström.
- Geeky Medics. Adapted from an original image by Hellerhoff. Licence: CC BY-SA 3.0
- Geeky Medics. Adapted from an original image by Nevit Dilmen. Licence: CC BY-SA 3.0
- Dr Naim Qaqish, Dr Matt Skalski et al. Normal radiographic measurements of the shoulder. Available from: [LINK]
- Geeky Medics. Adapted from an original image by Emilios Pakos et al. Orthopaedic Department, University Hospital of Ioannina, Ioannina, Greece. Licence: CC BY-SA 4.0
- Geeky Medics. Adapted from an original image by Nevit Dilmen. Licence: CC BY-SA 3.0
- Geeky Medics. Adapted from an original image by Georg Mattiassich, Lucian Lior Marcovici, Rolf Michael Krifter, Reinhold Ortmaier, Peter Wegerer, Albert Kroepfl. Licence: CC BY-SA 2.0
- Geeky Medics. Adapted from an original image by Emilios Pakos et al. Orthopaedic Department, University Hospital of Ioannina, Ioannina, Greece. Licence: CC BY-SA 4.0
- Geeky Medics. Adapted from an original image by Jmarchn. Licence: CC BY-SA 3.0
