

- 📖 Geeky Medics OSCE Book
- ⚡ Geeky Medics Bundles
- ✨ 1300+ OSCE Stations
- ✅ OSCE Checklist PDF Booklet
- 🧠 UKMLA AKT Question Bank
- 💊 PSA Question Bank
- 💉 Clinical Skills App
- 🗂️ Flashcard Collections | OSCE, Medicine, Surgery, Anatomy
- 💬 SCA Cases for MRCGP
To be the first to know about our latest videos subscribe to our YouTube channel 🙌
Measuring and recording observations and calculating a National Early Warning Score 2 (NEWS2) can appear in OSCEs. You’ll be expected to correctly record clinical observations (also known as vital signs), record the findings and calculate a NEWS2 score.
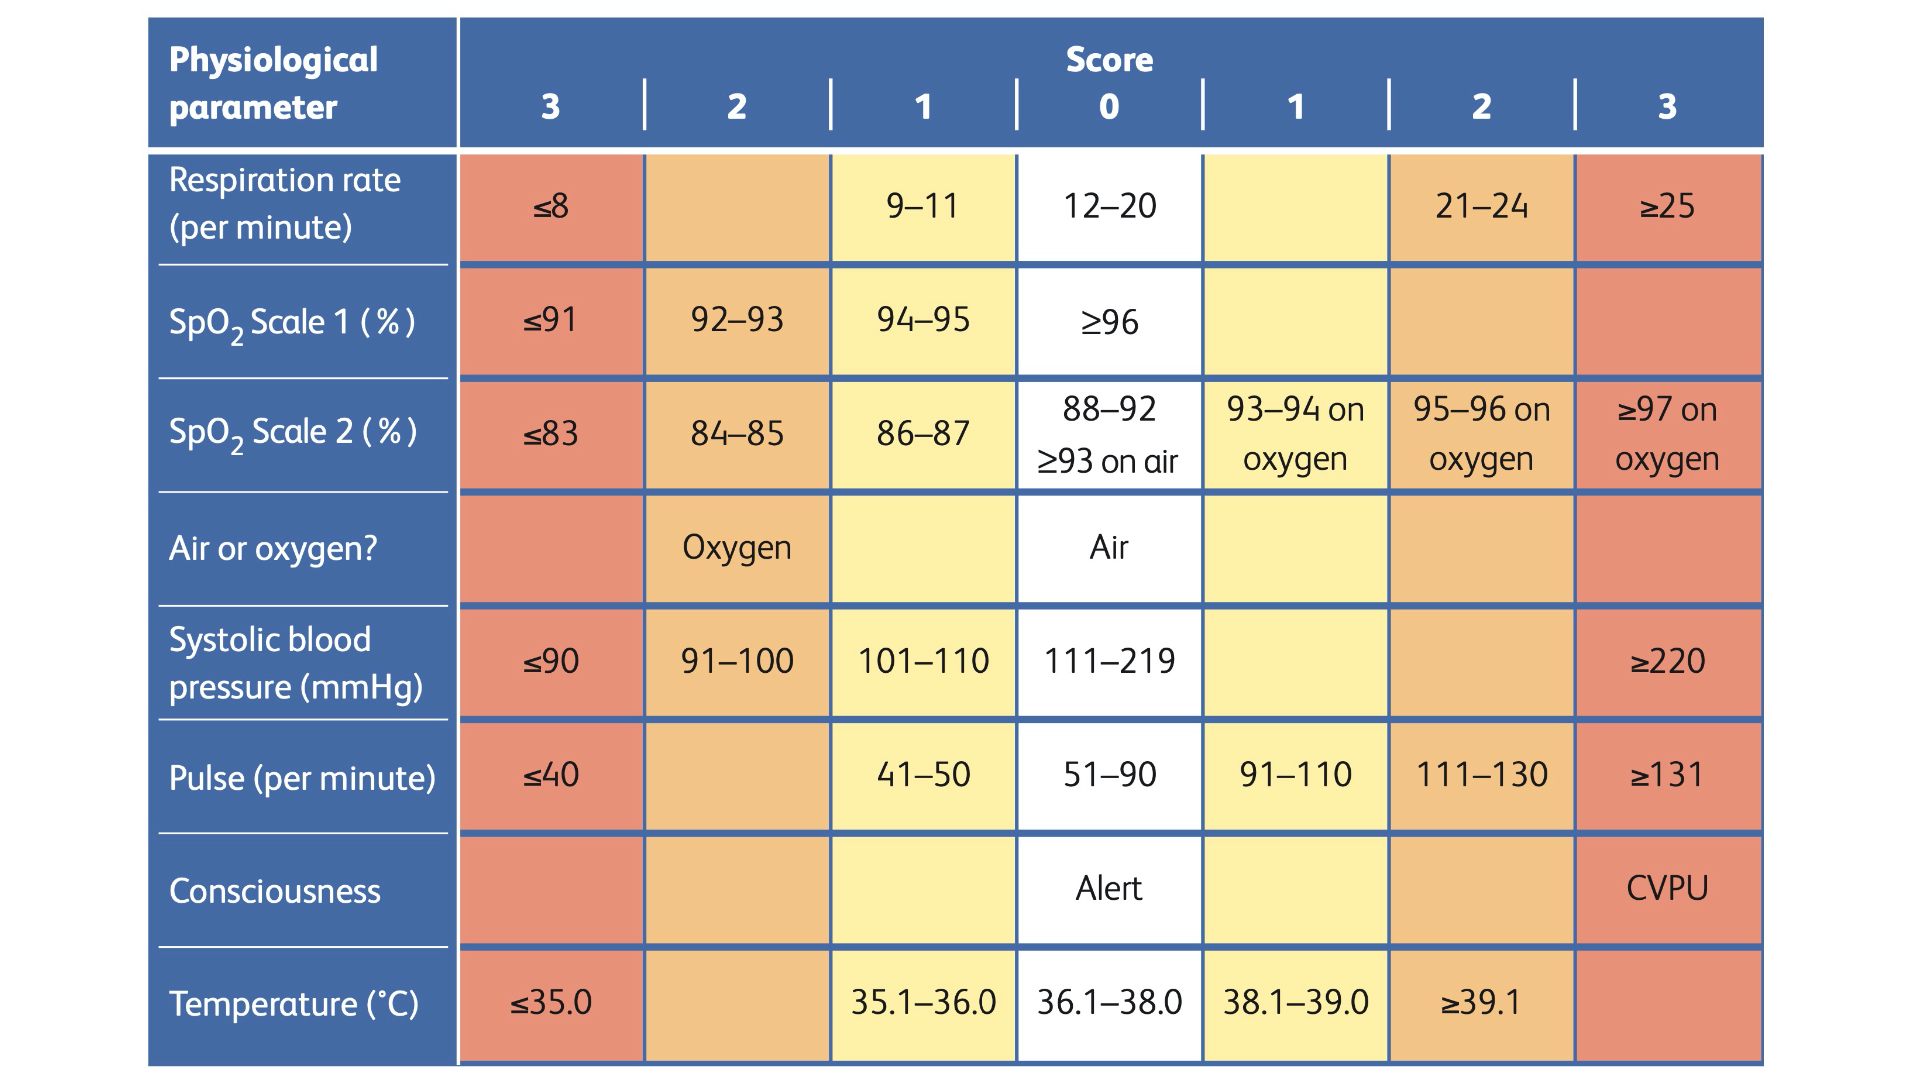
NEWS2 is a track-and-trigger system to identify adult patients at risk of clinical deterioration. The score is comprised of six components:1
- Respiratory rate (RR)
- Oxygen saturation (SpO2)
- Temperature
- Systolic blood pressure (BP)
- Heart rate (HR)
- Level of consciousness
Gather equipment
- Pulse oximeter
- Blood pressure monitor
- Thermometer
- Watch
- NEWS2 chart
Introduction
Wash your hands and don PPE if appropriate.
Introduce yourself to the patient including your name and role.
Confirm the patient’s name and date of birth.
Briefly explain what the procedure will involve using patient-friendly language.
Gain consent to proceed with recording observations (vital signs).
Ask if the patient has any pain before proceeding.
 Wash your hands


Heart rate (HR)
Assessing heart rate
1. Palpate the patient’s radial pulse, located at the radial side of the wrist, with the tips of your index and middle fingers aligned longitudinally over the course of the artery.
2. Once you have located the radial pulse, assess the rate and rhythm.
You can calculate the heart rate in several ways, including measuring for 60 seconds, measuring for 30 seconds and multiplying by 2 or measuring for 15 seconds and multiplying by 4. The shorter the interval used, the higher the risk of obtaining an inaccurate result, so wherever possible, you should palpate for a full 60 seconds.
For irregular rhythms, you should measure the pulse for a full 60 seconds to improve accuracy.
- Measure the pulse rate

Normal and abnormal heart rates
In healthy adults, the pulse should be between 60 – 100 bpm. An irregular rhythm is most commonly caused by atrial fibrillation, but other causes include ectopic beats in healthy individuals and atrioventricular blocks.
- A pulse <60 bpm is known as bradycardia and has a wide range of aetiologies (e.g. healthy athletic individuals, atrioventricular block, medications, sick sinus syndrome).
- A pulse of >100 bpm is known as tachycardia and also has a wide range of aetiologies (e.g. anxiety, supraventricular tachycardia, hypovolaemia, hyperthyroidism).
Respiratory rate (RR)
Assessing respiratory rate
1. Whilst still palpating the radial pulse (but no longer counting it), assess the patient’s respiratory rate. Palpation of the radial pulse at this stage is purely to avoid making the patient aware you are directly observing their breathing, as this can alter the respiratory rate.
2. Note any asymmetries in the expiratory and inspiratory phases of respiration (e.g. the expiratory phase is often prolonged in asthma exacerbations and in patients with COPD).
3. Assess the patient’s respiratory rate for 60 seconds.
- Assess the respiratory rate for 60 seconds

Respiratory rate abnormalities
In healthy adults, the respiratory rate should be between 12-20 breaths per minute.
- A respiratory rate of fewer than 12 breaths per minute is referred to as bradypnoea (e.g. opiate overdose).
- A respiratory rate of more than 20 breaths per minute is referred to as tachypnoea (e.g. acute asthma).
Oxygen saturation (SpO2)
Oxygen saturation is measured using a pulse oximeter. When recording oxygen saturations, note whether the patient is on supplemental oxygen or breathing room air.
1. Select an appropriate site for the pulse oximeter. If using the fingernail, ensure no nail varnish or dirt is covering the nail.
2. Switch on the pulse oximeter.
3. Place the pulse oximeter over the fingernail.
4. Wait for the oxygen saturation level to appear and note the reading.
- Assess SpO2 using a pulse oximeter

Target oxygen saturation
NEWS2 has two different scales for recording oxygen saturation:
- Scale 1 has a target oxygen saturation of ≥ 96% and is used for most patients.
- Scale 2 has a target oxygen saturation of 88 – 92% and is used for patients at risk of hypercapnic respiratory failure (e.g. patients with COPD).
Blood pressure (BP)
Measurement of blood pressure can be performed manually using a stethoscope and sphygmomanometer or by using an automatic blood pressure monitor.
The NEWS2 score only assigns a score based on the systolic blood pressure. However, the diastolic blood pressure should be recorded on the chart.
Attach the blood pressure cuff
1. Ensure the cuff size appears appropriate.
2. Wrap the cuff around the patient’s upper arm.
3. Line up the cuff marker with the brachial artery slightly medial to the biceps brachii tendon.
Estimate an approximate systolic blood pressure
1. Palpate the radial pulse.
2. Inflate the cuff until you can no longer feel this pulse.
3. Note the reading on the sphygmomanometer. This is a rough estimate of the systolic blood pressure.
Measure the blood pressure accurately
1. Place your stethoscope’s diaphragm over the brachial artery.
2. Re-inflate the cuff to 20 – 30 mmHg above your approximate systolic blood pressure measured earlier.
3. Begin to slowly deflate the cuff at around 2-3 mmHg per second.
4. Listen carefully, you will begin to hear a thumping pulsatile noise known as the 1st Korotokoff sound. The pressure at which this 1st sound is heard is the systolic blood pressure.
5. Continue to deflate the cuff, continuing to listen until the sounds completely disappear. The point at which you hear the last sound is referred to as the 5th Korotkoff sound. This is the diastolic blood pressure.
If the patient is noted to be hypertensive (>140/90) or hypotensive you should re-check the blood pressure after 2 minutes to confirm this is an accurate result. Use the other arm and consider if the cuff size is appropriate.
See our full guide to measuring blood pressure with a video demonstration for more details.
- Assess blood pressure

Level of consciousness
A patient’s level of consciousness can be measured using the ACVPU scale:
- Alert: the patient is fully alert with spontaneous eye-opening
- Confusion (new): the patient is alert, but confused or disorientated
- Voice: the patient responds to a verbal stimulus
- Pain: the patient responds to a pain stimulus only
- Unresponsive: no response to voice or pain stimulus
Temperature
Temperature is usually assessed using a tympanic thermometer as this is a rapid and non-invasive way of recording temperature.
Other methods for recording temperature include oral, rectal and axillary readings.
Measure temperature using a tympanic thermometer
The exact method of use will depend on the brand of the tympanic thermometer. Always follow the manufacturer’s instructions and local guidelines.
1. Ensure the tympanic thermometer is switched on, clean and in good working order.
2. Place a disposable cover over the probe end.
3. Place the probe into the ear canal and gently advance until the probe seals the opening of the ear canal.
4. Record the tympanic temperature.
5. Remove and dispose of the tympanic thermometer cover.
- Measure temperature using a tympanic thermometer

Recording observations on a NEWS2 chart
The measured observations should be recorded on a NEWS2 chart and the total NEWS2 score calculated.
You can download a blank PDF version here.
- Document vital signs on a NEWS2 chart - date & time observations performed


To complete the assessment…
Explain to the patient that the assessment is now complete.
Thank the patient for their time.
Dispose of PPE appropriately and wash your hands.
Summarise your findings and NEWS2 score.
References
- Royal College of Physicians. National Early Warning Score (NEWS) 2. Published in 2017. Available from: [LINK]
- Reproduced from: Royal College of Physicians. National Early Warning Score (NEWS) 2: Standardising the assessment of acute-illness severity in the NHS. Updated report of a working party. London: RCP, 2017.
