

- 📖 Geeky Medics OSCE Book
- ⚡ Geeky Medics Bundles
- ✨ 1300+ OSCE Stations
- ✅ OSCE Checklist PDF Booklet
- 🧠 UKMLA AKT Question Bank
- 💊 PSA Question Bank
- 💉 Clinical Skills App
- 🗂️ Flashcard Collections | OSCE, Medicine, Surgery, Anatomy
- 💬 SCA Cases for MRCGP
To be the first to know about our latest videos subscribe to our YouTube channel 🙌
This intraosseous (IO) access guide provides a step-by-step approach to gaining intraosseous access in an OSCE setting.
This guide will cover the EZ-IO® device, which is commonly used in clinical settings. However, other types of IO access devices exist, and it is important to follow local guidelines.
Intraosseous access
Intravenous cannulation can be challenging in certain situations, such as hypothermia, hypovolaemia, obesity and environmental factors (e.g. poor lighting, limited patient access). Delays in achieving vascular access can result in delayed patient management.
Intraosseous access (IO access) involves inserting a catheter into the medullary space of a long bone, providing access to the systemic vasculature. Like intravenous access, IO medications can bypass first-pass metabolism and have maximum bioavailability.
Indications
Indications for establishing IO access include:
- Failure to gain intravenous access and urgent vascular access required
- Cardiac arrest situations where IV access is not feasible or IV access has failed (common in pre-hospital practice)
Contraindications
Relative contraindications to establishing IO access include:
- Inability to accurately identify landmarks at the chosen anatomical site
- Long bone fracture
- Vascular injury to the extremity
- Previous orthopaedic procedure (e.g. prosthetic knee when selecting the proximal tibia site) or previous intraosseous attempt at that site in the previous 24 hours
- Overlying skin infection
Gather equipment
Collect the equipment required for the procedure and place it within reach, ensuring that all the items are clearly visible:
- Clean procedure tray (unlikely to be available in pre-hospital settings)
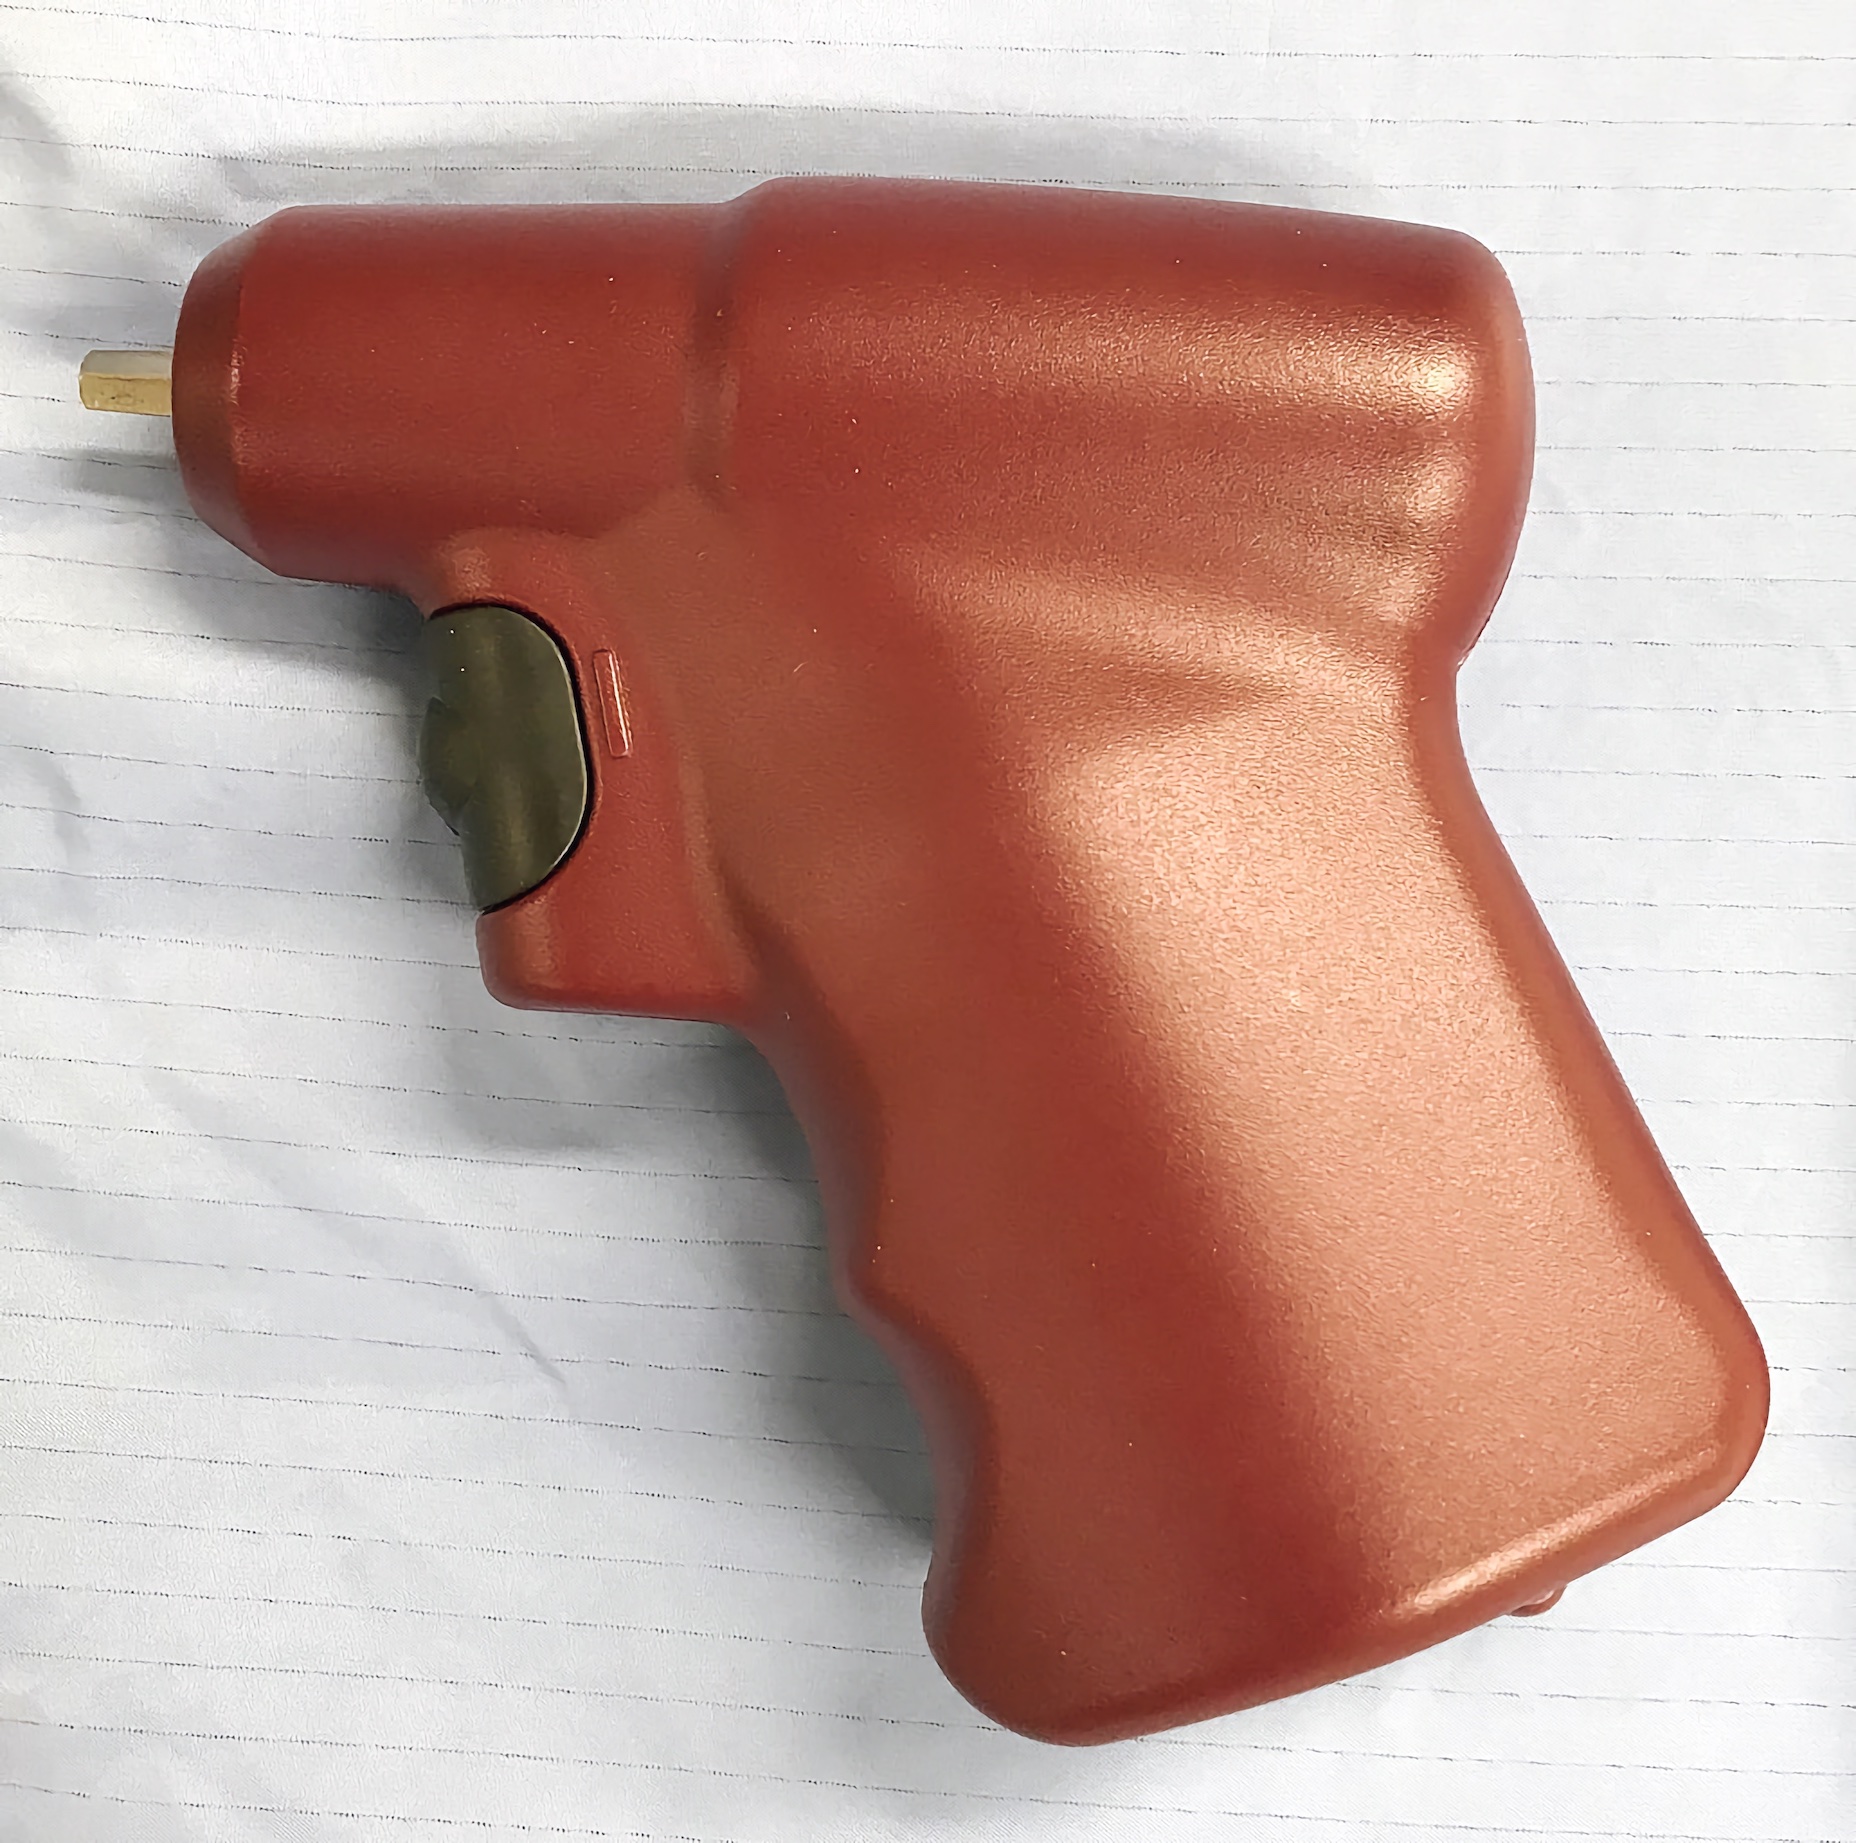
- EZ-IO® driver
- IO needles: pink (15mm), blue (25mm) or yellow (45mm)
- EZ-IO® stabilisation device*
- IO extension set*
- Non-sterile gloves
- Alcohol swab (2% chlorhexidine gluconate in 70% isopropyl)
- 10ml Luer-Lok™ syringe
- Normal saline 0.9% (10ml) or pre-filled flush syringe
- Sharps bin
- If carrying out this procedure on a conscious patient: local anaesthetic to flush the cannula once inserted (if available)
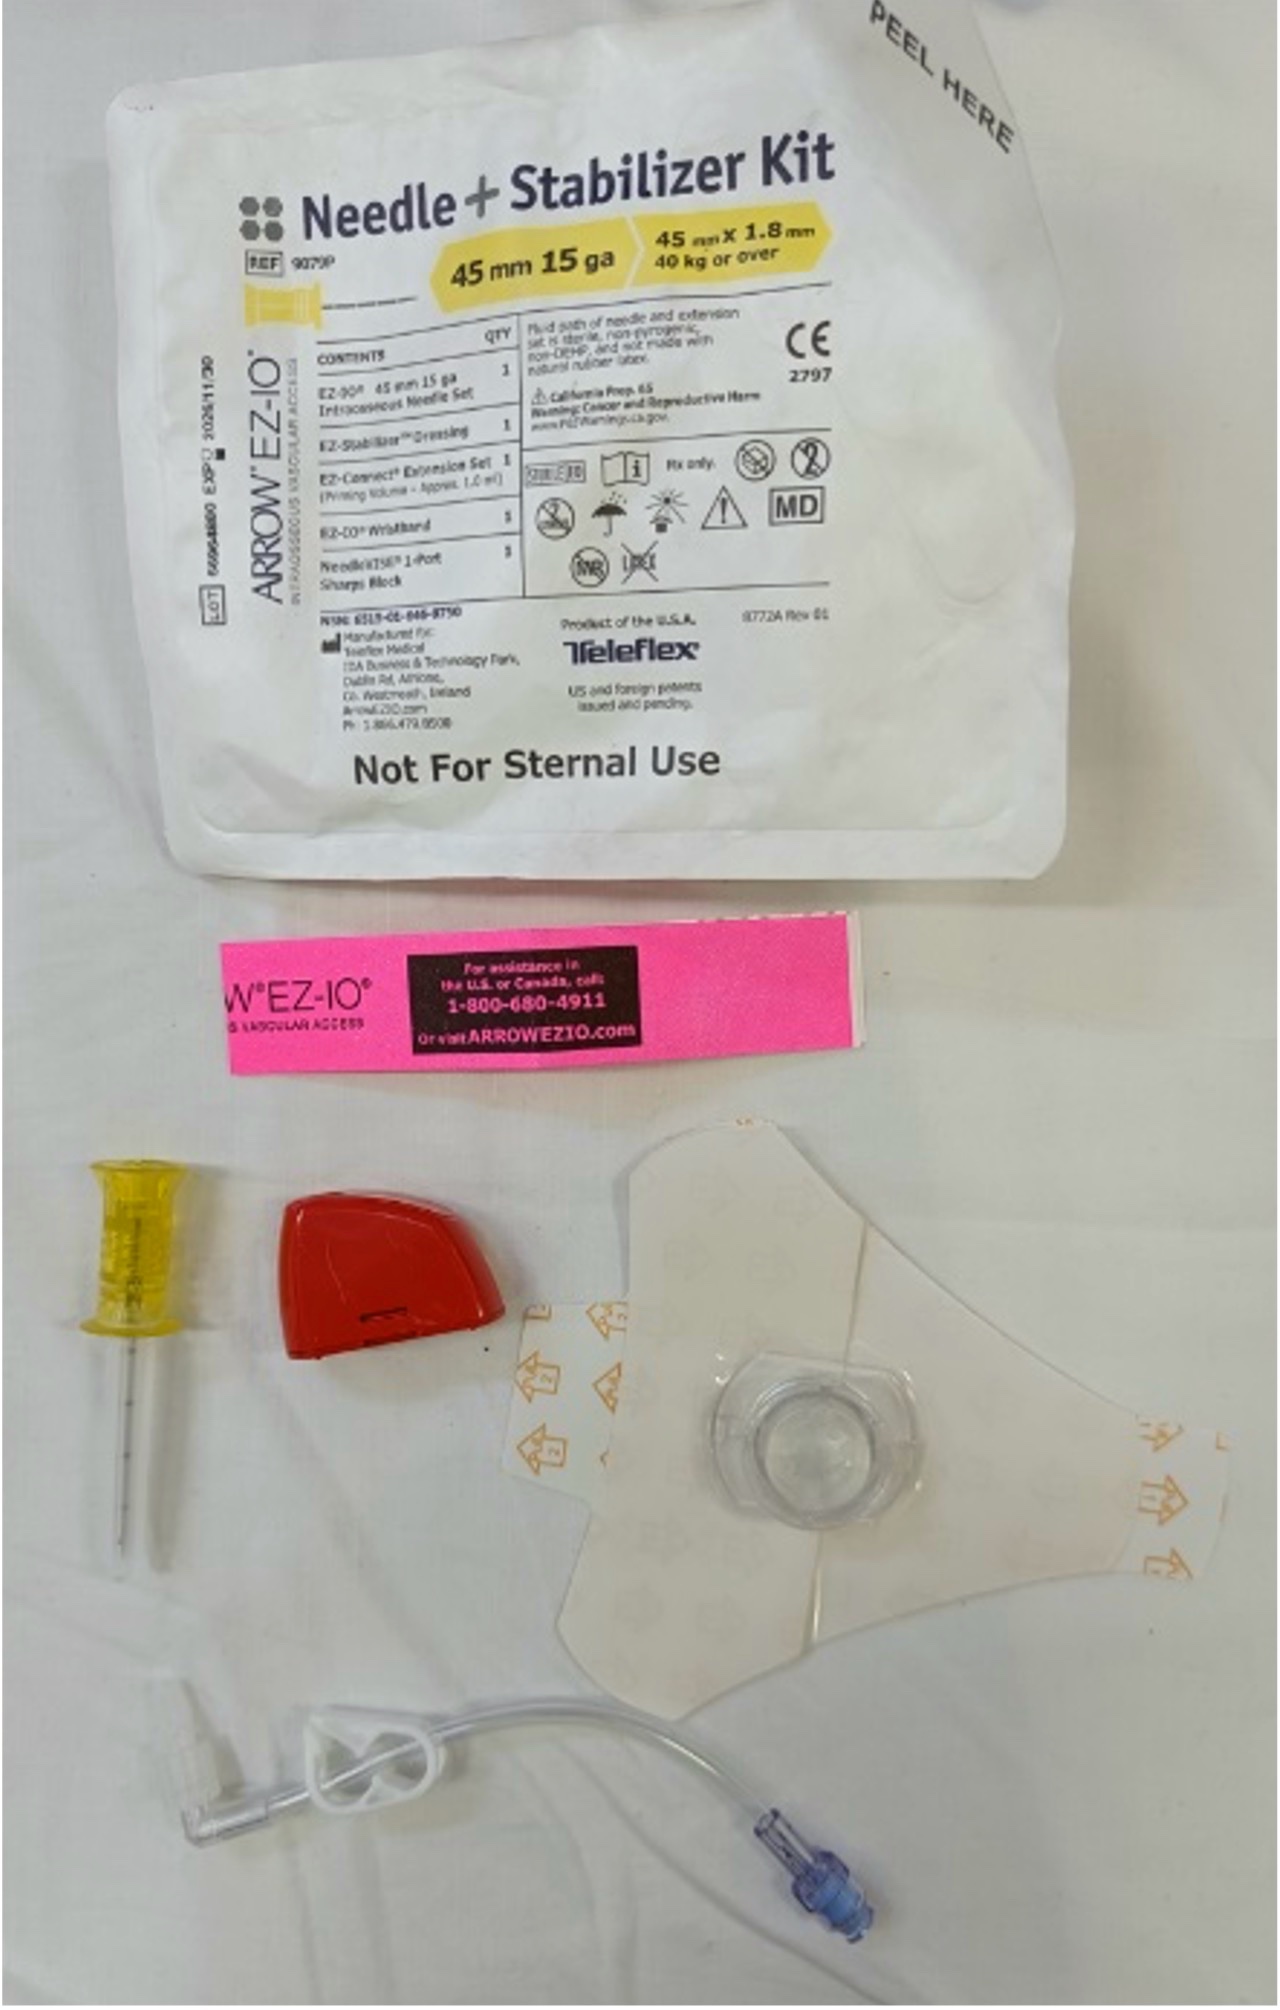
*This equipment is included in each EZ-IO® needle kit (Figure 2). The needle kit may also contain a red needle safety device.
 Gather equipment

If IO access is being established for a fluid infusion, prepare a primed IV giving set with fluids of choice and a pressure infuser. It is also useful to incorporate a three-way stopcock between the giving set and IO extension set to allow for the injection of additional medications if required (e.g. adrenaline or amiodarone in cardiac arrest).
Introduction
Wash your hands using alcohol gel. If your hands are visibly soiled, wash them with soap and water.
Don PPE if appropriate.
Note: IO access is typically performed on critically unwell patients who are unconscious. However, carrying out the following steps is good practice. IO access can also be gained on a conscious patient, local anaesthetic should be used as a flush once the needle is inserted (follow local guidelines).
Introduce yourself to the patient, including your name and role.
Confirm the patient’s name and date of birth.
Briefly explain what the procedure will involve using patient-friendly language: “I need to perform intraosseous cannulation, which involves placing a needle into your bone marrow so we can deliver medications. You may experience a small sharp pain as the needle is inserted.”
Gain consent to proceed with intraosseous access.
Check if the patient has any allergies (e.g. latex, adhesive).
Adequately expose the patient’s arms and legs as appropriate to landmark your chosen insertion site.
IO insertion sites
Insertion sites for the EZ-IO® include:
- Proximal humerus
- Proximal tibia
- Distal femur (paediatric)
- Distal tibia (paediatric)
Preparation
1. Don gloves (if not already wearing some).
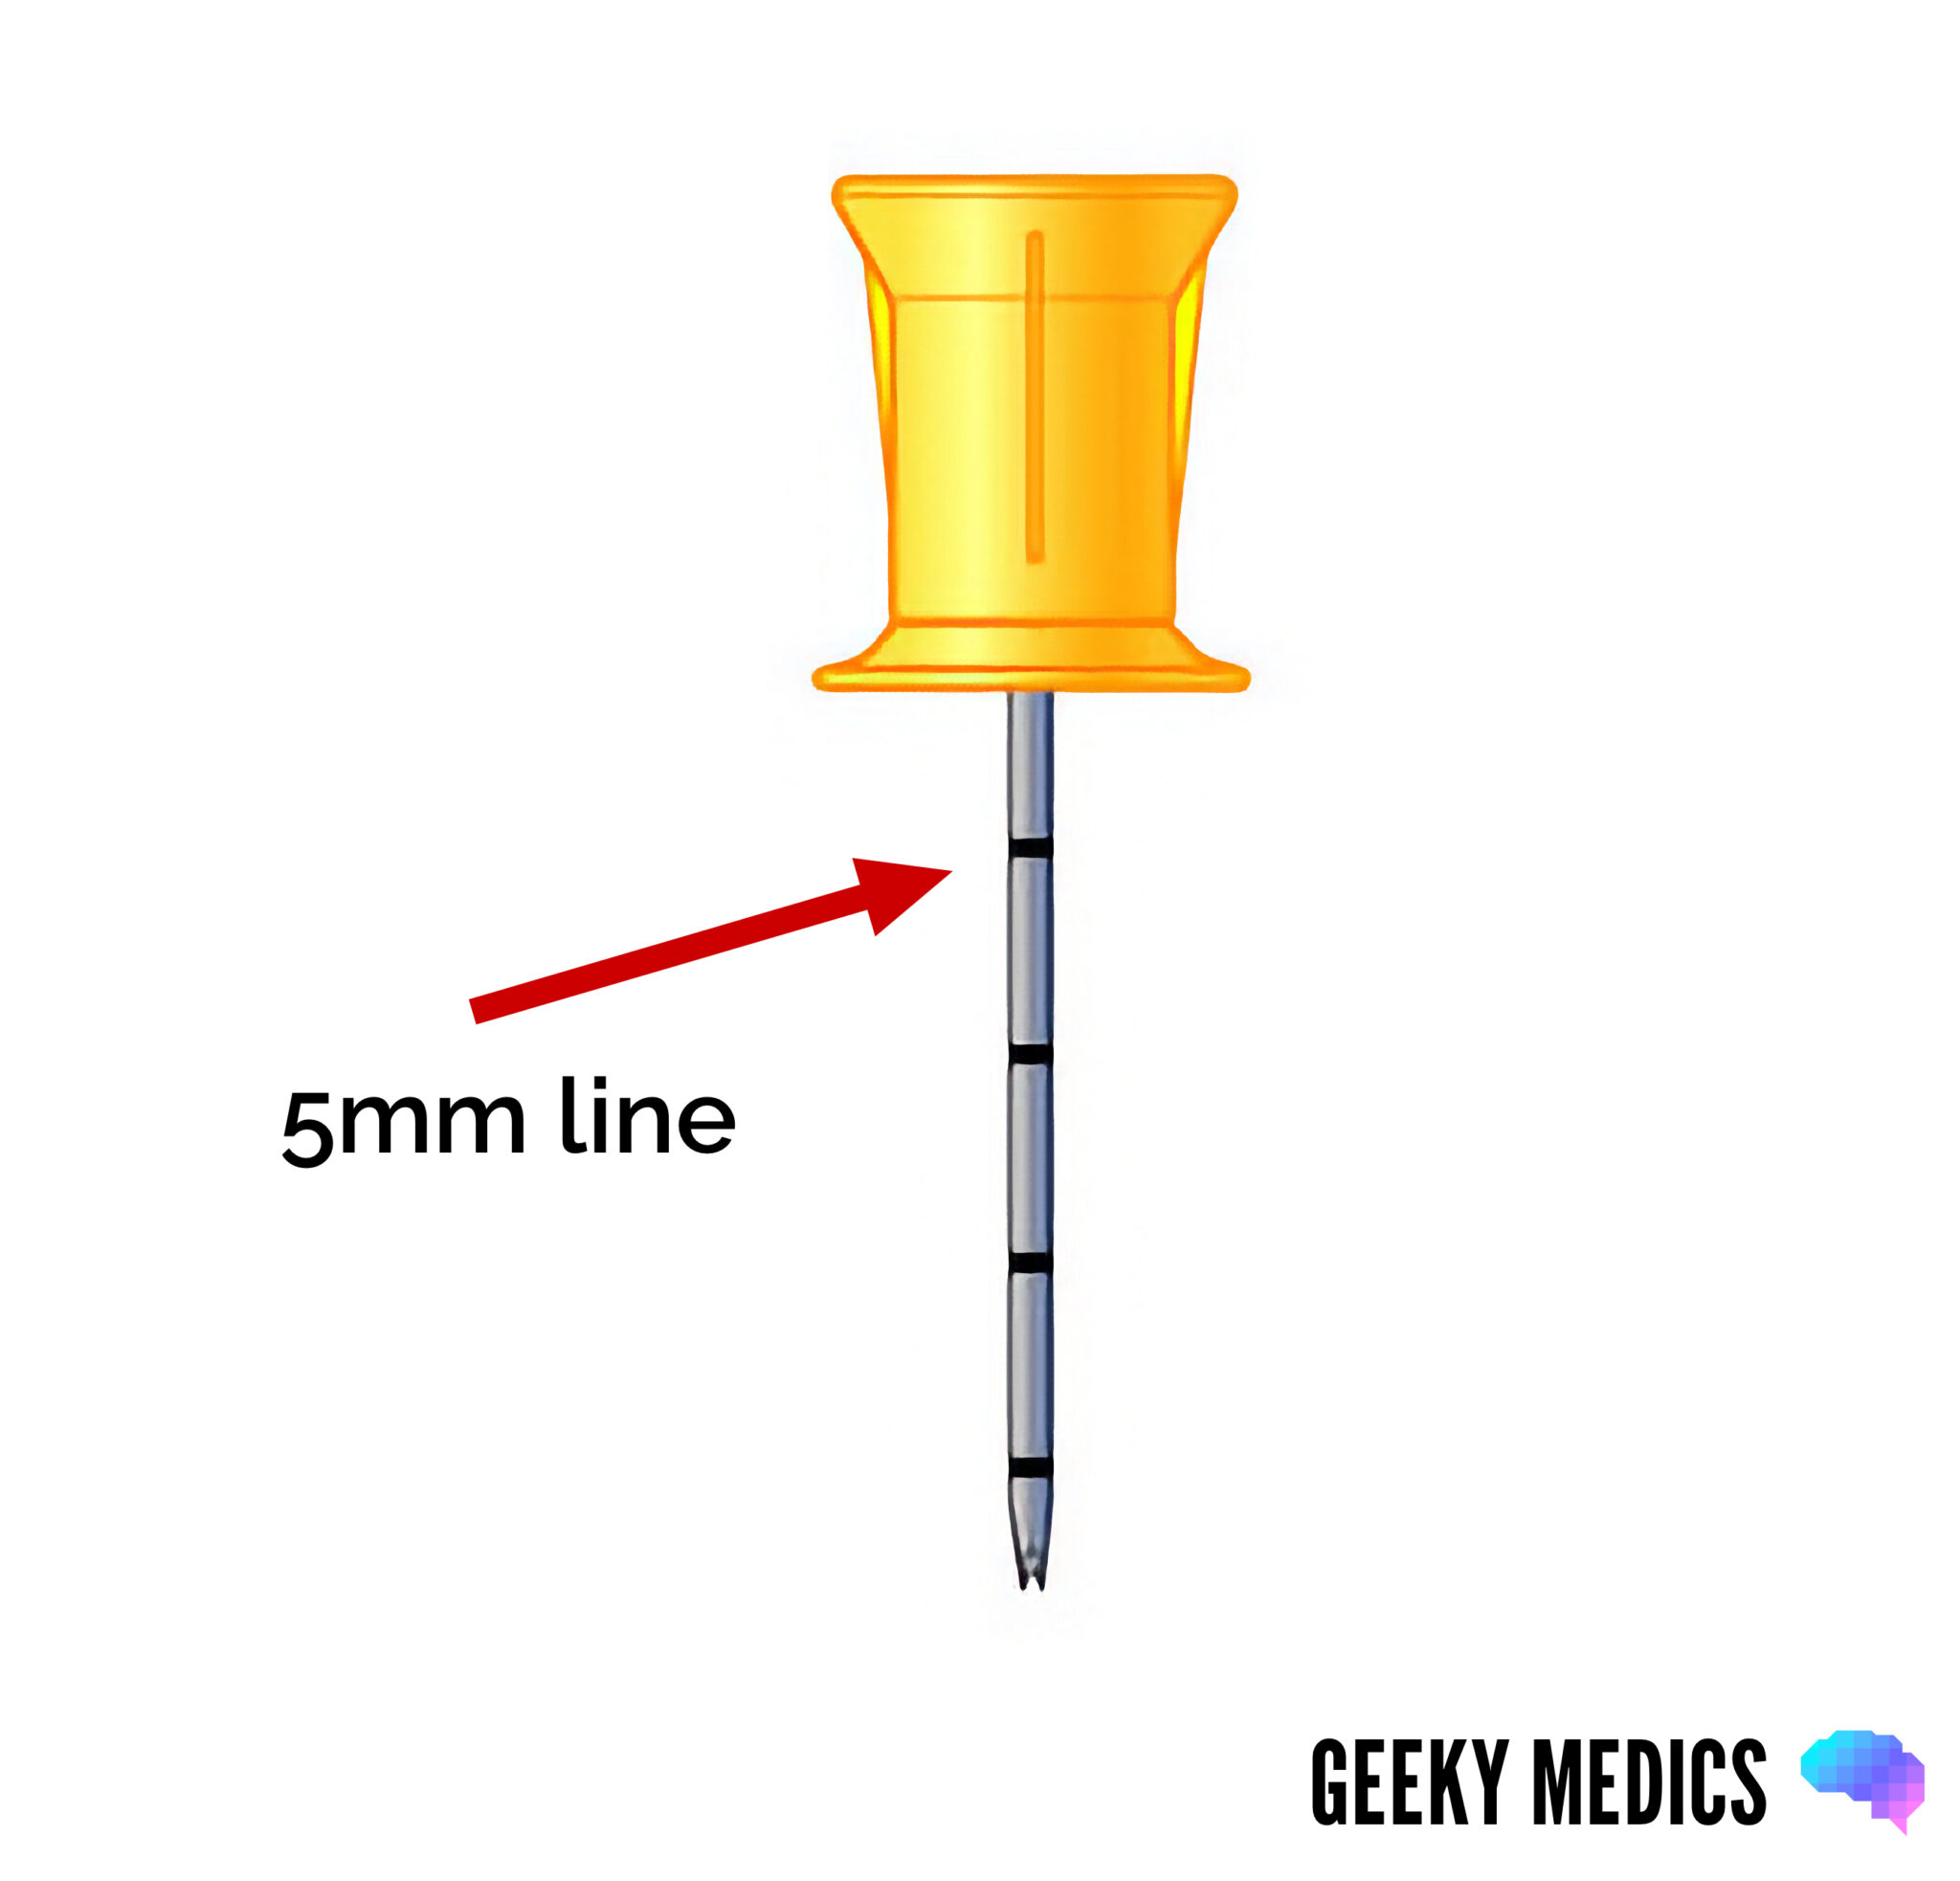
2. Choose an appropriate needle size based on weight, intended insertion site and patient characteristics. The aim is for the 5mm marker (the first black line nearest the needle hub) to be visible when the needle is manually inserted to the edge of the bone before operating the driver.
- 15 mm/pink (weight 3 – 39kg): paediatric
- 25 mm/blue (weight ≥ 3kg): paediatric and adults
- 45mm/yellow (weight ≥ 40kg): adults, proximal humerus insertion, excessive tissue over the insertion site
3. Open the needle pack and place the contents on a sterile field.
4. Prepare the flush, filling the 10ml syringe with normal saline (if using a pre-filled flush syringe, this step can be ignored). If carrying out IO access on a conscious patient, prepare a local anaesthetic flush.
5. Prime the EZ-IO® extension tubing with your flush, leaving the syringe attached (this will be pulled back to check for marrow aspirate once the cannula is inserted).
6. Identify your chosen insertion site using anatomical landmarks (these are described below).
Choosing an insertion site
Proximal humerus
The proximal humerus IO insertion site is located 1-2cm above the surgical neck of the humerus. To identify the insertion site:
1. Place the patient’s hand over the abdomen (elbow adducted and humerus internally rotated). Place your palm on the patient’s shoulder anteriorly. The area that feels like a “ball” under your palm is the general target area. You should be able to feel this ball, even on obese patients, by pressing deeply.
2. Place the ulnar aspect of your hand vertically over the axilla. Place the ulnar aspect of your other hand along the midline of the upper arm laterally.
3. Place your thumbs together over the arm. This identifies the vertical line of insertion on the proximal humerus.
4. Palpate deeply up the humerus to the surgical neck. This may feel like a golf ball on a tee- the spot where the “ball” meets the “tee” is the surgical neck. The insertion site is 1 to 2cm above the surgical neck, on the most prominent aspect of the greater tubercle.
5. The needle tip is inserted at a 45-degree angle to the anterior plane and posteromedial.
Advantages
- Higher flow rates are achievable than the proximal tibia site
- Easily accessed from the head if the clinician is in the airway management position
Disadvantages
- It can be dislodged and/or deformed if the arm is abducted and externally rotated
- In cardiac arrest situations, the area around the torso and head is generally a hive of activity, and the humeral head site may not be as easily accessible
Proximal tibia
The proximal tibia IO insertion site is approximately 2cm medial to the tibial tuberosity, or 3 cm below the patella and approximately 2cm medially, along the flat aspect of the tibia.
Identify the insertion site with the leg extended.
When using this site, avoiding the epiphyseal growth plate is important. This can be done by correctly landmarking the site.
Advantages
- Higher first-attempt success rate than humeral head and intravenous access in out-of-hospital cardiac arrest
- The patient’s legs are generally more accessible in cardiac arrest, allowing more space to perform the procedure
Disadvantages
- Unable to be used if vasculature compromised proximally (e.g. suspected fracture/fractured femur/pelvis)
- Tibias may not be accessible in those patients entrapped pre-hospital
Paediatric site selection
IO access in children is more challenging as the bone structure is less rigid. In smaller infants, the needle can be inserted by hand (and not using the driver) as it is easy to overshoot the medullary space accidentally. Always check and follow local clinical practice guidelines.
Several sites exist for IO access in children:
- Proximal humerus: similar to adults
- Proximal tibia: 1cm medial to the tibial tuberosity or just below the patella (approximately 1cm) along the flat aspect of the tibia, pinching the tibia between your fingers helps identify the medial and lateral borders of the tibia
- Distal femur: 1cm proximal to the superior border of the patella and approximately 1-2cm medial to the midline
- Distal tibia: 1-2cm proximal to the most prominent aspect of the medial malleolus; the insertion site should be the flat centre aspect of the bone
Insert the needle
1. Clean the insertion site with a chlorhexidine wipe.
2. Attach the needle to the driver.
3. Without operating the driver, manually press the needle and driver into the skin at the chosen site until it meets the bone. If the first black line closest to the needle hub (5mm line) is visible at this stage (Figure 3), then the needle is the correct length.
- If the 5mm marker is not visible, do not proceed. Withdraw the needle, and choose an appropriate needle size.
4. With gentle downward pressure on the driver, press the trigger to advance the needle.
5. Once the needle advances and you feel a “pop” or loss of resistance, you are in the correct space. Advance a little more to ensure the catheter is fully in place. Take care not to advance beyond this space. It is possible to over-penetrate the medullary space and enter the cortex on the opposite side.
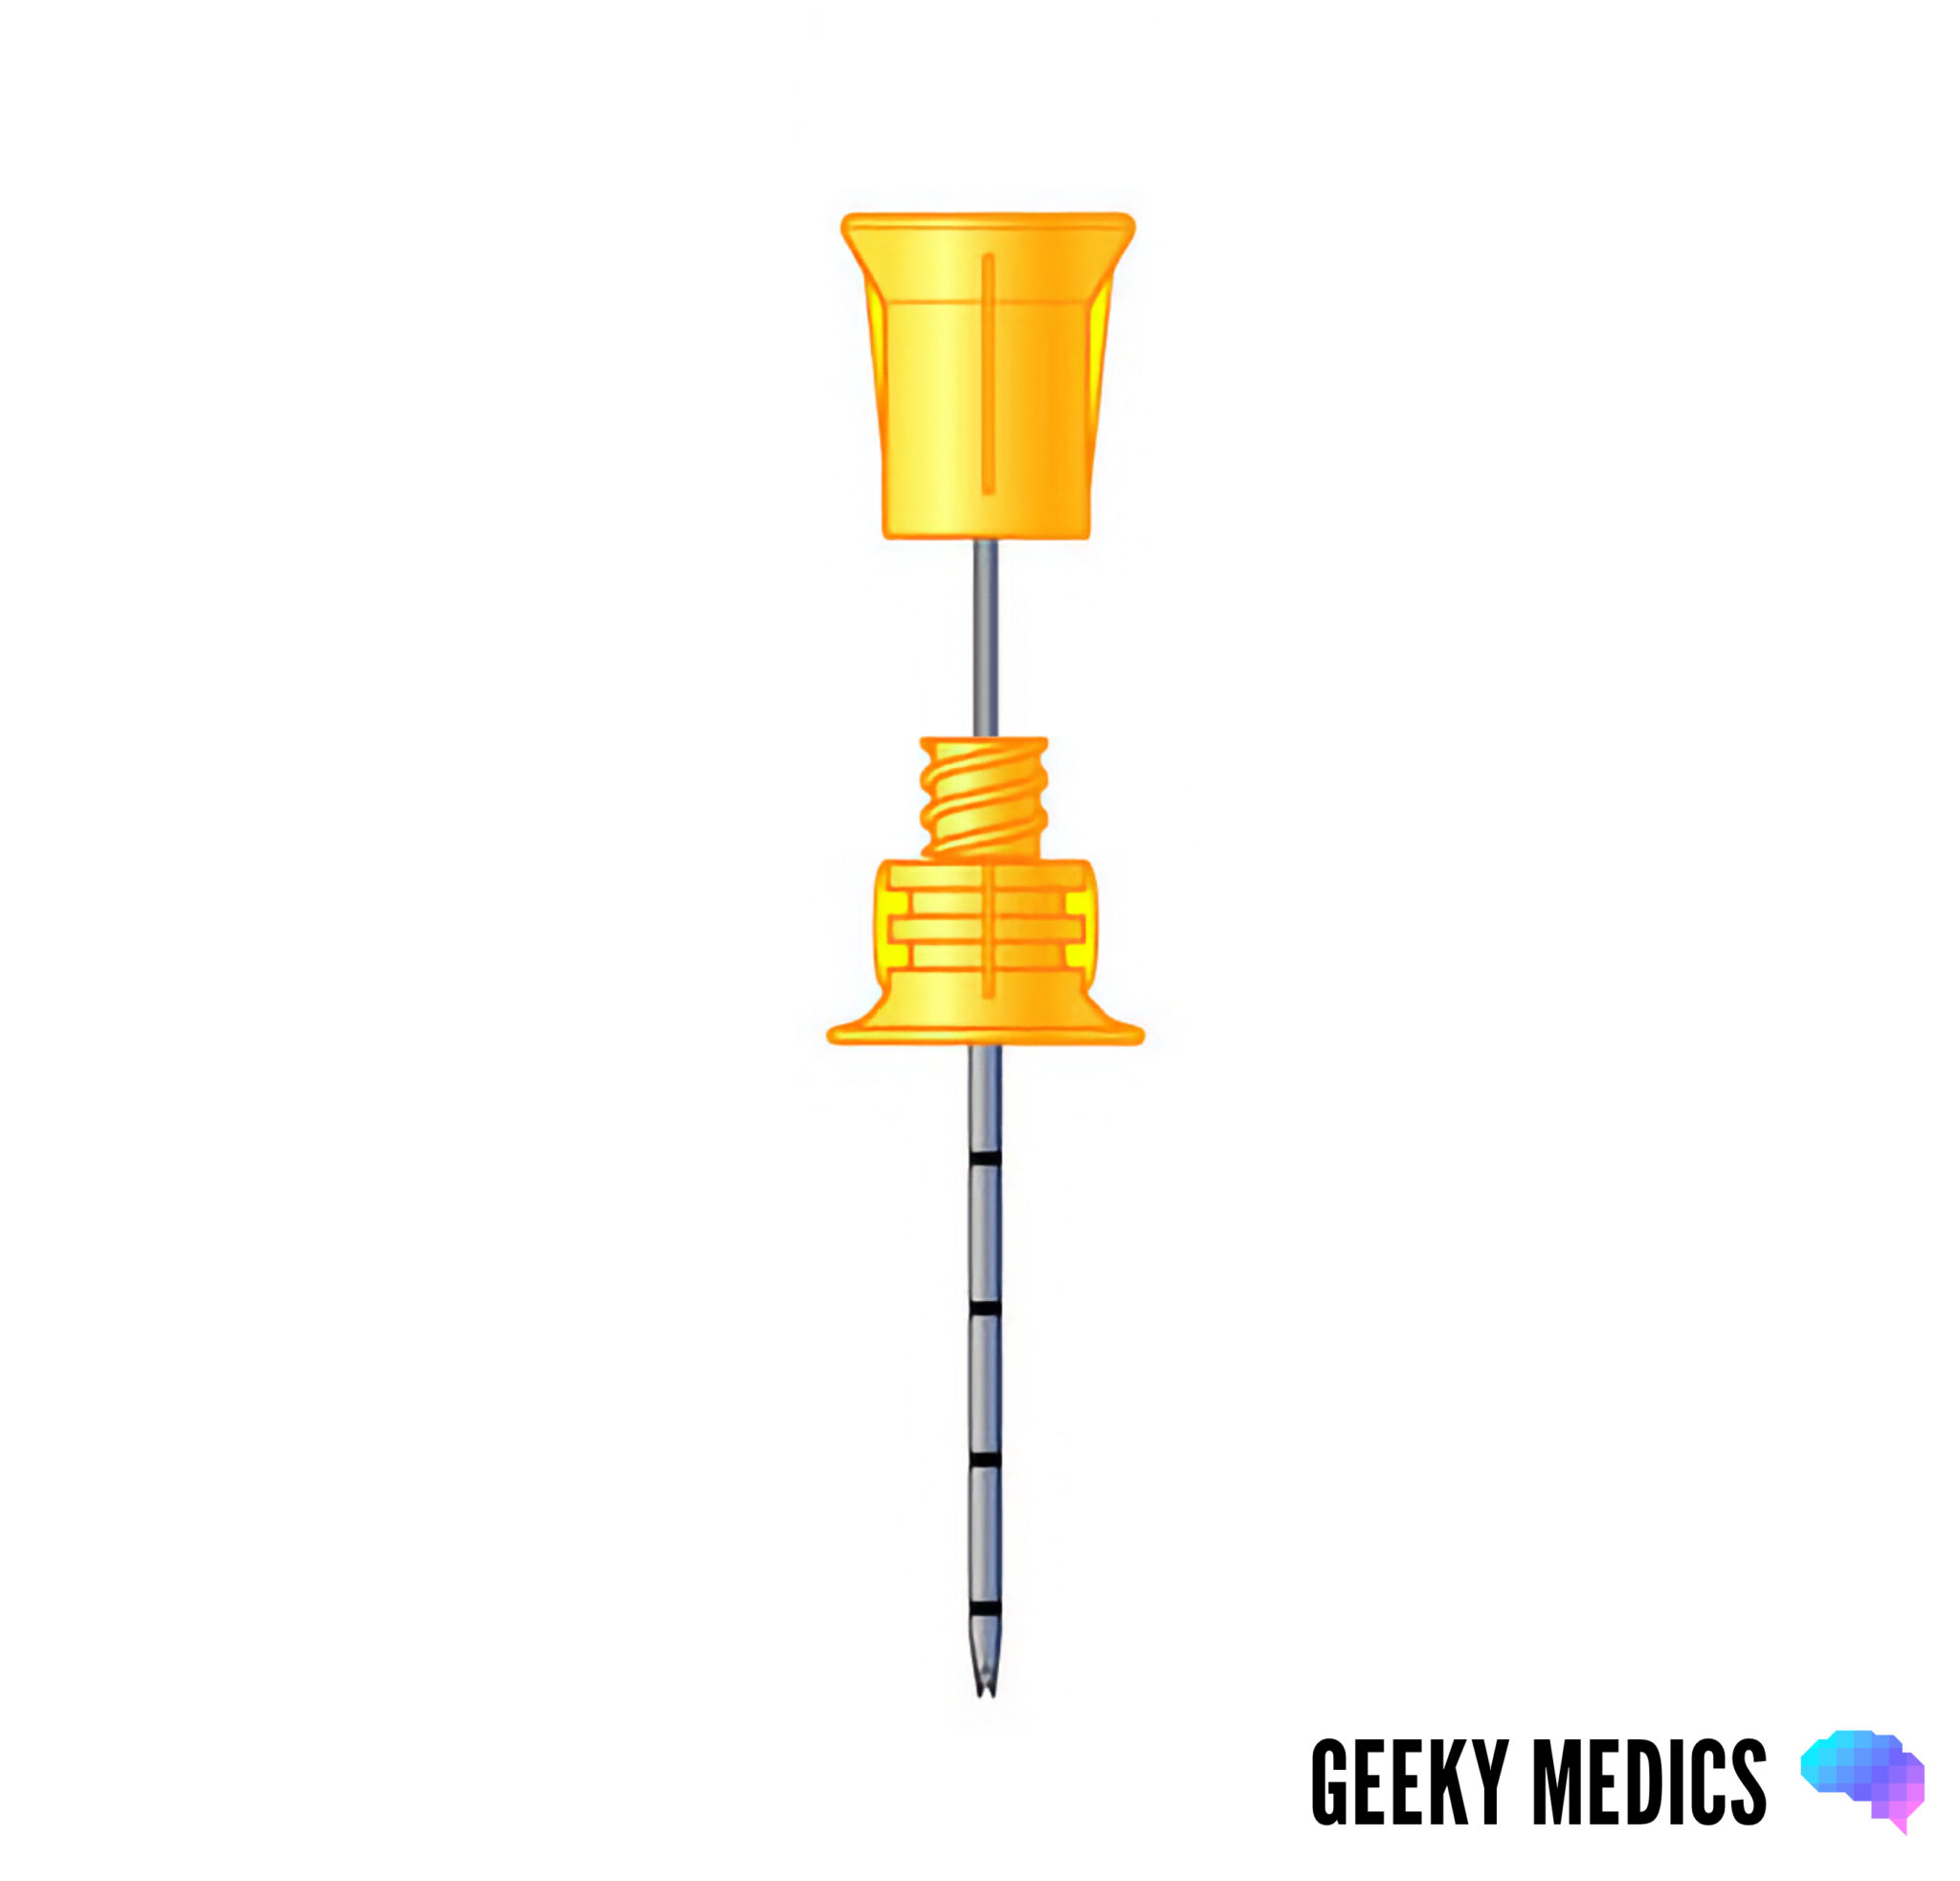
6. Stabilise the hub and detach the driver; the stylet twists out of the hub (Figure 4) and should be disposed of in an appropriate sharps bin.
7. Place the dressing over the hub and attach it to the skin. This must be done before connecting the extension tubing, as it does not fit through the dressing.
Flush the catheter
1. Attach the extension tubing and open the clamp.
2. Aspirate the syringe to check for bone marrow (this may not always be present) and then flush the catheter.
- Adults: 5 – 10ml
- Children: 2.5 – 5ml
3. There may be some resistance initially as the flush creates a cavity within the fibrin mesh of the medullary space.
Conscious patients
Flushing an intraosseous catheter can be painful for conscious patients. In conscious patients, administering a local anaesthetic (e.g. lidocaine) through the IO catheter can reduce pain. However, local anaesthetic may not be available in all settings – check and follow local guidelines.
To complete the procedure…
Dispose of your PPE and other clinical waste into an appropriate clinical waste bin.
Wash your hands.
Document the details of the procedure, including:
- The patient’s details: full name, date of birth and unique identification number
- The date and time that IO access was performed
- The indication for gaining IO access
- The type of needle used
- The anatomical insertion site
- The volume and type of flush used
- Your name, grade and contact details
Removing an IO catheter
To remove an IO catheter once it has been inserted, you will need the following:
- Gloves
- A 10ml Luer-Lok™ syringe
- Clean dressing
- Sharps bin
Removal procedure
1. Don gloves (if not already wearing some).
2. Remove the extension tubing and dressing from the catheter hub
3. Attach the syringe to the IO catheter.
4. Maintaining the same alignment as the IO hub, twist the syringe and catheter clockwise while pulling straight out. Do not rock or bend during IO needle removal.
5. Place the catheter and the syringe into a sharps container as a single unit.
6. Apply a clean dressing to the site.
Reviewer
Dr Jason van der Velde
Prehospital Emergency Medicine and Critical Care Retrieval Physician
References
- Perkins, G., 2023. Pre-hospitAl RAndomised trial of MEDICation route in out-of-hospital cardiac arrest (PARAMEDIC-3). Available from: [LINK]
- Garabon, J.J.W., Gunz, A.C., Ali, A. and Lim, R., 2022. EMS Use and Success Rates of Intraosseous Infusion for Pediatric Resuscitations: A Large Regional Health System Experience.
- Pasley, J., Miller, C.H.T., DuBose, J.J., Shackelford, S.A., Fang, R., Boswell, K., Halcome, C., Casey, J., Cotter, M., Matsuura, M., Relph, N., Tarmey, N.T. and Stein, D.M., 2015. Intraosseous infusion rates under high pressure: a cadaveric comparison of anatomic sites. The journal of trauma and acute care surgery, [online] 78(2), pp.295–299.
- Reades, R., Studnek, J.R., Vandeventer, S. and Garrett, J., 2011. Intraosseous versus intravenous vascular access during out-of-hospital cardiac arrest: a randomized controlled trial. Annals of emergency medicine, [online] 58(6), pp.509–516.
- Reid, C., 2018. Humeral Intraosseous – Stay In & Stay Straight. [online] Online. Available from: [LINK]
- Soar, J., Böttiger, B.W., Carli, P., Couper, K., Deakin, C.D., Djärv, T., Lott, C., Olasveengen, T., Paal, P., Pellis, T., Perkins, G.D., Sandroni, C. and Nolan, J.P., 2021. European Resuscitation Council Guidelines 2021: Adult advanced life support. [online]
- Telefex Medical, 2016. Arrow EZ-IO Intraosseous Vascular Access System Pocket Guide. [online] Available from: [LINK]
