
- 📖 Geeky Medics OSCE Book
- ⚡ Geeky Medics Bundles
- ✨ 1300+ OSCE Stations
- ✅ OSCE Checklist PDF Booklet
- 🧠 UKMLA AKT Question Bank
- 💊 PSA Question Bank
- 💉 Clinical Skills App
- 🗂️ Flashcard Collections | OSCE, Medicine, Surgery, Anatomy
- 💬 SCA Cases for MRCGP
To be the first to know about our latest videos subscribe to our YouTube channel 🙌
The Extended Focused Assessment using Sonography in Trauma (eFAST) is a sonographic examination that can be incorporated in the evaluation of patients with blunt or penetrating trauma to the torso.
The basic FAST exam assesses four standardised ultrasound views along the chest and abdomen, making use of gravity-dependent regions to rapidly identify intraperitoneal and/or pericardial fluid.
The extended FAST includes the additional evaluation of the anterior and lateral pleural spaces to evaluate for pneumothorax or pleural fluid, presumed to be a haemothorax until proven otherwise in the setting of trauma. A scan is deemed positive if any free fluid is visualised. However, it is important to note that a negative scan does not rule out internal bleeding.
Indications
Indications for eFAST include:
- Haemodynamically unstable blunt abdominal trauma
- Haemodynamically stable blunt chest trauma
- Any penetrating trauma to the chest
The FAST exam is less sensitive in the setting of penetrating trauma than blunt trauma due to air in the peritoneal or pleural spaces. Air does not allow ultrasound to penetrate deeper tissue.
Gather equipment
Collect all equipment needed for the exam and place it within reach at the patient’s bedside.
- Non-sterile gloves
- Gown or disposable apron (optional)
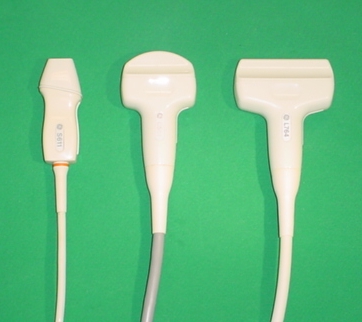
- Ultrasound machine
- Curvilinear probe
- Ultrasound gel
- Probe cover if present
The curvilinear probe is the probe of choice for the eFAST exam as it allows for both adequate penetration and image resolution in all areas examined. This removes any need to switch probes mid-exam.
Introduction
Wash your hands using alcohol gel. If your hands are visibly soiled, wash them with soap and water.
Don PPE as appropriate.
Introduce yourself to the patient including your name and role.
Confirm the patient’s name and date of birth.
Where possible, briefly explain what the procedure will involve using patient-friendly language: “Today I need to perform a FAST exam of your abdomen, which involves using an ultrasound to view your internal organs. This will help us to plan your future management to the best of our ability. The procedure may feel a little uncomfortable but shouldn’t be painful.”
Gain consent to proceed with the examination.
Preparation
1. Position the patient supine if not so already.
2. Adequately expose the patient for the examination.
3. Position yourself on the right side of the patient (if possible).
4. Place the ultrasound machine across the patient within your eye line (if possible).
5. Don probe cover if present and apply gel to the ultrasound probe.
If possible, adjusting the bed to place the patient in the Trendelenburg position and/or with their arms behind their head can improve the sensitivity of the examination.
Ultrasound views
Sequence
The sequence in which each view is obtained can vary based on the mechanism of injury. As a general guide:
- Blunt abdominal trauma: begin with a right upper quadrant view
- Penetrating abdominal trauma: begin with a cardiac view
- Respiratory distress: begin with a thoracic view

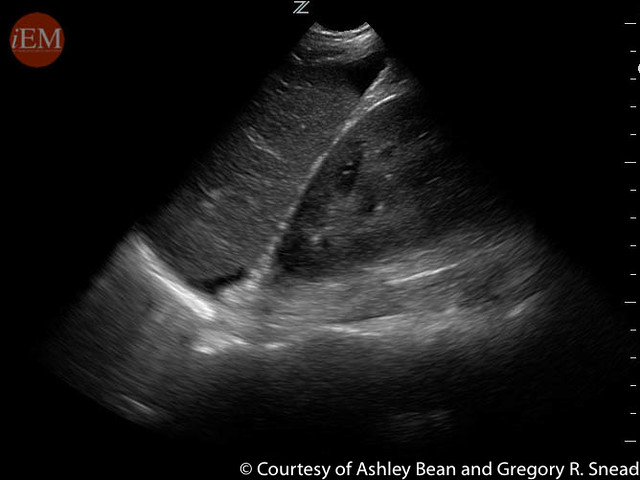
Cardiac
1. Orient the probe in the transverse plane with the marker towards the patient’s right.
2. Palpate for the patient’s xiphoid process and place the probe immediately
3. Point probe slightly towards the patient’s left, push down and fan until you can view all four chambers of the heart.
4. Fan the probe through the heart, assessing for hypoechoic free fluid within the pericardium. Clotted blood can appear slightly hyperechoic.
5. If the view is hard to obtain, slide the probe to the patients right. This allows the liver to act as an acoustic window, more effectively transmitting ultrasound.

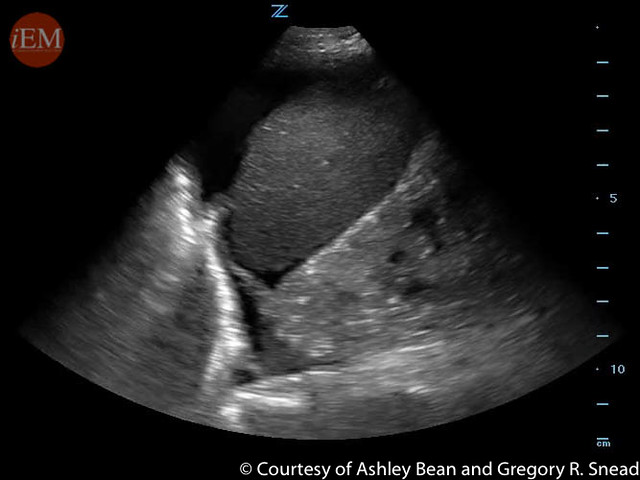
Right upper quadrant (RUQ)
1. Orient the probe in the longitudinal plane with the marker towards the patient’s head.
2. Place the probe along the mid-axillary line between the 9th-11th intercostal space. If needed, rotate anticlockwise into intercostal space to obtain an unobstructed view.
3. Slide the probe cephalad and caudad along the lateral chest wall until the interface between liver and diaphragm is visualised
4. Fan the probe to scan the region, assessing for hypoechoic free fluid in the hepatorenal pouch (of Morison).
5. Slide the probe cephalad to visualise the pleural space, assessing for the presence of mirror artefact or the spine sign to evaluate for haemothorax.
6. Slide the probe caudally down to the inferior renal pole, assessing for hypoechoic free fluid at the caudal tip of the liver or within pararenal recesses.
Free fluid within the RUQ is commonly found at the caudal tip of the liver and inferior pole of the kidney.
Left upper quadrant (LUQ)
1. Orient the probe in the longitudinal plane with the marker towards the patient’s head.
2. Place the probe along the posterior axillary line between the 6th-8th intercostal space. If needed, rotate clockwise into intercostal space to obtain an unobstructed view.
3. Slide the probe cephalad and caudad along the lateral chest wall until the interface between the spleen and diaphragm is visualised.
4. Fan the probe to scan the region, assessing for hypoechoic free fluid in the subphrenic and splenorenal recesses.
5. Slide the probe cephalad to visualise the pleural space, assessing for the presence of mirror artefact or spine sign to evaluate for haemothorax.
6. Slide the probe caudally down to the inferior renal pole, assessing for hypoechoic free fluid at the tip of the spleen, pararenal recesses or left paracolic gutter.
It is much more common for fluid to collect in the left subphrenic region than in the right.
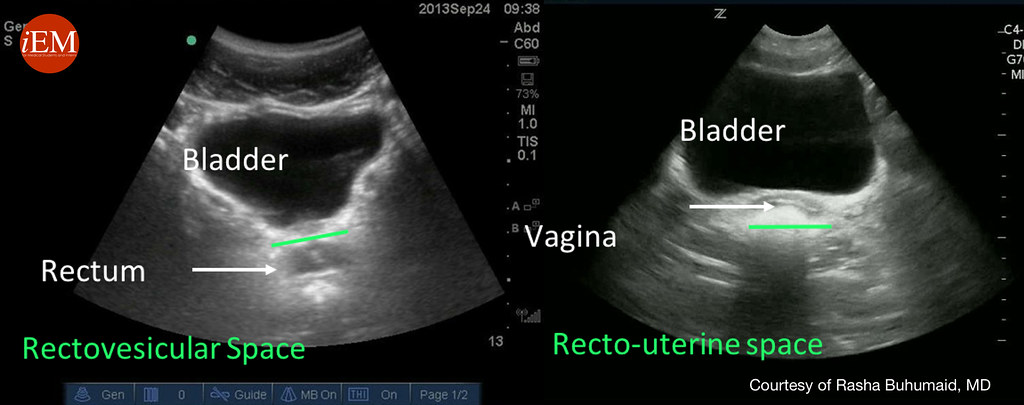
Pelvic
1. Orient the probe in the longitudinal plane with the marker towards the patient’s head.
2. Place the probe along the midline, immediately superior to the pubic symphysis.
3. Fan the probe to scan through the urinary bladder, assessing for surrounding hypoechoic free fluid.
4. Rotate the probe 90-degrees into the transverse plane with the marker towards the patient’s right.
5. Angle the probe down into the pelvis.
6. Fan the probe through the pelvis, assessing for hypoechoic free fluid in the rectouterine pouch (of Douglas) (female) or rectovesical pouch (male).
A full bladder may cause “posterior enhancement”, therefore gain may need to be lowered for proper visualisation.
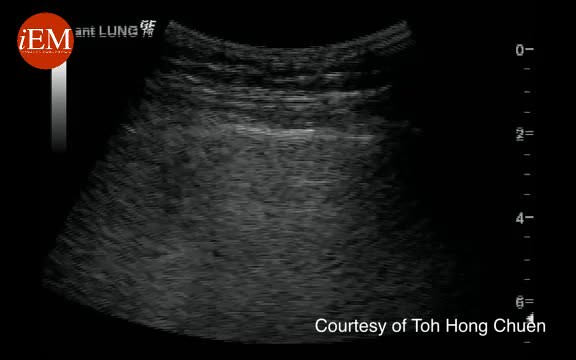
Thoracic (eFAST only)
1. Orient the probe in the longitudinal plane with the marker towards the patient’s head.
2. Place the probe along the midaxillary region at the level of the 3rd or 4th intercostal space.
3. Ensure that ribs are present on the left and right of the ultrasound field.
4. Ensure pleura visualised is below the ribs as subcutaneous emphysema can lead to misinterpretation of the true pleural line.
5. If there is doubt about pleural sliding, reduce gain until only the pleural line is visible. This allows any movement in the pleural line to be noticed.
6. The linear probe can be used to further interrogate the pleural line.
7. Switch to M-Mode if required to visualise the interface between the pleura and lung.
8. Assess for lung sliding, comet-tail artefacts, seashore sign, barcode sign and/or the presence of a “lung point” to evaluate for pneumothorax.
9. Repeat the above technique on the other side of the chest.
The discovery of a lung point where there is a transition from lung sliding is diagnostic of a pneumothorax.
To complete the procedure…
Document the procedure by saving images of the standard views, plus any additional images of pathology.
Explain to the patient that the procedure is now complete.
Dispose of PPE appropriately and wash your hands.
Document findings in the patient’s notes.
Discuss options for appropriate management based on sonography findings:
- Haemodynamically unstable patients with positive eFAST: emergency laparotomy
- Haemodynamically unstable patients with negative eFAST: CT scan, assess for non-peritoneal haemorrhage or repeat eFAST
- Haemodynamically stable patients with positive eFAST: CT scan
- Haemodynamically stable patients with negative eFAST: observation, discharge or repeat eFAST
Benefits and limitations
Benefits
The FAST exam is a rapid, non-invasive, radiation-free examination and can be easily incorporated into the bedside assessment of trauma patients.
The FAST exam is safe in paediatric and pregnant patients.
Limitations
Sensitivity is operator dependent and both false positives and negatives can arise. Therefore, the FAST exam should not be used as a stand-alone examination tool.
The FAST exam requires a minimum of 100-200mL of fluid for visualisation, meaning smaller collections of fluid may go undetected.
The FAST exam is unreliable for the visualisation of intraparenchymal or subcapsular haemorrhage.
Reviewer
Dr. Nicolas Lim, MB, BCh, BAO
Professor for Ultrasound Leadership Academy
Editor
Dr Chris Jefferies
References
- SAEM. FAST Exam. Published 2016. Available from: [LINK]
- Medscape. Focused Assessment with Sonography in Trauma (FAST). Published 2017. Available from: [LINK]
- Fleming, S., Bird, R., Ratnasingham, K., Sarker, S. J., Walsh, M., & Patel, B. (2012). Accuracy of FAST scan in blunt abdominal trauma in a major London trauma centre. International Journal of Surgery, 10(9), 470-474.
- Natarajan, B., Gupta, P. K., Cemaj, S., Sorensen, M., Hatzoudis, G. I., & Forse, R. A. (2010). FAST scan: is it worth doing in hemodynamically stable blunt trauma patients?. Surgery, 148(4), 695-701.
- Uptodate: Initial management of trauma in adults. Published 2020. Available from: [LINK]
Image references
- Kalumet. Sonden. License: [CC BY-SA]
- Valerie M Armstrong. EFAST View. License: [CC BY-SA]
- International Emergency Medicine Education Project. Subxiphoid view demonstrating pericardial effusion with diastolic collapse. License: [CC BY-NC-SA]
- International Emergency Medicine Education Project. Abnormal Right Upper Quadrant. License: [CC BY-NC-SA]
- International Emergency Medicine Education Project. Left Upper Quadrant. License: [CC BY-NC-SA]
- International Emergency Medicine Education Project. efast pelvic longitudinal anatomical structures. License: [CC BY-NC-SA]
- International Emergency Medicine Education Project. Normal thoracic view. License: [CC BY-NC-SA]
