
- 📖 Geeky Medics OSCE Book
- ⚡ Geeky Medics Bundles
- ✨ 1300+ OSCE Stations
- ✅ OSCE Checklist PDF Booklet
- 🧠 UKMLA AKT Question Bank
- 💊 PSA Question Bank
- 💉 Clinical Skills App
- 🗂️ Flashcard Collections | OSCE, Medicine, Surgery, Anatomy
- 💬 SCA Cases for MRCGP
To be the first to know about our latest videos subscribe to our YouTube channel 🙌
Introduction
Diagnostic thoracentesis (a pleural tap) involves removing a sample of pleural fluid from the pleural space.
This guide provides a step-by-step approach to performing diagnostic thoracentesis in an OSCE setting, it is NOT intended to be used to guide patient care.
Indications
Indications for diagnostic thoracentesis include:
- Malignant pleural effusion: to aid diagnosis (small volume aspiration) or relieve symptoms (large volume aspiration)*
- Suspected empyema: to aid diagnosis and guide decision on whether to proceed to chest drain (if pH <7.2 or frank pus)
- Pleural effusion of unknown cause: to aid diagnosis and guide treatment
*In this guide, we will discuss small volume aspiration
Gather equipment
Gather the appropriate equipment to perform a pleural tap:
- Antiseptic solution with applicator (e.g. chlorhexidine applied with ChloraPrep™)
- Sterile drapes
- Sterile field (e.g. wound care pack)
- Sterile gloves
- 21G (green) needle
- 50ml Luer lock syringe
- Sterile gauze and dressing
- Appropriate containers to collect fluid for microbiology, cytology, and biochemistry results
- Ultrasound machine with sterile ultrasound probe sheath
If local anaesthetic is required:
- 5ml local anaesthetic, such as 1% lidocaine
- 23G (blue) or 25G (orange) needle
- 5ml syringe
Pre-procedure
Contraindications
Check for any contraindications prior to performing the procedure:
- Uncooperative patient
- Local skin infection at the needle insertion site
- Bleeding disorder or coagulopathy (including INR >1.5 or platelets <50)
- No safe site for aspiration of fluid identified on thoracic ultrasound
- Unavailability of an ultrasound operator
Review imaging
Ensure there is a recent chest x-ray which shows pleural effusion and note which side.
Make you have an appropriately qualified ultrasound operator available (in the United Kingdom, this would be an operator with at least level 1 competency in thoracic ultrasound).
Introduction
Wash your hands using alcohol gel. If your hands are visibly soiled, wash them with soap and water.
Don PPE if appropriate.
Introduce yourself to the patient including your name and role.
Confirm the patient’s name and date of birth.
Explain what the procedure will involve using patient-friendly language: “We can see from the x-ray of your chest that there is some fluid in your lung cavity. To work out the cause of this and give you the right treatment, we need to take a sample of this fluid. We do this by inserting a needle through your chest wall using an ultrasound machine to find the safest place to do so.”
“This is usually a very quick procedure, and we don’t normally need to give local anaesthetic, as injecting the local anaesthetic can cause more discomfort than without.”
“This is a low-risk procedure. The most common potential complications include bleeding, pain, air or blood being introduced into the lung cavity, damage to the nearby organs, and failure of the procedure. However, we believe that the benefits of doing this procedure outweigh the risks.”
Gain consent to proceed with pleural aspiration: preferably written, but some hospitals may accept verbal consent (check local guidelines).
Check if the patient has any allergies (e.g. latex, local anaesthetic).
Ask the patient if they have any pain before continuing with the clinical procedure.
Preparation
Patient positioning
Position the patient sitting comfortably on a chair or bed. Ideally, the patient should be sitting upright and leaning forwards.
This can be achieved by sitting the patient on the edge of their bed, with their bedside table in front of them. Place two pillows on the table and ask the patient to place their arms on the pillow, ensuring that the table wheels are locked in place.
Ultrasound guidance
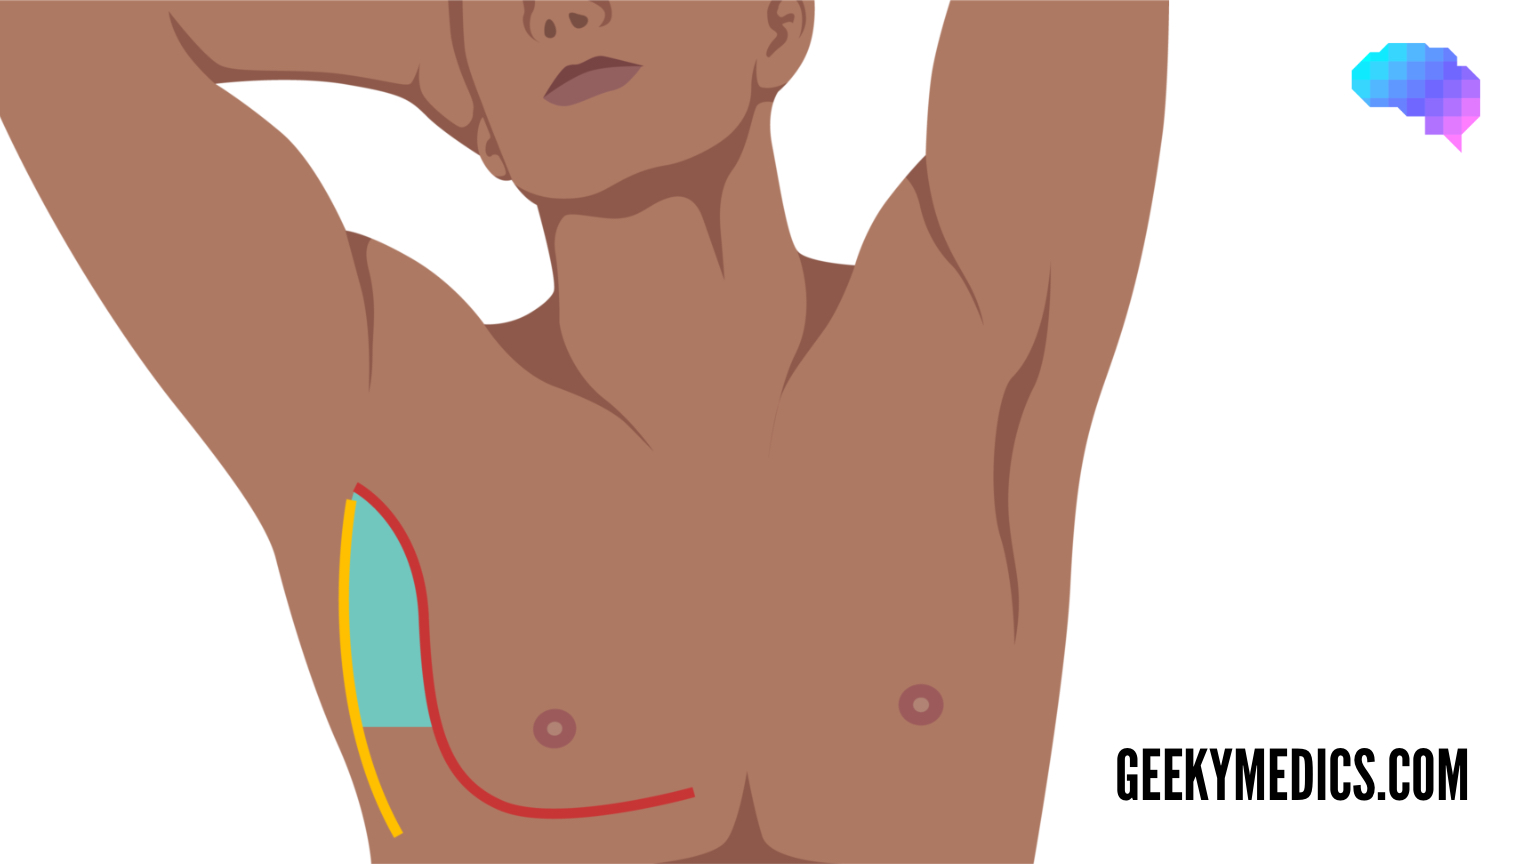
Ask the ultrasound operator to perform an initial scan. The operator should assess the side with the effusion and mark or make note of the best place to aspirate. Ideally, this should be within the triangle of safety (see Figure 1).
A simple way to mark the area is to push a pen lid into the skin, twisting while trying to avoid causing the patient discomfort. This marking will still be visible after cleaning the skin.
The triangle of safety
The triangle of safety is an area of the axilla with the lowest rate of complications when performing an invasive pleural procedure such as a pleural tap or chest drain.
Needles inserted outside of this area have a higher chance of perforating the lung, pericardium, heart, and liver, and thus must be performed under careful ultrasound guidance.
The triangle of safety is bordered by three anatomical landmarks:
- Pectoralis major
- Latissimus dorsi
- 5th intercostal space (roughly at the level of the nipple)
Perform the pleural tap
Setting up the sterile field
1. Wash your hands and don an apron.
2. Remove the outer packaging from the sterile field.
3. Place the sterile field on the clean top shelf of the trolley, opening the pack from the corners without touching the inner surface of the field.
4. Use aseptic non-touch technique (ANTT) to place the antiseptic solution, sterile drapes, needles, syringe, sterile ultrasound probe cover, sterile gauze, and sterile dressing onto the sterile field.
5. Wash your hands.
6. Don sterile gloves and clean a ~20cm area of the patient’s skin around the aspiration site.
7. Apply sterile drapes to the patient, ensuring that only the cleaned area is visible.
8. If using local anaesthetic, check the expiry date and ask your ultrasound operator to open the vial, using a needle and syringe to draw this up without sterile equipment touching a non-sterile surface.
9. Place your hand inside the sterile ultrasound probe sheath to grab the probe from your operator, holding on to it as you allow the rest of the sheath to cover the probe wire.
10. Place the elastic bands supplied with the sheath underneath the probe and hand it to your ultrasound operator, who should also be wearing sterile gloves.
11. Finally, attach your 21G needle onto the 50ml Luer lock syringe.
Aspirate pleural fluid
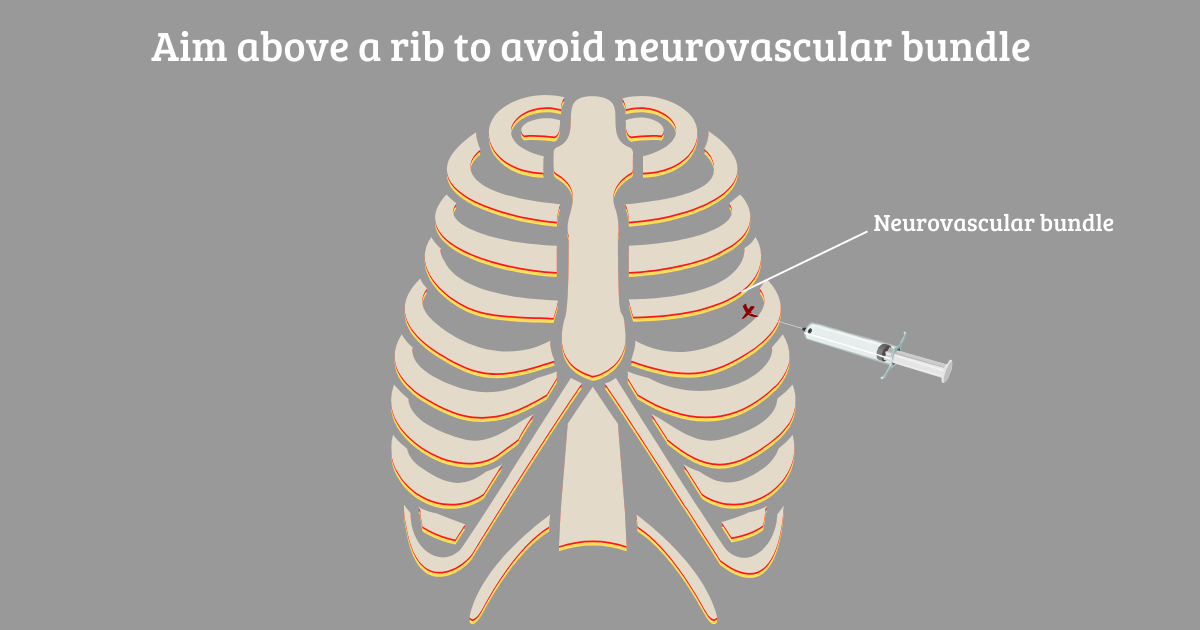
1. Check the skin mark and feel the area to ensure you insert the needle above a rib, to avoid causing damage to the neurovascular bundle (see Figure 2).
2. At this stage, your ultrasound operator can re-check the needle insertion site to ensure the fluid has not shifted.
3. If using local anaesthetic, insert the needle into the skin at a shallow angle (~15 degrees). As you inject between the dermis and epidermis you should see a small raised area called a “dermal bleb”.
4. Insert the 21G needle with the attached 50ml syringe and gently advance it while aspirating by pulling back on the syringe.
5. Stop advancing as soon as you start to aspirate fluid.
6. Aspirate 20-50ml, then remove the needle.
7. Wipe away any blood with sterile gauze and apply a sterile dressing.
To complete the procedure…
Explain to the patient that the procedure is now complete.
Thank the patient for their time.
Document the patient’s details on the specimen containers at the bedside (using either pre-printed or handwritten labels).
Dispose of PPE and other clinical waste into an appropriate clinical waste bin.
Prescribe appropriate analgesia.
Inform the nursing staff that you have performed a pleural tap and have placed a sterile dressing, and ask them to complete a set of observations.
Investigations
Request a chest x-ray to ensure there is no pneumothorax following the procedure.
Decant the pleural fluid into separate containers depending on required investigations:
- Biochemistry: LDH & protein: 2-5ml in a plain container or serum blood collection tube depending on local policy.
- Microbiology: fluid culture & sensitivities: 5ml in a plain container. If pleural infection is likely, send 5ml in both blood culture bottles in addition.
- Cytology: cytological examination and differential cell count: aim for 30ml in a plain container to assess for malignant cells.
Investigations to rule out specific diagnoses
These investigations are only necessary if the diagnosis has been suspected based on clinical presentation or appearance of the pleural fluid:
- Empyema: pH (0.5-1ml collected in heparinised blood gas syringe, analysed on ward blood gas machine, or sent to the lab on ice depending on local policy)
- Tuberculosis: acid-fast bacilli (5ml in a plain container)
- Chylothorax (milky effusion): triglycerides and cholesterol
- Pancreatitis-related effusion: amylase
- Haemothorax: haematocrit
Send paired serum blood samples for protein & LDH, so that Light’s criteria can be applied.
Light’s criteria
The collected fluid is an exudate if one or more of the following criteria are met:
- Pleural fluid protein is more than half the serum protein
- Pleural fluid LDH is more than 0.6 times the serum LDH
- Pleural fluid LDH is more than 2/3 the upper limit of normal of the serum LDH
For more information, see the Geeky Medics guide to pleural fluid interpretation.
Documentation
Document details of the procedure in the patient’s notes including:
- Your personal details including your name, job role and GMC number
- The date and time the procedure was performed
- What form of consent was gained – if verbal, what risks were communicated
- The indication for the pleural tap
- The volume of fluid removed
- Any complications
- What investigations have been requested, and who is responsible for interpreting the results
Reviewer
Dr Praveen Bhatia
Respiratory Consultant
Editor
Dr Chris Jefferies
References
Text references
- British Thoracic Society. BTS Clinical Statement on Pleural Procedures. June 2022. Available from: [LINK]
- British Thoracic Society. BTS Guideline for Pleural Disease. June 2022. Available from: [LINK]
- Thorax. Pleural procedures and thoracic ultrasound: British Thoracic Society pleural disease guideline 2010. August 2010. Available from: [LINK]
Image references
- Figure 1. MedCourse. Triangle of Safety. Licence: [CC BY-SA].
- Figure 2. MedCourse. Aim above a rib to avoid neurovascular bundle. Licence: [CC BY-SA].
