

- 📖 Geeky Medics OSCE Book
- ⚡ Geeky Medics Bundles
- ✨ 1300+ OSCE Stations
- ✅ OSCE Checklist PDF Booklet
- 🧠 UKMLA AKT Question Bank
- 💊 PSA Question Bank
- 💉 Clinical Skills App
- 🗂️ Flashcard Collections | OSCE, Medicine, Surgery, Anatomy
- 💬 SCA Cases for MRCGP
To be the first to know about our latest videos subscribe to our YouTube channel 🙌
Visual acuity assessment frequently appears in OSCEs and you’ll be expected to pick up the relevant clinical signs using your examination skills. This guide provides a step-by-step approach to assessing visual acuity, including a video demonstration.
Gather equipment
Gather the appropriate equipment:
- Snellen chart
- Fine print reading chart
- Pinhole
Introduction
Wash your hands and don PPE if appropriate.
Introduce yourself to the patient including your name and role.
Confirm the patient’s name and date of birth.
Briefly explain what the examination will involve using patient-friendly language.
Gain consent to proceed with the examination.
Position the patient sitting on a chair.
Ask if the patient has any pain before proceeding.
Assessment of distance vision
Begin by assessing the patient’s visual acuity using a Snellen chart. If the patient normally uses distance glasses, ensure these are worn for the assessment.
1. Stand the patient at 6 metres from the Snellen chart.
2. Ask the patient to cover one eye and read the lowest line they are able to.
3. Record the lowest line the patient was able to read (e.g. 6/6 [metric] which is equivalent to 20/20 [imperial]).
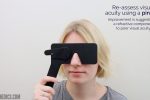
4. You can have the patient read through a pinhole to see if this improves vision (if vision is improved with a pinhole, it suggests there is a refractive component to the patient’s poor vision).
5. Repeat the above steps with the other eye.
Recording visual acuity
Visual acuity is recorded as chart distance (numerator) over the number of the lowest line read (denominator):
- If the patient reads the 6/6 line but gets 2 letters incorrect, you would record this as 6/6 (-2).
- If the patient gets more than 2 letters wrong, then the previous line should be recorded as their acuity.
- When recording the vision it should state whether this vision was unaided (UA), with glasses or with a pinhole (PH).
Further steps for patients with poor vision
If the patient is unable to read the top line of the Snellen chart at 6 metres (even with pinhole) move through the following steps as necessary:
1. Reduce the distance to 3 metres from the Snellen chart (the acuity would then be recorded as 3/denominator).
2. Reduce the distance to 1 metre from the Snellen chart (1/denominator).
3. Assess if they can count the number of fingers you’re holding up (recorded as “Counting Fingers” or “CF”).
4. Assess if they can see gross hand movements (recorded as “Hand Movements” or “HM”).
5. Assess if they can detect light from a pen torch shone into each eye (“Perception of Light”/”PL” or “No Perception of Light”/”NPL”).
 Assess visual acuity using a Snellen chart


Assessment of near vision
Assess the patient’s near vision using a near vision chart. If the patient normally uses reading glasses, ensure these are worn for the assessment.
Fine print reading
1. Ask the patient to cover one eye.
2. Then ask the patient to read a paragraph of small print in a book or newspaper.
3. Repeat the assessment on the other eye.
- Assess near vision with fine print reading

Causes of decreased visual acuity
Decreased visual acuity has many potential causes including:
- Refractive errors
- Amblyopia
- Ocular media opacities such as cataract or corneal scarring
- Retinal diseases such as age-related macular degeneration
- Optic nerve (CN II) pathology such as optic neuritis
- Lesions higher in the visual pathways
Optic nerve (CN II) pathology usually causes a decrease in acuity in the affected eye. In comparison, papilloedema (optic disc swelling from raised intracranial pressure), does not usually affect visual acuity until it is at a late stage.
To complete the examination…
Explain to the patient that the examination is now finished.
Thank the patient for their time.
If mydriatic drops were instilled, remind the patient they cannot drive for the next 3-4 hours until their vision has returned to normal.
Dispose of PPE appropriately and wash your hands.
Suggest further assessment and investigations
All of the following further assessments and investigations are dependent on the patient’s presenting complaint and in most cases, none of them would need to be performed:
- Amsler chart: to assess for central visual loss and distortion which is commonly associated with macular degeneration.
- Cranial nerve examination: to further assess for evidence of cranial nerve pathology (e.g oculomotor nerve).
- Blood pressure: if there are concerns about hypertensive retinopathy.
- Capillary blood glucose: if there are concerns about diabetic retinopathy.
- Retinal photography: to better visualise any abnormalities noted on fundoscopy.
