

- 📖 Geeky Medics OSCE Book
- ⚡ Geeky Medics Bundles
- ✨ 1300+ OSCE Stations
- ✅ OSCE Checklist PDF Booklet
- 🧠 UKMLA AKT Question Bank
- 💊 PSA Question Bank
- 💉 Clinical Skills App
- 🗂️ Flashcard Collections | OSCE, Medicine, Surgery, Anatomy
- 💬 SCA Cases for MRCGP
To be the first to know about our latest videos subscribe to our YouTube channel 🙌
This guide provides a structured approach to newborn life support (NLS), including how to set up a resuscitaire and the NLS algorithm. It has been created to assist healthcare students in preparing for emergency simulation sessions as part of their training. It is not intended to be relied upon for patient care.
Most neonates tolerate the birth process well and tend to be born in good condition, requiring minimal assistance. However, a small number of neonates require additional help and support with transitioning from intrauterine to extrauterine life.
Preparation
If it is anticipated that the baby may be born in poor condition, ensure roles are assigned to team members and make sure there is an allocated scribe who understands the NLS algorithm to document the resuscitation events. Ensure senior help is sought early if needed.
Important information to gather before delivery includes:
- Reason for neonatal presence at delivery
- Single/multiple pregnancy
- Gestation of baby
- Any significant antenatal diagnosis/concerns
- If there are any signs of fetal distress/pathological cardiotocograph (CTG)
- Any meconium
- Any risk factors for sepsis (e.g. prolonged rupture of membranes >24 hours in term baby and >18 hours in preterm baby, maternal infection, maternal group B streptococcus colonisation)
Setting up the resuscitaire
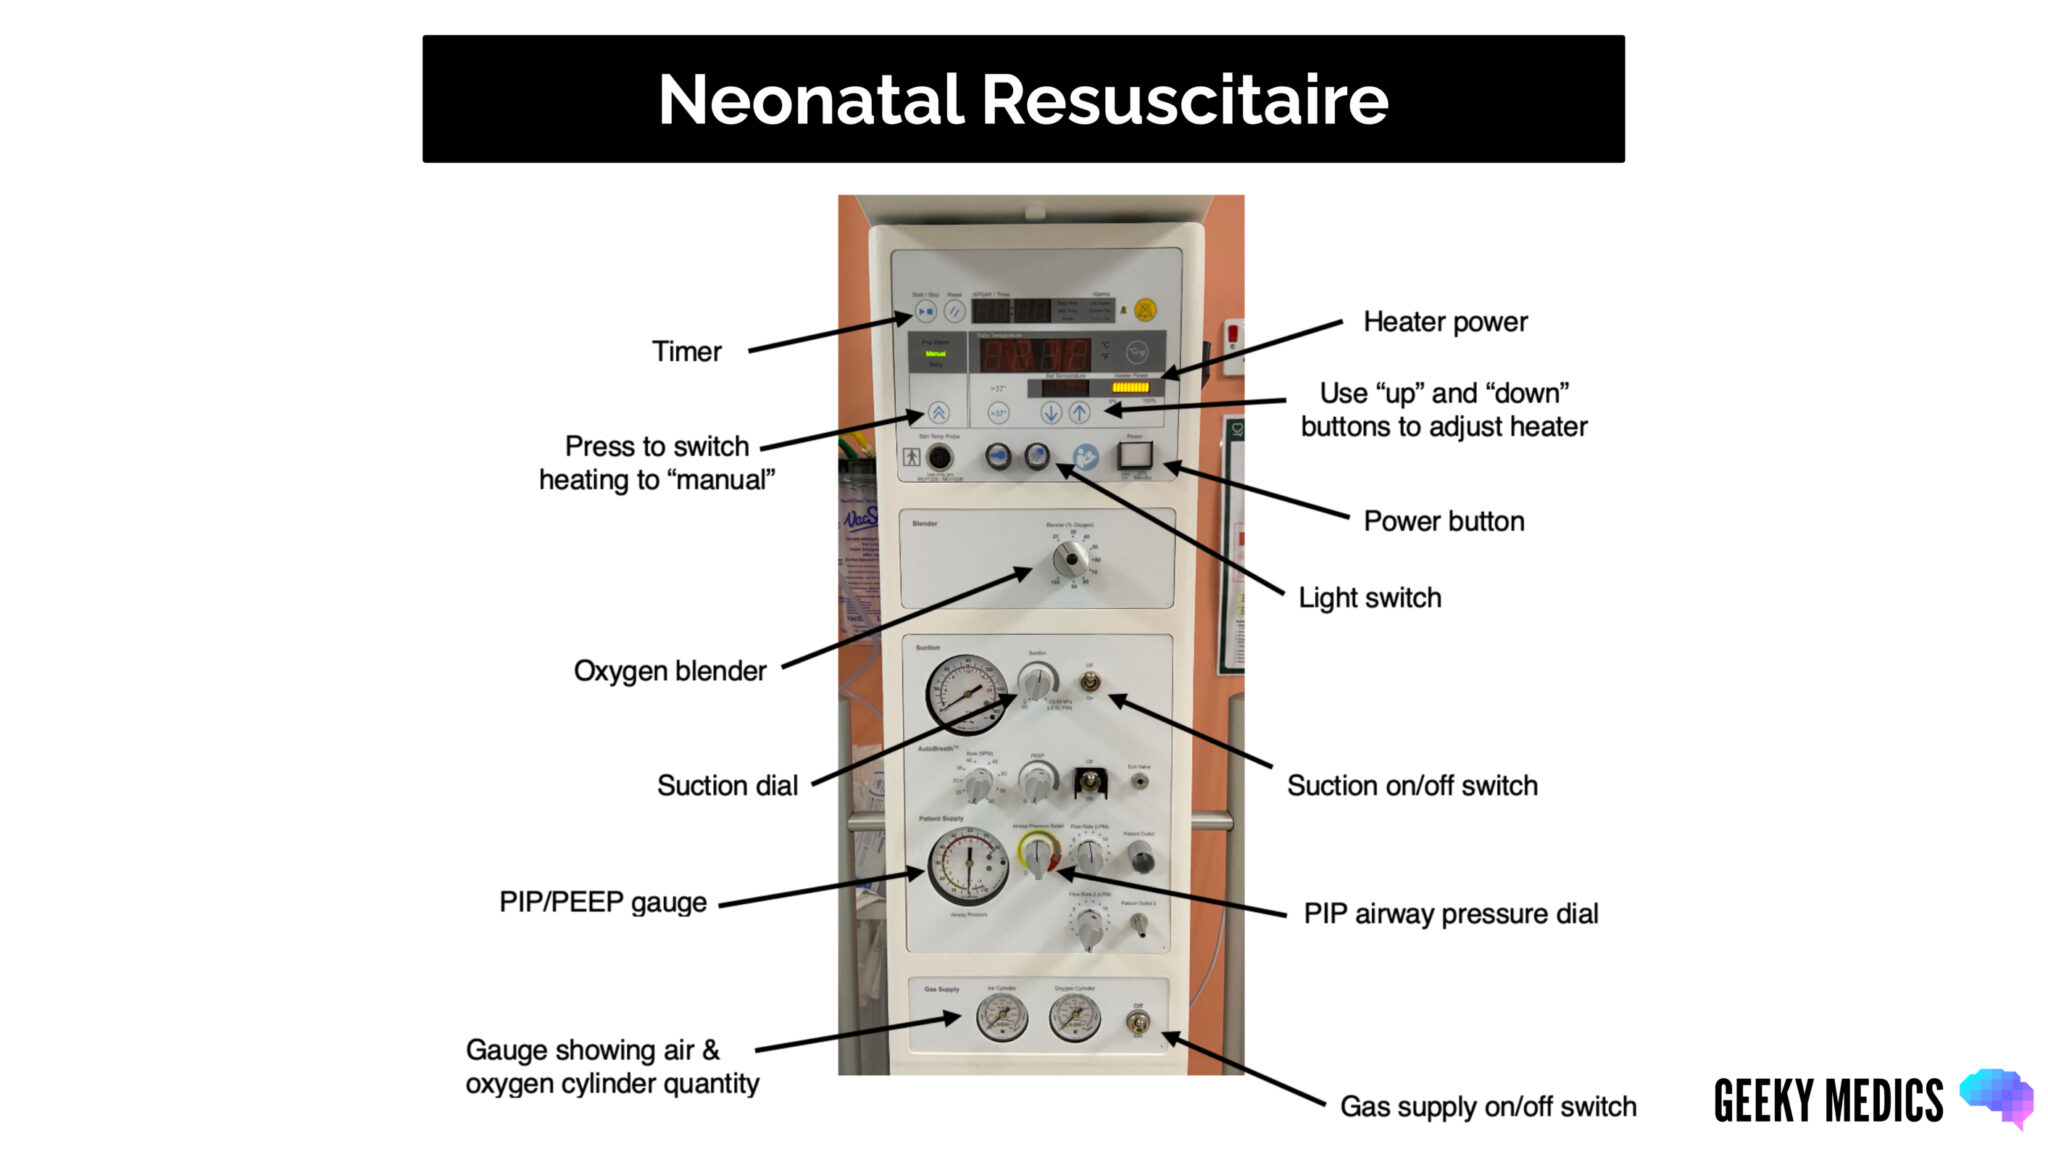
Power
Ensure the resuscitaire is plugged in. Press the power button on the resuscitaire to switch it on. Press the light switch button to turn the light on.
Cylinders
Connect air and oxygen ports to the wall (this ensures an unlimited supply). If using oxygen and air cylinders, ensure they are open (to open use metal key), ensure the cylinders are full, and be mindful that they may become empty during use so have spares nearby.
Heating
The resuscitaire will automatically go to the pre-warm temperature setting when switched on. Turn the heat setting to manual and put the heat up to maximum.
Place a few open towels on the resuscitaire to warm up.
Have your hat ready.
Oxygen
Check your oxygen. The blender should be initially set at:
- FiO2 21% if ≥32 weeks gestation
- FiO2 21-30% if 28-31 weeks gestation
- FiO2 30% if <28 weeks gestation
To adjust the oxygen, turn the dial to the required oxygen level.
Suction
To check the suction, switch on the gas supply and switch the suction on by turning the switch to the “on” position. Ensure suction tubing is connected to the resuscitaire and attached to a suction catheter.
Occlude the suction catheter and adjust pressures using the dial. The suction can be turned off until needed. If left on, it can use up the cylinders very quickly.
Airway pressures
To check the airway pressures, switch on the gas supply and ensure the T-piece is connected to the gas outlet on the resuscitaire. Use an appropriately sized mask depending on the gestation/estimated weight of the baby. Have varying sizes nearby if needed.
To check your pressures, occlude the valve at the end of the T-piece. The needle on the gauge will move, showing your positive end expiratory pressure (PEEP), which should be at 5.
To adjust the PEEP, turn the dial on the top of the T-piece.
To check your peak inspiratory pressure (PIP), keep the valve at the end of the T-piece occluded, place your thumb over the top of the T-piece and look at the gauge. The PIP should be at 30 for a term baby and 25 for a preterm baby (<32 weeks gestation). This can be adjusted using the airway pressure dial on the resuscitaire.
Ensure you have a stethoscope and a working laryngoscope with varying sized blades (00-1).
Newborn life support algorithm
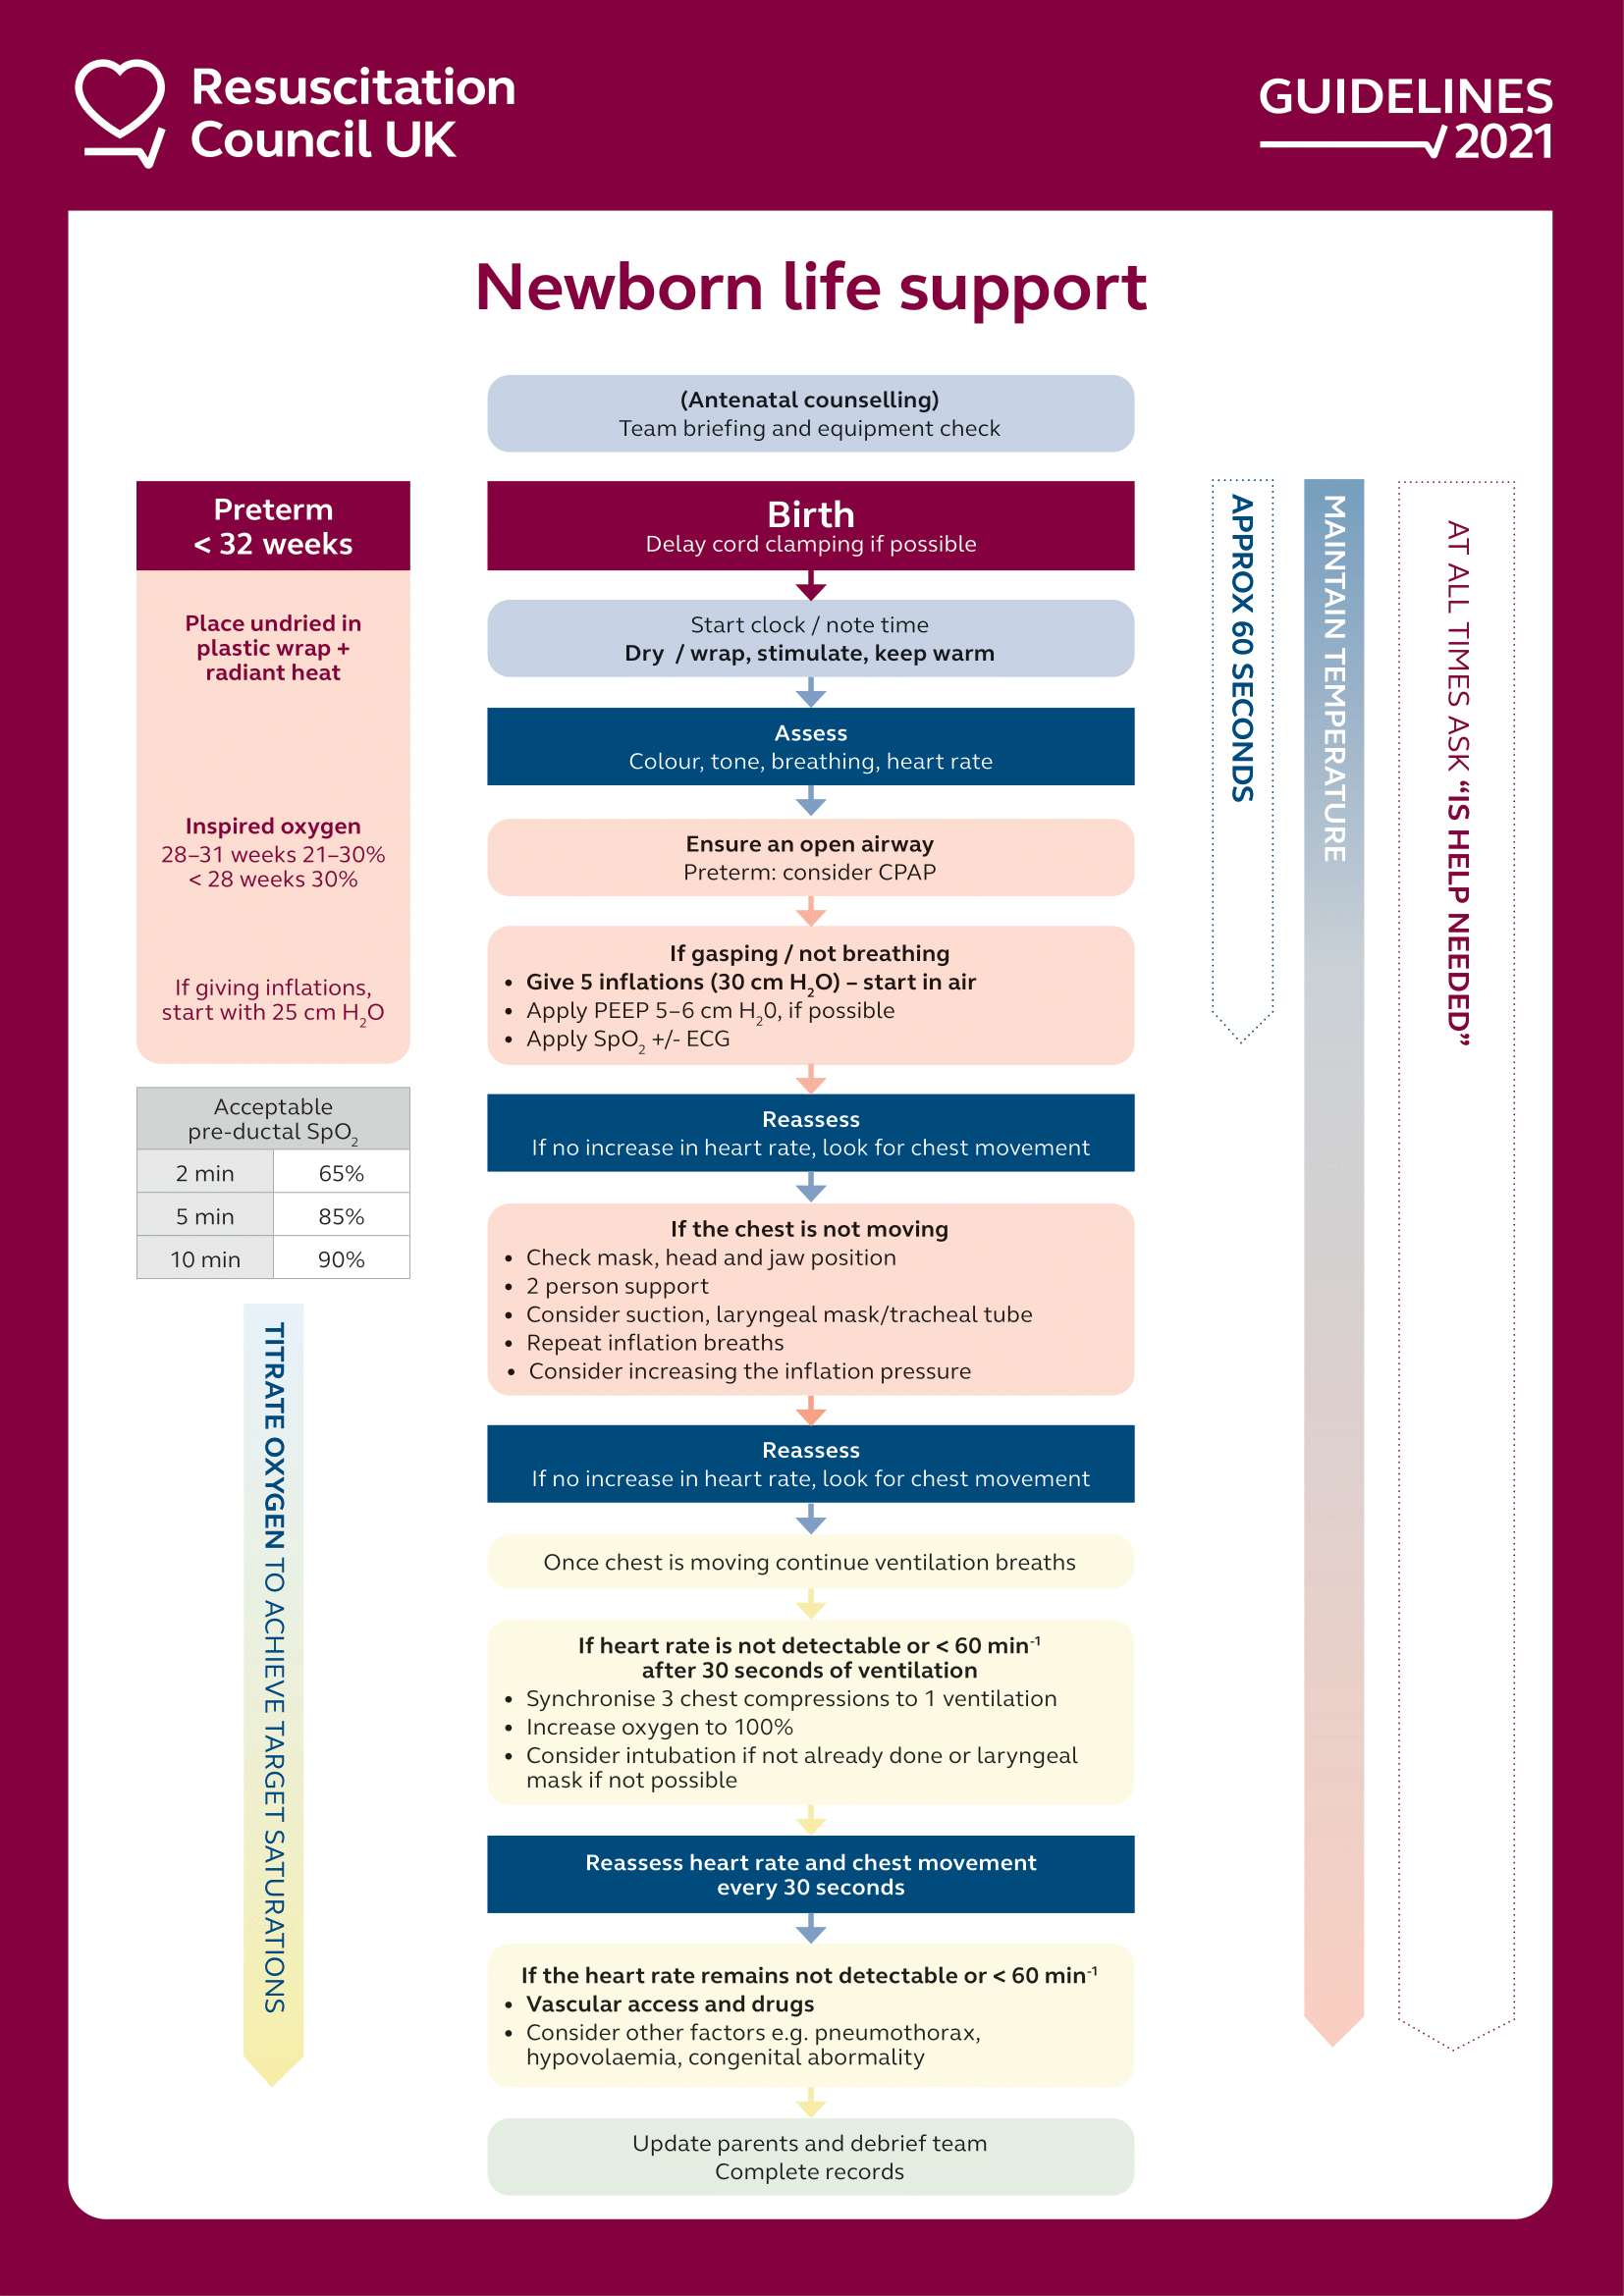
Delivery of the baby
As soon as the baby is born, start the timer and note the time of birth.
Aim for 1-minute delayed cord clamping if the baby does not require immediate resuscitation. This is particularly important for preterm babies for whom early cord clamping can be a harmful intervention.
Rapidly assess the colour, tone, heart rate and adequacy of breathing whilst the baby is attached to the cord. If there are any concerns, the cord should be clamped sooner, and the baby should be brought over to the resuscitaire for assessment.
The baby’s temperature should be monitored closely after birth and maintained between 36.5 – 37.5 degrees. Ensure the environment is warm and draught-free.
Term and near-term infants >32 weeks
Dry and stimulate the baby with a warm towel and apply a hat. Remove the wet towel, replace it with a warm, clean towel, and wrap the baby to keep them warm.
If the baby does not require any resuscitation, place the baby in skin-to-skin with the mother and cover with a dry towel.
If the baby requires resuscitation or support with transition, keep them on the resuscitaire under the radiant heater, and keep them as covered as possible.
Preterm baby ≤32 weeks
Babies ≤32 weeks gestation should have a hat applied and be placed undried into a sterile polyethylene suit (face should remain uncovered) under the radiant heater on the resuscitaire.
This creates a greenhouse effect, which protects the baby from draughts and prevents heat loss. They can also be placed on a transwarmer (thermal mattress) to provide extra warmth.
Assessment of the baby
Initial rapid assessment
Stimulate
Stimulation is an important first step of neonatal resuscitation. This is done as the baby is initially handled and dried with a towel. Whilst drying them with a towel, rub their back and the soles of their feet to stimulate them further, but remember not to be too vigorous.
Tone & colour
Assess the tone and colour. Babies may be cyanosed immediately after birth, but this should improve within minutes. It can be difficult to assess cyanosis visually.
Babies who are initially very floppy or pale may require early support, and the cord will likely need to be clamped immediately.
Heart rate
The heart rate ideally should be auscultated with a stethoscope:
- Heart rate >100 bpm: satisfactory
- Heart rate <100 bpm: if the heart rate doesn’t increase with stimulation or is <60/undetectable, the cord should be clamped immediately and the baby brought to the resuscitaire for assessment/intervention
Breathing
Assess breathing:
- Adequate breathing: if there is established regular breathing or the baby is crying.
- Inadequate/absent breathing: if there is an abnormal pattern, gasping/grunting or absence of breathing
APGAR score
The APGAR score provides a standardised assessment of a newborn at delivery. It is assessed at 1 minute, 5 minutes and 10 minutes of age. It is scored out of 10.
Table 1. Calculating the APGAR score
| 0 points | 1 point | 2 points | |
| Appearance (skin colour) | Cyanotic/pale | Pink body with peripheral cyanosis | Pink |
| Pulse | Absent | < 100 | > 100 |
| Grimace (reflex irritability) | No response when stimulated | Grimace/ weak cry when stimulated | Pulls away, cries when stimulated |
| Activity (tone) | Absent/Floppy | Flexed arms and legs | Active movement |
| Respiration |
Apnoeic |
Slow, irregular breathing | Strong cry, regular breathing |
Newborn life support
Inadequate/absent breathing or HR <100 despite stimulation
1. Ask for the cord to be clamped immediately unless able to support the baby on the cord
2. Switch on the gas supply on the resuscitaire
3. Bring the baby to the resuscitaire and place under the radiant heater
4. Dry and stimulate the baby
5. Remove any wet towels and replace them with warm, clean towels; put on hat
6. Place the head in a neutral position and maintain an open airway
7. Auscultate the heart rate and assess the breathing
8. Attach a saturation probe to the baby’s right hand (pre-ductal)
9. If the heart rate is still <100 or if the baby is gasping or apnoeic, proceed to give five inflation breaths as soon as possible
10. Call for senior help early
Inflation breaths
Ensuring the head is in a neutral position, identify the correct sized facemask for the baby. Position the mask to cover the nose and mouth (but not the eyes) and ensure an adequate seal by applying gentle downward pressure and lifting the jaw into the mask.
Give five inflation breaths with inflation pressures set at 30/5 (if ≥32 weeks gestation). Ensure each breath lasts 2-3 secs. Count each breath (e.g. 1-2-3, 2-2-3, 3-2-3, 4-2-3, 5-2-3).
Assess for a response
Assess both the heart rate and look for chest movement with the inflation breaths:
- The heart rate will be the first improvement with adequate ventilation/oxygenation
- Visible movement of the chest with the inflation breaths indicates a patent airway and adequate delivery of breaths
If there is a heart rate response and/or chest rise with inflation breaths:
- Move onto ventilation breaths
If there is no heart rate response and no chest rise with inflation breaths (i.e., ineffective inflation breaths):
- Readjust the facemask with jaw thrust, ensure the head is in a neutral position, and a good seal is maintained
- Use a two-person technique (ideal)
- Consider suctioning under direct vision using the laryngoscope
- Following each intervention, give a further set of inflation breaths and re-assess for response.
- Check if the equipment is working correctly
If, despite initial interventions, there is still inadequate chest expansion and no heart rate response:
- Consider tracheal intubation (if competent) or laryngeal mask airway (LMA)
- Consider increasing the inflation pressure
Re-assess after each intervention for heart rate and chest movement.
Do not move onto ventilation breaths until you see an effective chest rise and/or heart rate response.
Ventilation breaths
Once you have achieved adequate chest expansion following five inflation breaths, commence ventilation breaths no matter the heart rate.
Ventilation breaths should be continued at a rate of 30 breaths/minute and last around 1 second. If, despite effective ventilation, the pre-ductal oxygen saturation or the heart rate remains low, increase the oxygen concentration.
Table 2. Acceptable pre-ductal saturations
| Age | Acceptable pre-ductal saturations |
| 2 minutes | 60% |
| 3 minutes | 70% |
| 4 minutes | 80% |
| 5 minutes | 85% |
| 10 minutes | 90% |
Assess for a response
If the heart rate is >60 after the first 30 seconds of ventilation breaths:
- Continue ventilation breaths until effective breathing is established
- Re-assess every 30 seconds
If the heart rate is <60 after the first 30 seconds of ventilation breaths:
- If, despite good quality breaths and adequate chest rise, the heart rate remains <60 commence chest compressions
Chest compressions
Chest compressions should be commenced if the heart rate remains <60 or absent following 30 seconds of effective ventilation breaths. Ensure inspired oxygen is set at 100% if requiring chest compressions.
Call for senior help if you have not already done so.
How to perform chest compression
Use a two handed hand-encircling technique for effective compressions:
- Put both your hands around the baby’s chest, with one thumb on top of the other thumb meeting over the sternum in between the nipples
- Compress to a 1/3 of the diameter of the chest, allowing full recoil of the chest between compressions
- Compressions should be performed at a 3:1 ratio with 3 compressions to 1 breath; there should be around 15 cycles every 30 seconds
- Re-assess every 30 seconds.
Consider securing the airway if the heart rate remains <60 or absent despite effective ventilation breaths and chest compressions for 30 seconds. This can be done by intubating the baby or inserting a laryngeal mask airway, ensuring chest compressions are interrupted as little as possible.
Vascular access
The umbilical vein should be used for vascular access for the emergency administration of drugs and fluids.
A clean insertion technique should be used in an emergency rather than a sterile one. To confirm that the umbilical venous catheter (UVC) is in the correct position before use, blood should be aspirated back from the UVC. Samples can be sent for blood gas, blood sugar and other tests.
Intraosseous (IO) access can also be used as an alternative method for administering drugs/fluid if UVC access cannot be obtained.
Drugs
Adrenaline 1:10,000
Dose: 0.2ml/kg intravenous (20 micrograms/kg); 1ml/kg intra-tracheal dose (100 micrograms/kg) if no other access is available
Subsequent doses should be administered every 3-5 minutes if HR < 60.
Sodium bicarbonate 4.2%
Dose: 1-2mmol/kg = 2-4ml/kg IV
Sodium bicarbonate may be considered in a prolonged unresponsive resuscitation.
Dextrose 10%
Dose: 2.5ml/kg IV
Dextrose may be considered in a prolonged resuscitation.
0.9% sodium chloride / O negative blood
Dose: 10ml/kg
These can be used as volume replacement in blood loss/shock.
Absence of adequate response
Consider other reversible causes such as tension pneumothorax, blood loss, equipment failure or congenital abnormalities.
Decisions around discontinuing resuscitation should be made by senior neonatal staff. The focus should be on maintaining comfort and dignity for the baby and family. Parents should be kept informed throughout the resuscitation.
Reviewer
Dr Rachel Toone
Consultant Neonatalogist
Editor
Dr Chris Jefferies
References
- Resuscitation Council (UK). Newborn resuscitation and support of transition of infants at birth Guidelines. Available from: [LINK]
