- 📖 Geeky Medics OSCE Book
- ⚡ Geeky Medics Bundles
- ✨ 1300+ OSCE Stations
- ✅ OSCE Checklist PDF Booklet
- 🧠 UKMLA AKT Question Bank
- 💊 PSA Question Bank
- 💉 Clinical Skills App
- 🗂️ Flashcard Collections | OSCE, Medicine, Surgery, Anatomy
- 💬 SCA Cases for MRCGP
To be the first to know about our latest videos subscribe to our YouTube channel 🙌
This guide provides an overview of performing an oropharyngeal swab for the purposes of viral sample collection (e.g. COVID-19) in an OSCE setting. It does not include details on the appropriate personal protective equipment (PPE) required, which is pathogen dependent (see our guide to PPE).
It should be noted that this guide only provides a general approach to sample collection and the details regarding storage medium and transport vary depending on the pathogen being tested for. You should always consult your local guidelines before taking a sample from a patient.
Gather equipment
Gather the relevant equipment for the procedure:
- Gloves and other appropriate PPE.
- Flexible plastic oropharyngeal swab.
- Tongue depressor.
- Specimen tube containing universal transport medium.
Oropharyngeal swab tips for the purposes of viral sample collection must be synthetic. Cotton or calcium alginate tipped swabs can kill viral particles and/or interfere with PCR testing.
Only swabs with flexible plastic shafts should be used, wooden shafts increase the risk of patient injury during the procedure.
Introduction
Wash your hands and don PPE.
Introduce yourself to the patient including your name and role.
Confirm the patient’s name and date of birth.
Briefly explain what the procedure will involve using patient-friendly language: making sure to explain that the procedure will be uncomfortable and will likely elicit a gag reflex.
Gain consent to proceed with performing an oropharyngeal swab.
Ask the patient if they have any pain before continuing with the clinical procedure.
Position the patient sitting comfortably on a chair or bed.
Performing the oropharyngeal swab
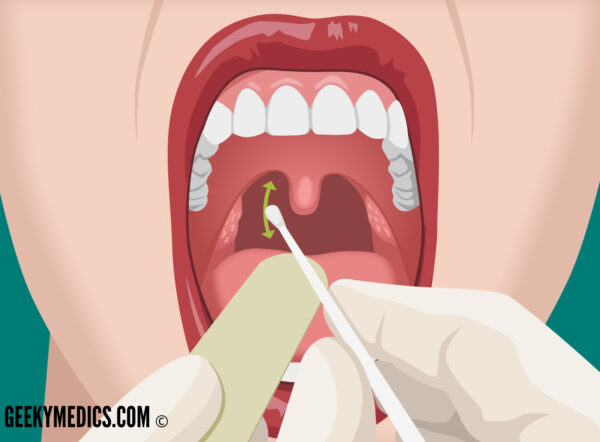
1. With the patient seated, ask them to open their mouth wide, stick their tongue out and say “ahhh”.
2. Depress the patient’s tongue using a tongue depressor.
3. Insert the oropharyngeal swab, avoiding touching the teeth, tongue and other structures.
4. Collect the sample from the oropharyngeal wall, twisting the swab slowly and thoroughly to increase the likelihood of collecting an adequate sample.
5. Remove the oropharyngeal swab.
6. Insert the oropharyngeal swab into the tube of universal transport medium, ensuring that the swab tip is fully submerged into the liquid of the tube.
7. Snap off the shaft of the oropharyngeal swab at the break line, allowing the remaining shaft and swab tip to remain submerged in the tube’s liquid.
8. Label the sample with the patient’s name, date of birth and unique identification number.
9. Appropriately package the specimen for transport to the lab.
10. Arrange for transport of the specimen within an appropriate time frame.

To complete the procedure…
Explain to the patient that the procedure is now complete.
Thank the patient for their time.
Offer the patient paper towels to clean away any secretions.
Dispose of PPE appropriately and wash your hands.
Document the details of the procedure in the patient’s notes:
- Your personal details including your name, job role and GMC number.
- The date and time the procedure was performed.
- Confirmation that verbal consent was obtained.
- The indication for performing an oropharyngeal swab.
- Any complications that occurred during the procedure.
References


