

- 📖 Geeky Medics OSCE Book
- ⚡ Geeky Medics Bundles
- ✨ 1300+ OSCE Stations
- ✅ OSCE Checklist PDF Booklet
- 🧠 UKMLA AKT Question Bank
- 💊 PSA Question Bank
- 💉 Clinical Skills App
- 🗂️ Flashcard Collections | OSCE, Medicine, Surgery, Anatomy
- 💬 SCA Cases for MRCGP
To be the first to know about our latest videos subscribe to our YouTube channel 🙌
Knee examination frequently appears in OSCEs and you’ll be expected to identify the relevant clinical signs using your examination skills. This knee examination OSCE guide provides a clear step-by-step approach to examining the knee, with an included video demonstration. Musculoskeletal examinations can be broken down into four key components: look, feel, move and special tests. This can be helpful as an aide-memoire if you begin to feel like you’ve lost your way during an OSCE.
Introduction
Wash your hands and don PPE if appropriate.
Introduce yourself to the patient including your name and role.
Confirm the patient’s name and date of birth.
Briefly explain what the examination will involve using patient-friendly language.
Gain consent to proceed with the examination.
Adequately expose the patient’s legs (typically this involves the patient wearing only their underwear) and provide a blanket to cover the patient when not being examined.
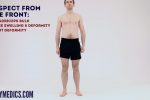
Position the patient standing for initial inspection of the lower limbs.
Ask the patient if they have any pain before proceeding with the clinical examination.
Look
General inspection
Clinical signs
Perform a brief general inspection of the patient, looking for clinical signs suggestive of underlying pathology:
- Body habitus: obesity is a significant risk factor for joint pathology due to increased mechanical load (e.g. osteoarthritis).
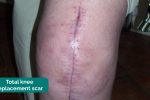
- Scars: may provide clues regarding previous lower limb surgery.
- Wasting of muscles: suggestive of disuse atrophy secondary to joint pathology or a lower motor neuron injury.
Objects or equipment
Look for objects or equipment on or around the patient that may provide useful insights into their medical history and current clinical status:
- Walking aids: the ability to walk can be impacted by a wide range of knee, hip and ankle pathology.
- Prescriptions: prescribing charts or personal prescriptions can provide useful information about the patient’s recent medications (e.g. analgesia).
Closer inspection of the knees
Ask the patient to stand and turn in 90° increments as you inspect the knee joints from each angle for evidence of pathology.
Anterior inspection
Inspect the anterior aspect of the knees and note any abnormalities:
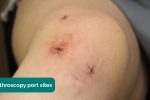
- Scars: note the location of scars as they may provide clues as to the patient’s previous surgical history (e.g. arthroscopy port entry sites) or indicate previous joint trauma.
- Bruising: suggestive of recent trauma or spontaneous haemarthrosis (e.g. patients on anticoagulants or with clotting disorders such as haemophilia).
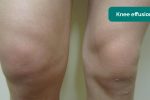
- Swelling: note any evidence of asymmetry in the size of the knee joints that may suggest unilateral swelling (e.g. effusion, inflammatory arthropathy, septic arthritis, haemarthrosis).
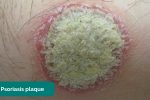
- Psoriasis plaques: typically present over extensor surfaces and important to note due to the increased risk of psoriatic arthritis.
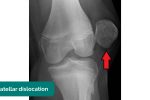
- Patellar position: the patella is normally located over the centre of the knee joint and any deviation from this central position may indicate patellar dislocation or subluxation (i.e. partial dislocation).
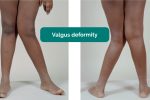
- Valgus deformity of the knee: the tibia is turned outward in relation to the femur, resulting in the knees ‘knocking’ together.
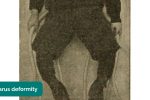
- Varus deformity of the knee: the tibia is turned inward in relation to the femur, resulting in a bowlegged appearance.
- Quadriceps wasting: note any asymmetry in the bulk of the quadriceps muscles which may be due to disuse atrophy or a lower motor neuron lesion.
Lateral inspection
Inspect the lateral aspect of the knees and note any abnormalities:
- Extension abnormalities: knee hyperextension can occur secondary to cruciate ligament injury.
- Flexion abnormalities: fixed flexion deformity at the knee joint may suggest the presence of contractures secondary to previous trauma, inflammatory conditions or neurological disease.
Posterior inspection
Inspect the posterior aspect of the knees and note any abnormalities:
- Scars: again look for scars indicative of previous trauma or surgery.
- Muscle wasting: inspect for any asymmetry in the muscle bulk of the posterior compartment of the thigh or lower leg suggestive of disuse atrophy or a lower motor neuron lesion.
- Popliteal swellings: possible causes include a Baker’s cyst or popliteal aneurysm (typically pulsatile).
 Inspect the anterior aspect of the knee


Gait
Ask the patient to walk to the end of the examination room and then turn and walk back whilst you observe their gait paying attention to:
- Gait cycle: note any abnormalities of the gait cycle (e.g. abnormalities in toe-off or heel strike).
- Range of movement: often reduced in the context of chronic joint pathology (e.g. osteoarthritis, inflammatory arthritis).
- Limping: may suggest joint pain (i.e. antalgic gait), weakness or joint instability (e.g. ligamentous injury).
- Leg length: note any discrepancy which may be the cause or the result of joint pathology.
- Turning: patients with joint disease may turn slowly due to restrictions in joint range of movement or instability.
- Height of steps: high-stepping gait is associated with foot drop, which can be caused by peroneal nerve palsy (e.g. trauma, surgery).
- Assess gait

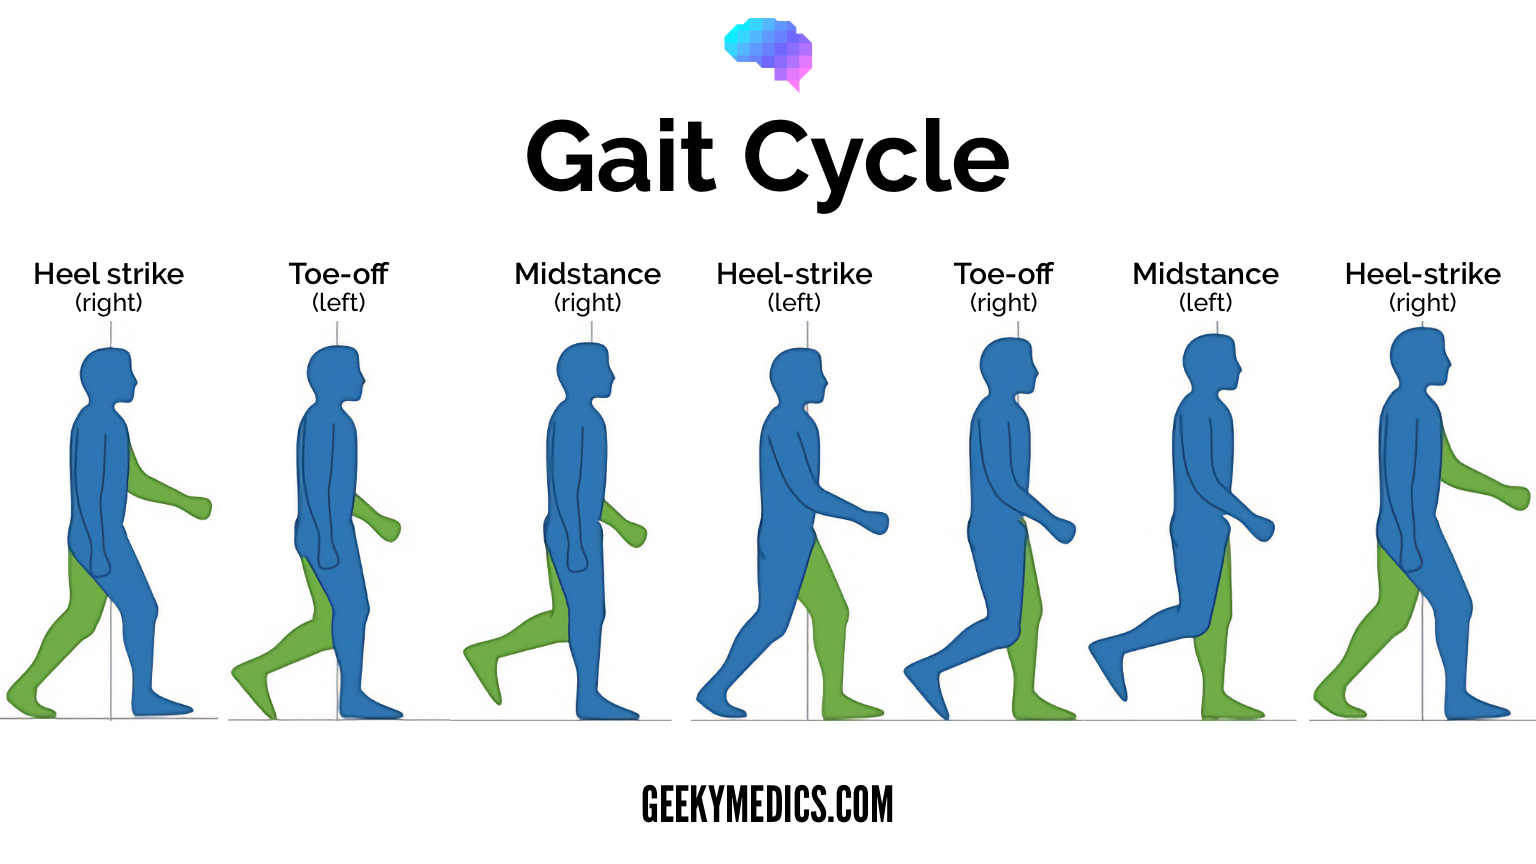
Gait cycle
The gait cycle has six phases:
- Heel-strike: initial contact of the heel with the floor.
- Foot flat: weight is transferred onto this leg.
- Mid-stance: the weight is aligned and balanced on this leg.
- Heel-off: the heel lifts off the floor as the foot rises but the toes remain in contact with the floor.
- Toe-off: as the foot continues to rise the toes lift off the floor.
- Swing: the foot swings forward and comes back into contact with the floor with a heel strike (and the gait cycle repeats).
Inspection with the patient on the bed
Ask the patient to lay down on the clinical examination couch, with the headrest positioned at a 45° angle for the next part of the assessment.
Briefly inspect the knee joints once more for abnormalities whilst the patient is lying down:
- Scars
- Swelling
- Bruising
- Quadriceps wasting
- Knee joint asymmetry
- Fixed flexion deformity
- Abnormal patellar position
Feel
Temperature
With the patient still positioned supine on the clinical examination couch, with the headrest at a 45° angle, simultaneously assess and compare knee joint temperature using the back of your hands.
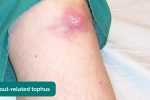
Increased temperature of a joint, particularly if also associated with swelling and tenderness may indicate septic arthritis, inflammatory arthritis, gout or pseudogout.
Measurement of quadriceps bulk
Quadriceps wasting is commonly associated with knee joint pathology occurring secondary to disuse atrophy. Wasting will often be apparent on inspection, however subtle wasting may only be detectable by comparative measurement of leg circumference.
To measure the circumference of the leg in the region of the quadriceps place a measuring tape around each leg at a point approximately 20cm above the tibial tuberosity.
Record the circumference of each leg and compare to see if there is a significant difference indicative of quadriceps wasting.
Palpation of the extended knee
With the patient’s leg straight and relaxed, systematically palpate the joint lines and surrounding structures of each knee joint.
Patella
1. Assess the medial and lateral border of the patella for tenderness by stabilising one side of the patella and palpating the other with a fingertip:
- Tenderness may represent injury or patellofemoral arthritis.
- If the patient appears apprehensive, developing tension in the muscles of the leg as you begin to mobilise the patella (typically in the lateral direction), it may suggest a history of recurrent patellar dislocation which the patient is anticipating (this can be formally assessed using the patellar apprehension test).
2. Palpate the patellar ligament for tenderness suggestive of tendonitis or rupture.
Medial and lateral joint lines
1. Palpate the medial and lateral joint lines of the knee including the collateral ligaments for evidence of tenderness which may suggest:
- Fracture
- Meniscal injury (e.g. meniscal tear)
- Collateral ligament injury (e.g. rupture)
2. Palpate the quadriceps tendon for tenderness suggestive of tendonitis or rupture.
- Assess and compare knee joint temperature


Patellar apprehension test
The patellar apprehension test is not usually performed in an OSCE, but it’s useful to understand how the test is carried out.
With the patient’s knee fully extended, medial pressure is applied to the patella (to mobilise the patella laterally) whilst simultaneously slowly flexing the knee joint. The presence of active resistance from the patient suggests previous patellar instability and dislocation (as the patient is apprehensive about it recurring).
Assess for joint effusion
Joint effusion can be caused by ligament rupture (e.g. anterior cruciate ligament), septic arthritis, inflammatory arthritis and osteoarthritis.
Patellar tap
The patellar tap test can be used to screen for the presence of a moderate-to-large knee joint effusion.
1. With the patient’s knee fully extended, empty the suprapatellar pouch by sliding your left hand down the thigh to the upper border of the patella.
2. Keep your left hand in position and use your right hand to press downwards on the patella with your fingertips.
3. If there is fluid present you will feel a distinct tap as the patella bumps against the femur.
- Perform patellar tap

Sweep test
The sweep test can be useful to identify small joint effusions that may not be obvious using the patellar tap method.
1. Position the patient supine with the leg relaxed and knee extended.
2. Empty the suprapatellar pouch by sliding your left hand down the thigh to the upper border of the patella.
3. Stroke the medial side of the knee joint to move any excess fluid across to the lateral side of the joint.
4. Now stroke the lateral side of the knee joint which will cause any excess fluid to move back across to the emptied medial side of the knee joint. This causes the appearance of a bulge or ripple on the medial side of the joint indicating the presence of effusion.
- Empty the suprapatellar pouch and then sweep fluid from the medial side of the joint across to the lateral side of the joint.


Palpation of the flexed knee
With the patient’s knee flexed at 90° repeat the same process of palpation as you did when the knee was extended. Joint lines and the popliteal fossa are often easier to assess with the knee flexed.
Patella
Palpate the patellar ligament for tenderness suggestive of tendonitis or rupture.
Medial and lateral joint lines
Palpate the medial and lateral joint lines of the knee including the collateral ligaments for evidence of tenderness which may suggest:
- Fracture
- Meniscal injury (e.g. meniscal tear)
- Collateral ligament injury (e.g. rupture)
Tibial tuberosity and the head of the fibula
Palpate the tibial tuberosity for evidence of a bony elevation and tenderness which is typically associated with Osgood-Schlatter disease.
Palpate the head of the fibula for tenderness which is often associated with fracture.
Popliteal fossa
With your thumbs placed on the tibial tuberosity, curl your fingers into the popliteal fossa and palpate for evidence of a swelling which may indicate the presence of a popliteal cyst (often referred to as a Baker’s cyst). A pulsatile mass in the popliteal fossa may represent a popliteal aneurysm.
- Palpate the patella tendon with the knee joint flexed


Osgood-Schlatter disease
Osgood-Schlatter disease (OSD) involves inflammation of the patellar ligament at the tibial tuberosity (its insertion point) and most often affects males between the age of 10-15. Typical presenting features include a painful bony elevation over the tibial tuberosity which is worsened with activity. Risk factors include overuse, often due to sports that involve lots of running and jumping.
Popliteal fossa pathology
There are two main types of popliteal fossa pathology to be aware of:
- A popliteal cyst (also known as a Baker’s cyst) typically presents as a fluctuant swelling in the popliteal fossa. The swelling will feel tense when the patient’s knee is extended and soft when the knee is flexed (known as Foucher’s sign). The cyst may also transilluminate with a pen torch.
- Popliteal aneurysms are rare, but if the popliteal pulse is visible and superficially palpable this should be considered. Typically the popliteal pulse is only palpable on deep palpation of the popliteal fossa.
Move
The knee joint of each leg should be assessed and compared.
If the patient is known to have an issue with a particular leg, you should assess the ‘normal’ leg first for comparison.
Active movement
Active movement refers to a movement performed independently by the patient. Ask the patient to carry out a sequence of active movements to assess joint function. As the patient performs each movement, note any restrictions in the range of the joint’s movement and also look for signs of discomfort.
It’s important to clearly explain and demonstrate each movement you expect the patient to perform to aid understanding.
Active knee flexion
Normal range of movement: 0-140°
Instructions: Ask the patient to flex their knee as far as they are comfortably able to – “Move your heel as close to your bottom as you can manage.”
Active knee extension
Normal range of movement: the leg should be able to lie flat (180°)
Instructions: Ask the patient to extend their knee, so that their leg is flat on the bed – “Straighten your leg out so that it is flat on the bed.”
Passive movement
Passive movement refers to a movement of the patient, controlled by the examiner. This involves the patient relaxing and allowing you to move the joint freely to assess the full range of joint movement. It’s important to feel for crepitus as you move the joint (which can be associated with osteoarthritis) and observe any discomfort or restriction in the joint’s range of movement.
Passive knee flexion
Normal range of movement: 0-140°
Instructions: Whilst supporting the patient’s leg, flex the knee as far as you are able, making sure to observe for signs of discomfort.
Passive knee extension
If the patient is able to lay their legs flat on the bed, they are already demonstrating a normal range of movement for knee extension. To assess for hyperextension:
1. On the leg being assessed, hold above the ankle joint and gently lift the leg upwards.
2. Inspect the knee joint for evidence of hyperextension, with less than 10° being considered normal. Excessive knee hyperextension may suggest pathology affecting the integrity of the knee joint’s ligaments.
- Active knee flexion


Special tests
Cruciate ligament assessment
Posterior sag sign
The posterior cruciate ligament (PCL) is responsible for preventing backward displacement of the tibia or forward sliding of the femur. As a result, if the PCL is ruptured the tibia can sag posteriorly in relation to the femur and this is what is known as the ‘posterior sag sign’.
To screen for the posterior sag sign make sure the patient is relaxed and ask them to flex their knee to 90º with their foot placed flat on the bed. Inspect the lateral aspect of the knee joint for evidence of posterior sag.
It is important to identify this sign before proceeding to the anterior drawer test, as a posterior cruciate ligament tear can result in a false positive anterior drawer sign. This is because an anterior movement of the tibia will occur during the anterior drawer test due to the tibia moving from a posteriorly subluxed position back to its neutral position. This relocation of the tibia to its neutral position may then be misinterpreted as excessive anterior movement secondary to anterior cruciate ligament laxity or rupture.
Anterior drawer test
The anterior drawer test is used to assess the integrity of the anterior cruciate ligament.
1. Position the patient supine on the clinical examination couch with their knee flexed to 90º.
2. Wrap your hands around the proximal tibia with your fingers around the back of the knee joint.
3. Rest your forearm down the patient’s lower leg to fix its position.
4. Position your thumbs over the tibial tuberosity.
5. Ask the patient to keep their legs as relaxed as tense hamstrings can mask pathology.
6. Pull the tibia anteriorly and feel for any anterior movement of the tibia on the femur. With healthy cruciate ligaments, there should be little or no movement noted. Significant movement may suggest anterior cruciate ligament laxity or rupture.
Posterior drawer test
Repeat steps 1-5 and then push the tibia posteriorly. With healthy cruciate ligaments, there should be little or no movement noted. Significant posterior movement may suggest posterior cruciate ligament laxity or rupture.
- Anterior drawer test


Lachman’s test
Lachman’s test is an alternative test assessing for laxity or rupture of the anterior cruciate ligament (ACL). This test is rarely required in an OSCE scenario, with the anterior drawer test being the preferred method of ACL assessment.
1. Flex the patient’s knee to 30°.
2. Hold the lower leg with your dominant hand with your thumb on the tibial tuberosity and your fingers over the calf.
3. With the non-dominant hand, hold the thigh just above the patella.
4. Use the dominant hand to pull the tibia forwards on the femur while the other hand stabilises the femur.
Significant anterior movement of the tibia on the femur suggests ACL laxity or rupture.
- Lachman's test - flex the patient's knee to 30°


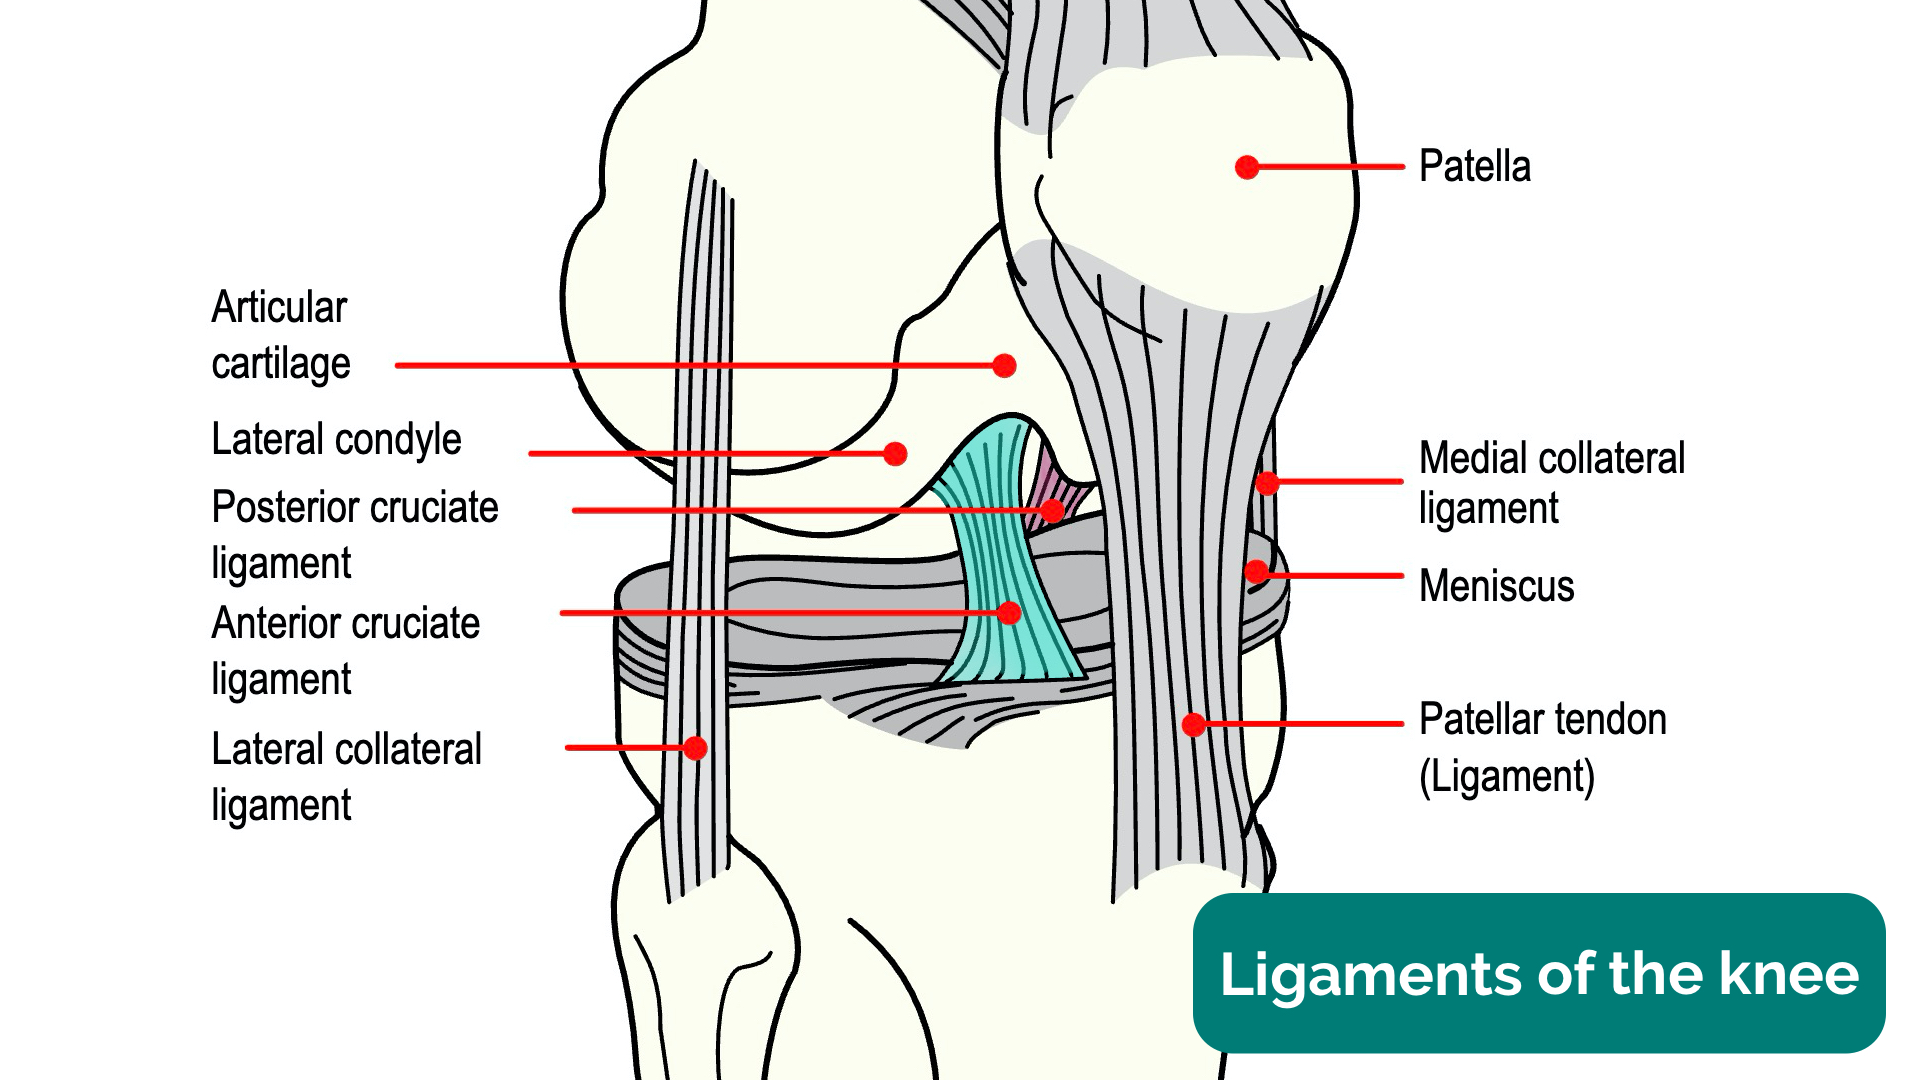
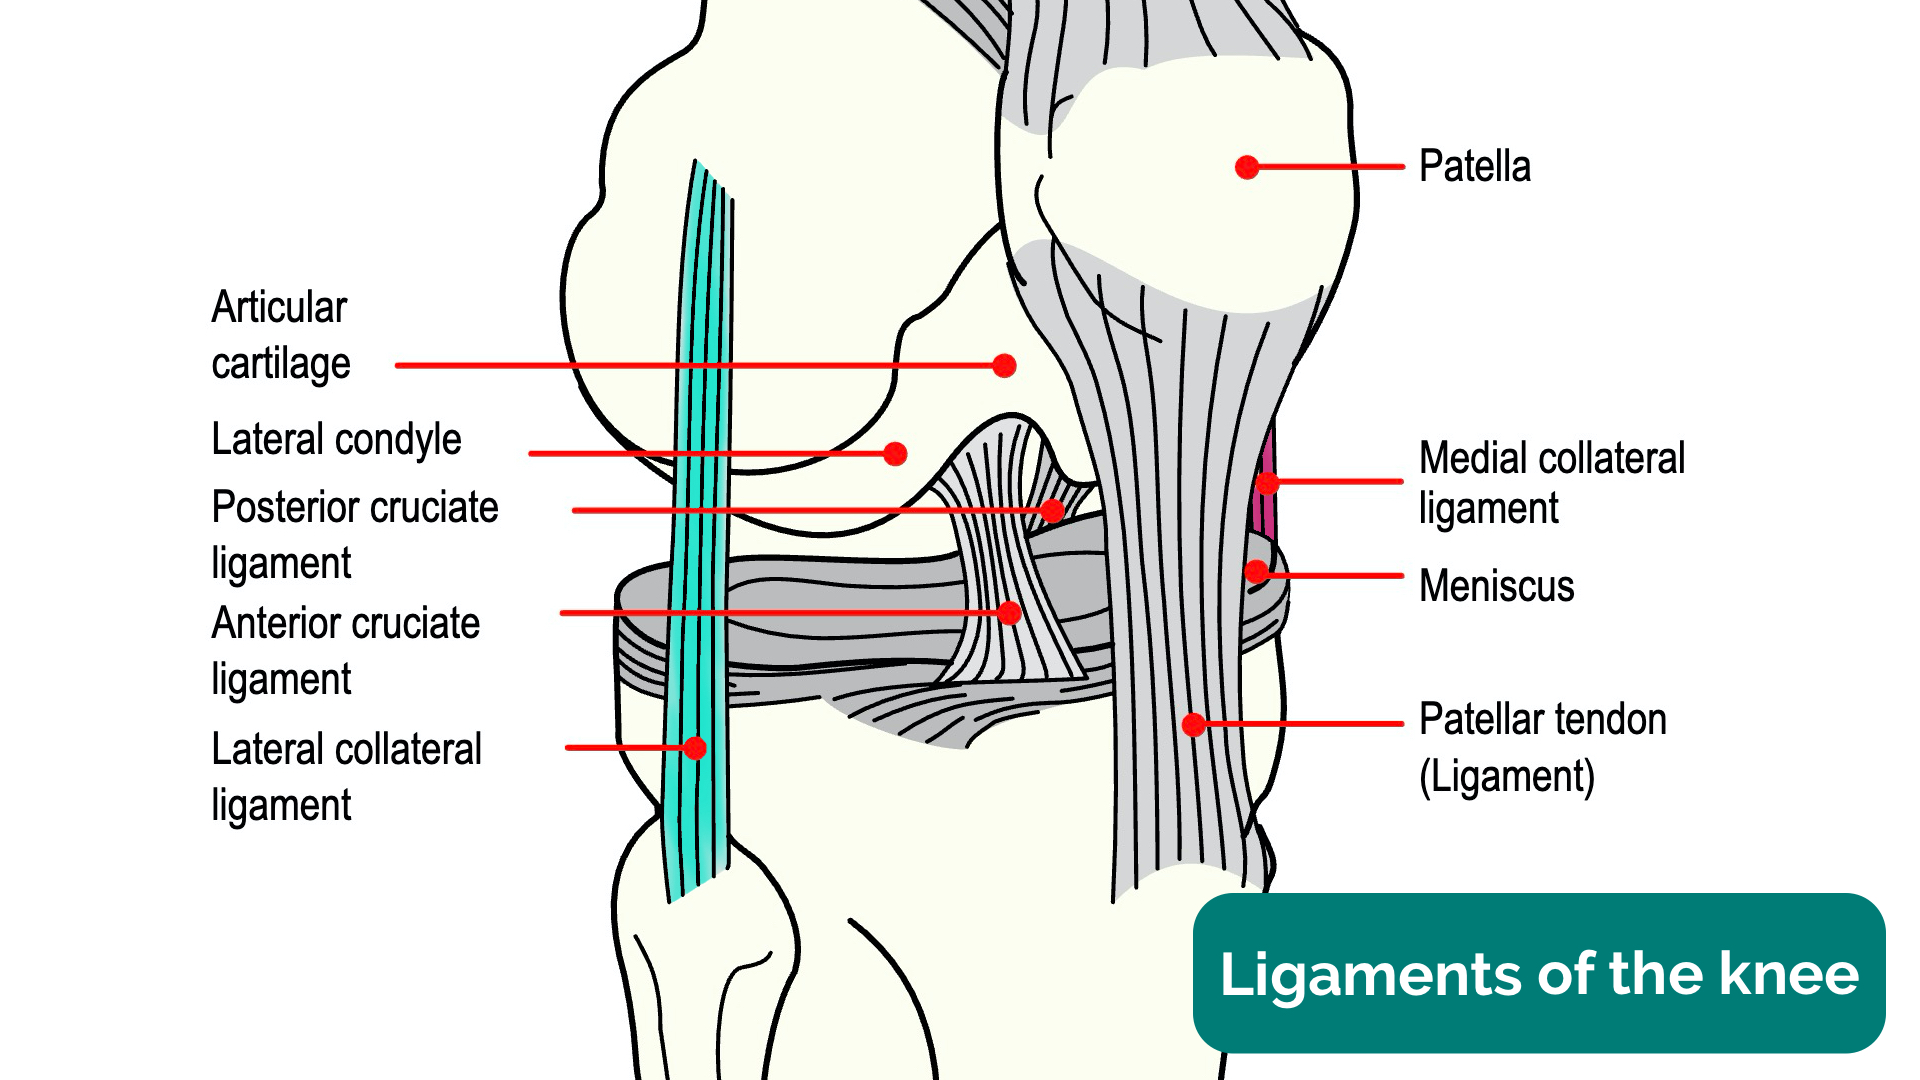
Cruciate ligaments of the knee
The cruciate ligaments of the knee include the anterior cruciate ligament (ACL) and the posterior cruciate ligament (PCL).
The ACL originates from deep within the notch of the distal femur and inserts in the anterior region of the intercondylar area of the tibia. Its primary purpose is to stabilise the knee joint by preventing anterior tibial subluxation (i.e. prevent anterior displacement of the tibia relative to the femur). ACL injury (i.e. rupture) typically occurs when a patient lands on a leg and then quickly pivots in the opposite direction resulting in a valgus twisting injury (e.g. in football).
The PCL originates from the lateral edge of the medial femoral condyle and attaches in the posterior region of the intercondylar area. Its primary purpose is to stabilise the knee joint by preventing posterior tibial subluxation (i.e. prevent posterior displacement of the tibia relative to the femur). PCL injury typically occurs secondary to hyperflexion of the knee joint (e.g. a fall onto a flexed knee).
The ACL and PCL cross over each other, forming a cross shape (the Latin translation of cruciate is “cross-shaped”).
Collateral ligament assessment
Lateral collateral ligament assessment (varus stress test)
The lateral collateral ligament (LCL) assessment involves the application of a varus force to assess the integrity of the LCL of the knee joint.
The instructions below are for examining the right knee, use the opposite hands if assessing the left knee.
1. Extend the patient’s knee fully so that the leg is straight.
2. Hold the patient’s ankle between your right elbow and side.
3. Position your right palm over the medial aspect of the knee.
4. Position your left palm a little lower down over the lateral aspect of the lower limb, with your fingers reaching upwards to palpate the lateral knee joint line.
5. Push steadily outward with your right palm whilst pushing inwards with the left palm.
6. Whilst performing this manoeuvre, palpate the lateral knee joint line with the fingers of your left hand.
With healthy collateral ligaments, there should be no abduction or adduction possible.
If there is LCL laxity or rupture your fingers should be able to feel a palpable gap caused by the lateral aspect of the joint opening up secondary to the varus force being applied.
Medial collateral ligament assessment (valgus stress test)
The medial collateral ligament (MCL) assessment involves the application of a valgus force to assess the integrity of the MCL of the knee joint.
The instructions below are for examining the right knee, use the opposite hands if assessing the left knee.
1. Extend the patient’s knee fully so that the leg is straight.
2. Hold the patient’s ankle between your right elbow and side.
3. Position your left palm over the lateral aspect of the knee.
4. Position your right palm a little lower down over the medial aspect of the lower limb, with your fingers reaching upwards to palpate the medial knee joint line.
5. Push steadily inward with your left hand whilst pushing outwards with the right hand.
6. Whilst performing this manoeuvre, palpate the medial knee joint line with the fingers of your right hand.
With healthy collateral ligaments, there should be no abduction or adduction possible.
If there is MCL laxity or rupture your fingers should be able to feel a palpable gap caused by the medial aspect of the joint opening up secondary to the valgus force being applied.
Further collateral ligament assessment
If after this assessment the knee appears stable you can further assess the collateral ligaments by repeating this test with the knee flexed at 30°. At this position, the cruciate ligament is not taught so minor collateral ligament laxity can be more easily detected.
- Assess lateral collateral ligaments
")
")
Collateral ligaments of the knee
The collateral ligaments of the knee include the medial collateral ligament (MCL) and the lateral collateral ligament (LCL).
The primary function of the MCL is to stabilise the knee by resisting valgus forces that would push the knee medially. Injury of the MCL typically occurs secondary to excessive valgus force when the knee is partially flexed (e.g. a direct blow to the lateral aspect of the knee joint).
The primary function of the LCL is to stabilise the knee by resisting varus forces that would push the knee laterally. Injury of the LCL typically occurs secondary to excessive varus force (e.g. a direct blow to the medial aspect of the knee joint).
Assessment of the menisci
McMurray’s test is used to assess the menisci for evidence of a meniscal tear. This test is not usually expected in an OSCE scenario as it can cause significant pain and even meniscal injury if performed incorrectly. It is important however to have an awareness of how and why the test is performed.
McMurray’s test for assessing the medial meniscus
The instructions below are for examining the right knee, use the opposite hands if assessing the left knee.
1. With the patient supine on the clinical examination couch, passively flex the knee being assessed as far as is possible.
2. Hold the patient’s right knee with your left hand, with your thumb over the medial aspect and fingers over the lateral aspect of the joint lines.
3. Hold the patient’s right foot by the sole using your right hand.
4. Create valgus stress on the knee joint with your left hand by applying outward pressure as if trying to abduct the leg at the hip whilst fixating and externally rotating the foot. At the same time slowly extend the knee joint.
The presence of a click and discomfort is suggestive of a medial meniscal tear.
McMurray’s test for assessing the lateral meniscus
The instructions below are for examining the right knee, use the opposite hands if assessing the left knee.
1. With the patient supine on the clinical examination couch, passively flex the knee being assessed as far as is possible.
2. Hold the patient’s right knee with your left hand, with your thumb over the medial aspect and fingers over the lateral aspect of the joint lines.
3. Hold the patient’s right foot by the sole using your right hand.
4. Create varus stress on the knee joint with your left hand by applying inward pressure as if trying to adduct the leg at the hip whilst fixating and internally rotating the foot. At the same time slowly extend the knee joint.
The presence of a click and discomfort is suggestive of a lateral meniscal tear.
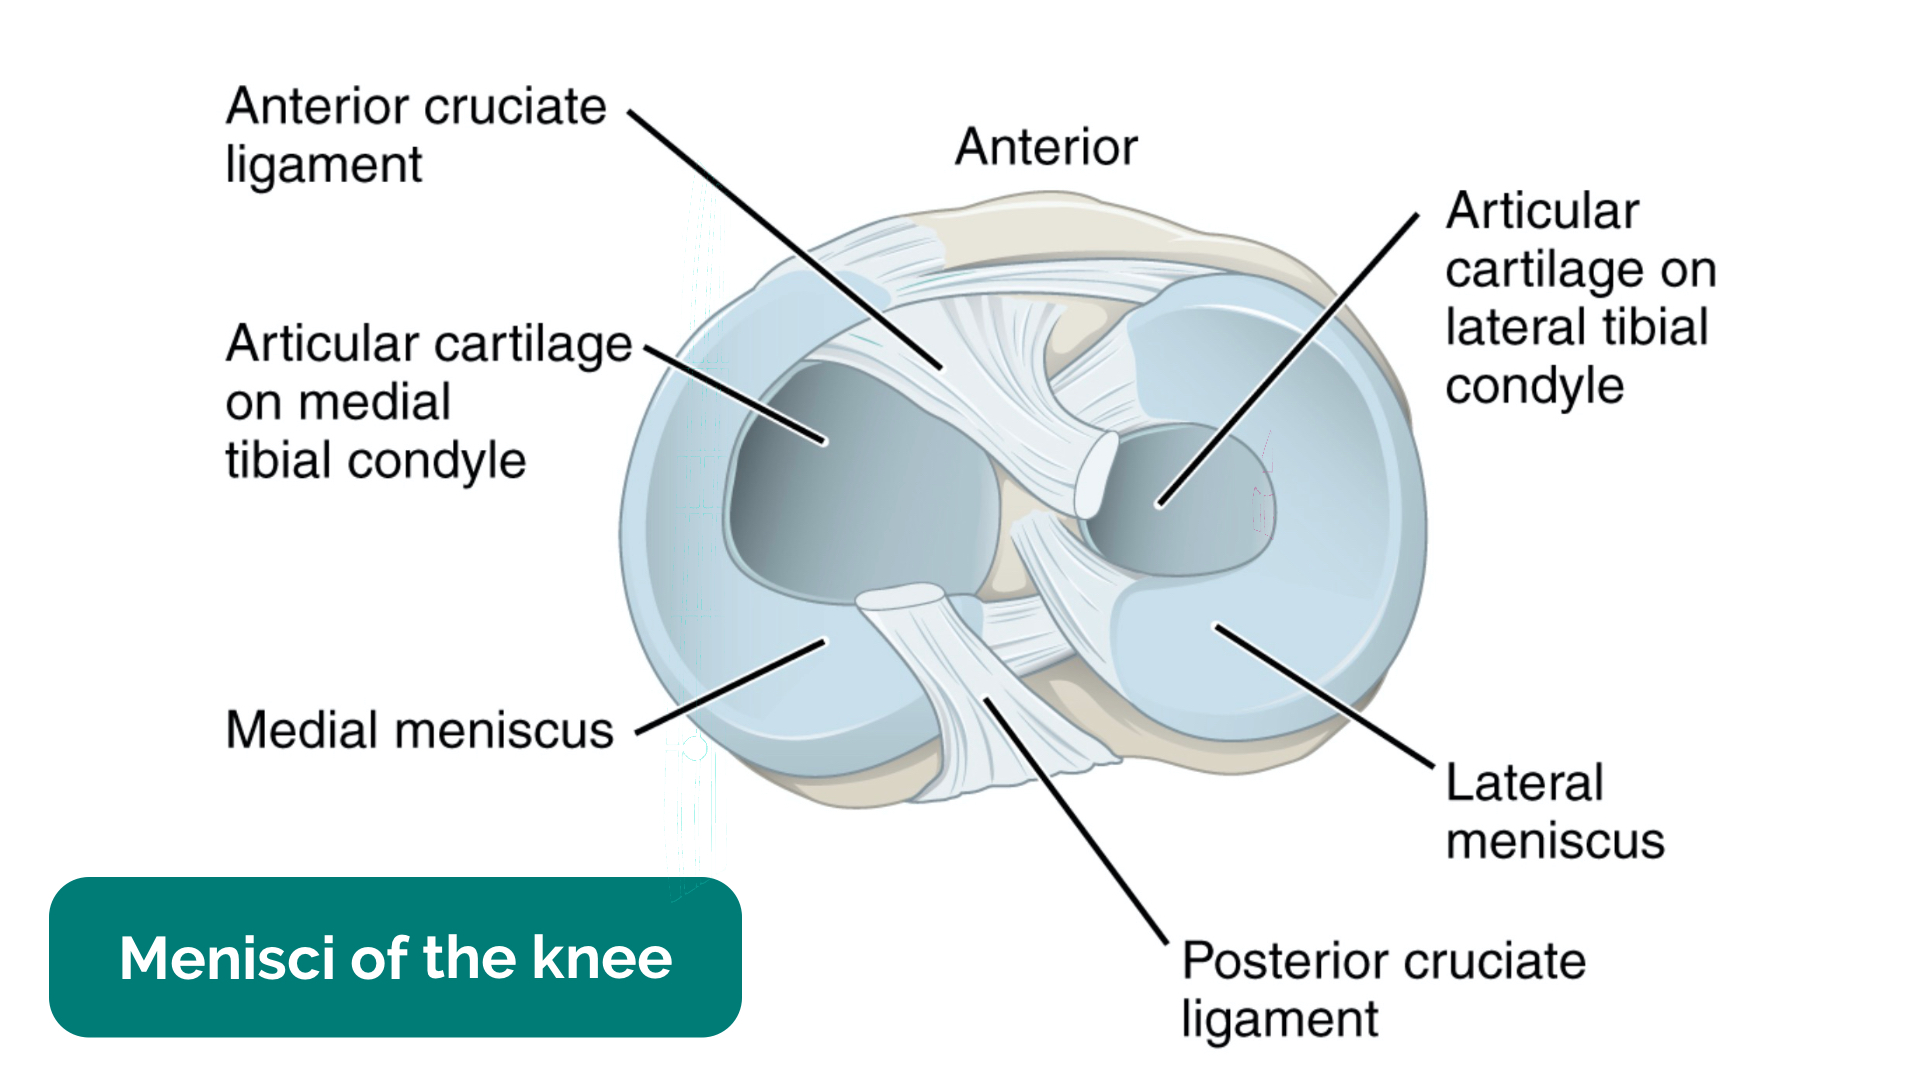
Menisci of the knee
The menisci of the knee are two crescent-shaped pads of fibrocartilagenous tissue which function to stabilise the knee joint and distribute friction between the femur and tibia. Injury to the menisci can occur secondary to sudden twisting of the knee (e.g. in football) which tears the meniscal tissue. Typically symptoms of meniscal injuries include sudden-onset pain, a popping sensation, locking and instability of the knee joint.
To complete the examination…
Explain to the patient that the examination is now finished.
Thank the patient for their time.
Dispose of PPE appropriately and wash your hands.
Summarise your findings.
Example summary
“Today I examined Mr Smith, a 32-year-old male. On general inspection, the patient appeared comfortable at rest, with no stigmata of musculoskeletal disease. There were no objects or medical equipment around the bed of relevance.
“Assessment of the lower limbs revealed a normal gait and knee joint appearance. The range of movement of both knee joints was also normal. There were no abnormalities noted on the assessment of the ligaments and menisci of either knee joint.”
“In summary, these findings are consistent with a normal knee joint examination.”
“For completeness, I would like to perform the following further assessments and investigations.”
Further assessments and investigations
- Neurovascular examination of both lower limbs.
- Examination of the joints above and below (e.g. ankle and hip).
- Further imaging if indicated (e.g. X-ray and MRI).
Reviewer
Mr Tejas Yarashi
Consultant Trauma & Orthopaedic Surgeon
References
- Dave Haygarth. Adapted by Geeky Medics. Total knee replacement scar. Licence: CC BY.
- Tim1965. Adapted by Geeky Medics. Arthroscopic port sites. Licence: CC BY-SA.
- James Heilman, MD. Adapted by Geeky Medics. Knee effusion. Licence: CC BY-SA.
- James Heilman, MD. Adapted by Geeky Medics. Psoriasis plaque. Licence: CC BY-SA.
- NickGorton. Adapted by Geeky Medics. Gout-related tophus. Licence: CC BY-SA.
- James Heilman, MD. Adapted by Geeky Medics. Patellar dislocation. Licence: CC BY-SA.
- BioMed Central. Adapted by Geeky Medics. Valgus deformity. Licence: CC BY.
- Geeky Medics. Varus deformity.
- Geeky Medics. Ligaments of the knee joint.
- OpenStax College. Adapted by Geeky Medics. Menisci. Licence: CC BY.
- Adapted by Geeky Medics. BoH, CC BY-SA 4.0
