

- 📖 Geeky Medics OSCE Book
- ⚡ Geeky Medics Bundles
- ✨ 1300+ OSCE Stations
- ✅ OSCE Checklist PDF Booklet
- 🧠 UKMLA AKT Question Bank
- 💊 PSA Question Bank
- 💉 Clinical Skills App
- 🗂️ Flashcard Collections | OSCE, Medicine, Surgery, Anatomy
- 💬 SCA Cases for MRCGP
To be the first to know about our latest videos subscribe to our YouTube channel 🙌
What is the Arclight?
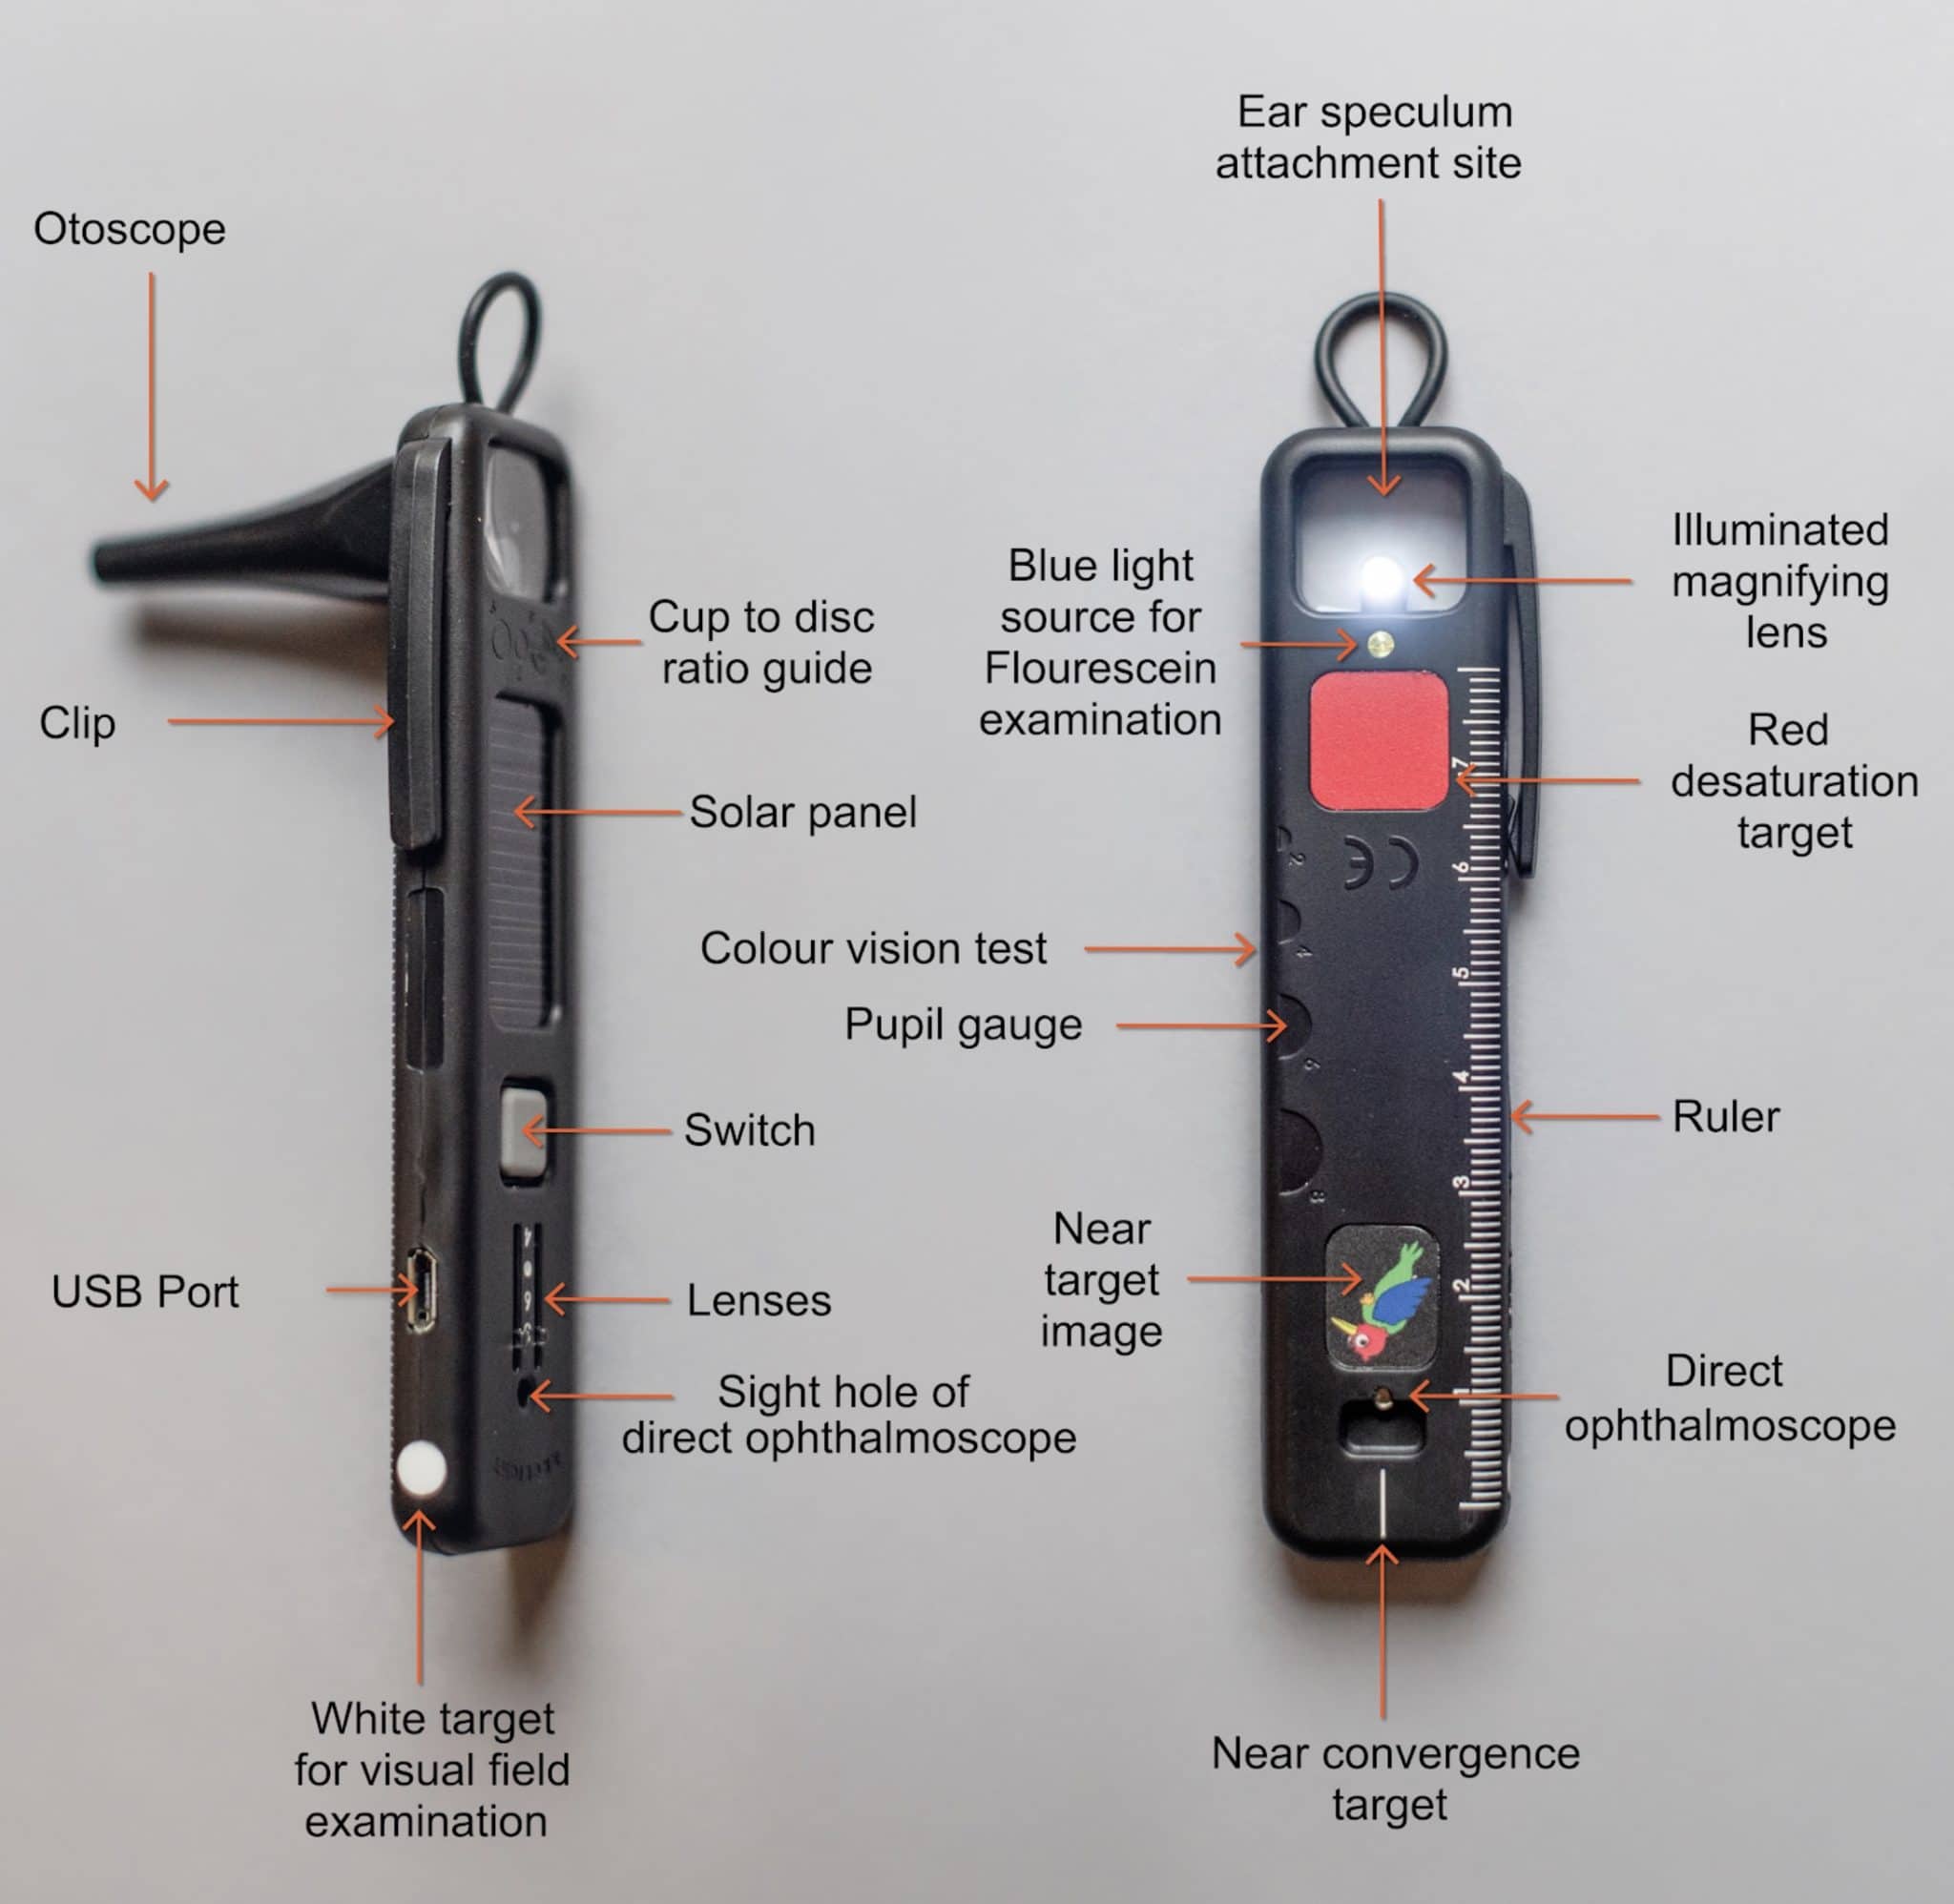
The Arclight is a multi-purpose solar-powered diagnostic tool that combines a direct ophthalmoscope, anterior segment loupe and otoscope (as well as a number of other functions) into a small highly portable device (Figure 1).
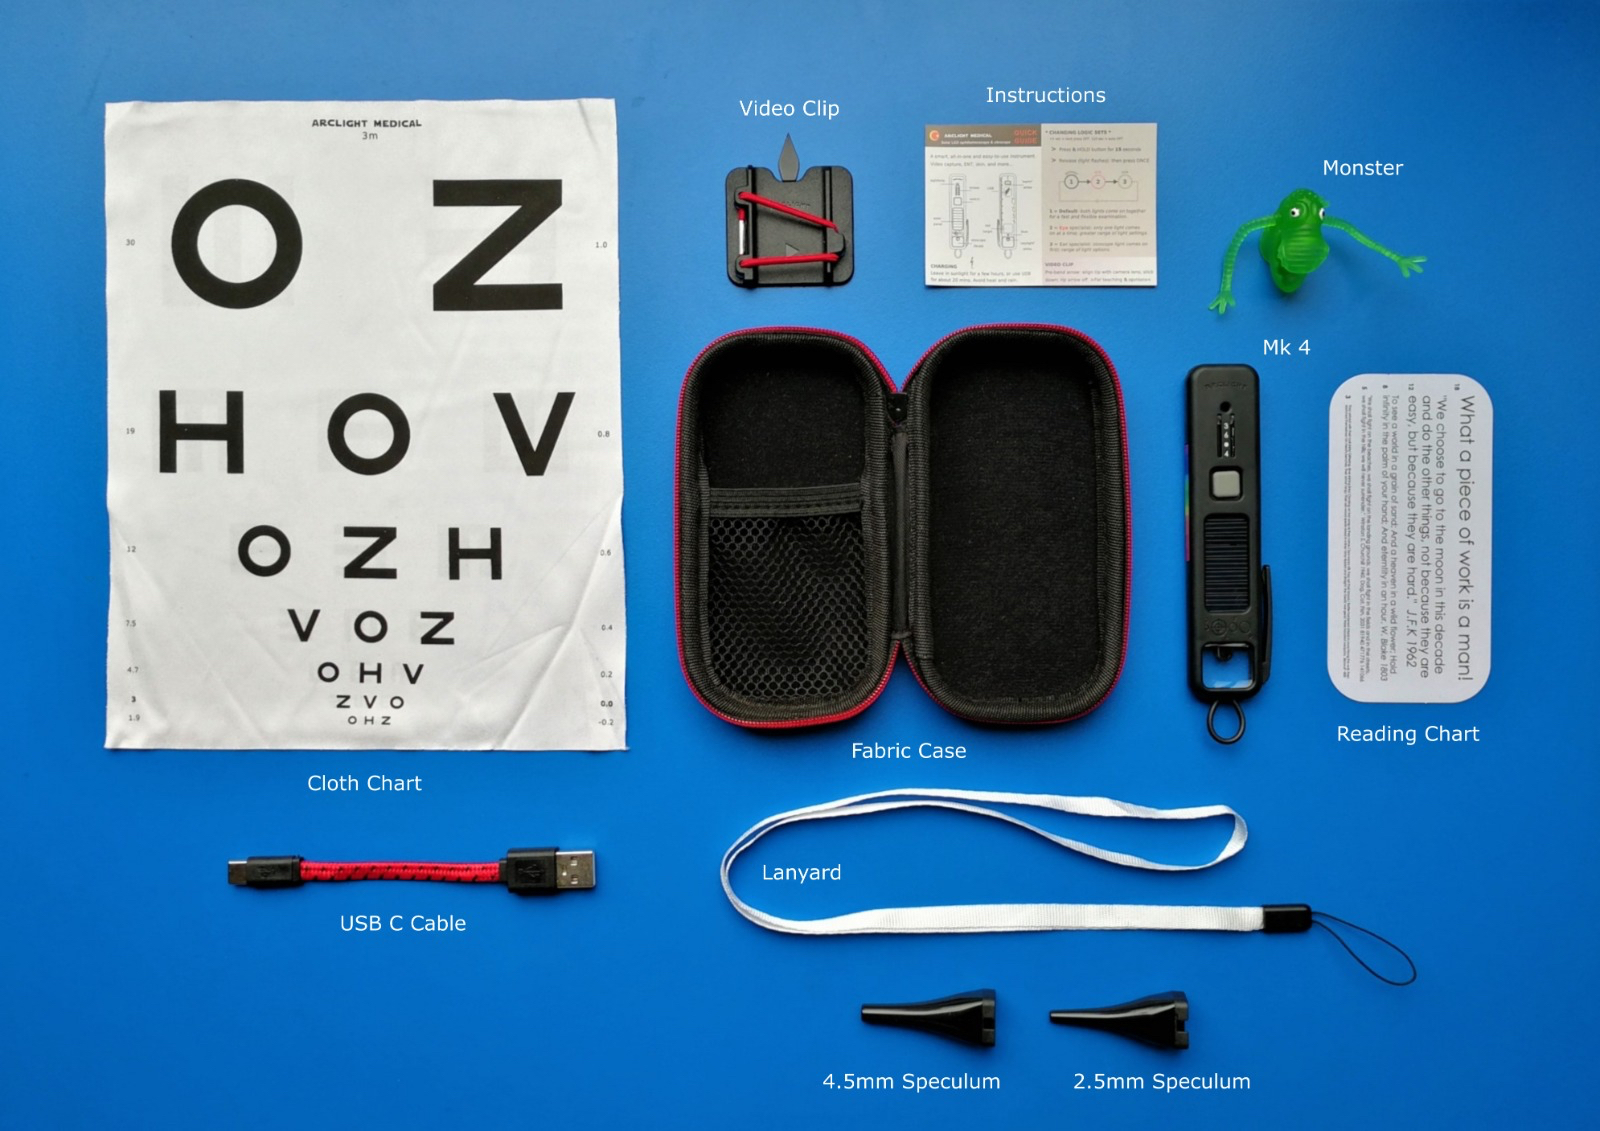
It comes in a case with a 3-metre visual acuity chart, clip to attach to a mobile phone camera to capture clinical signs, lanyard, speculae and a USB charging lead (Figure 2).
The device has been developed by the Arclight Project social enterprise led by the University of St Andrews in Scotland.
Originally made to overcome barriers to ownership in low-resource settings there are now over 28,000 devices worldwide. The scientific evidence base for its effectiveness has grown and it is consequently gaining traction amongst medical students in wealthier countries too.
Frugal and simplified engineering makes it compact, portable and easy to use. Using a LED light source, it is recharged via a built-in solar panel or through a USB cable, negating the need to find replacement bulbs and batteries.
The Arclight represents an opportunity for medical students to own an effective eye and ear diagnostic tool to practice with regularly to build competency and confidence to take forwards into their working life.
How do you use the Arclight?
Direct ophthalmoscopy
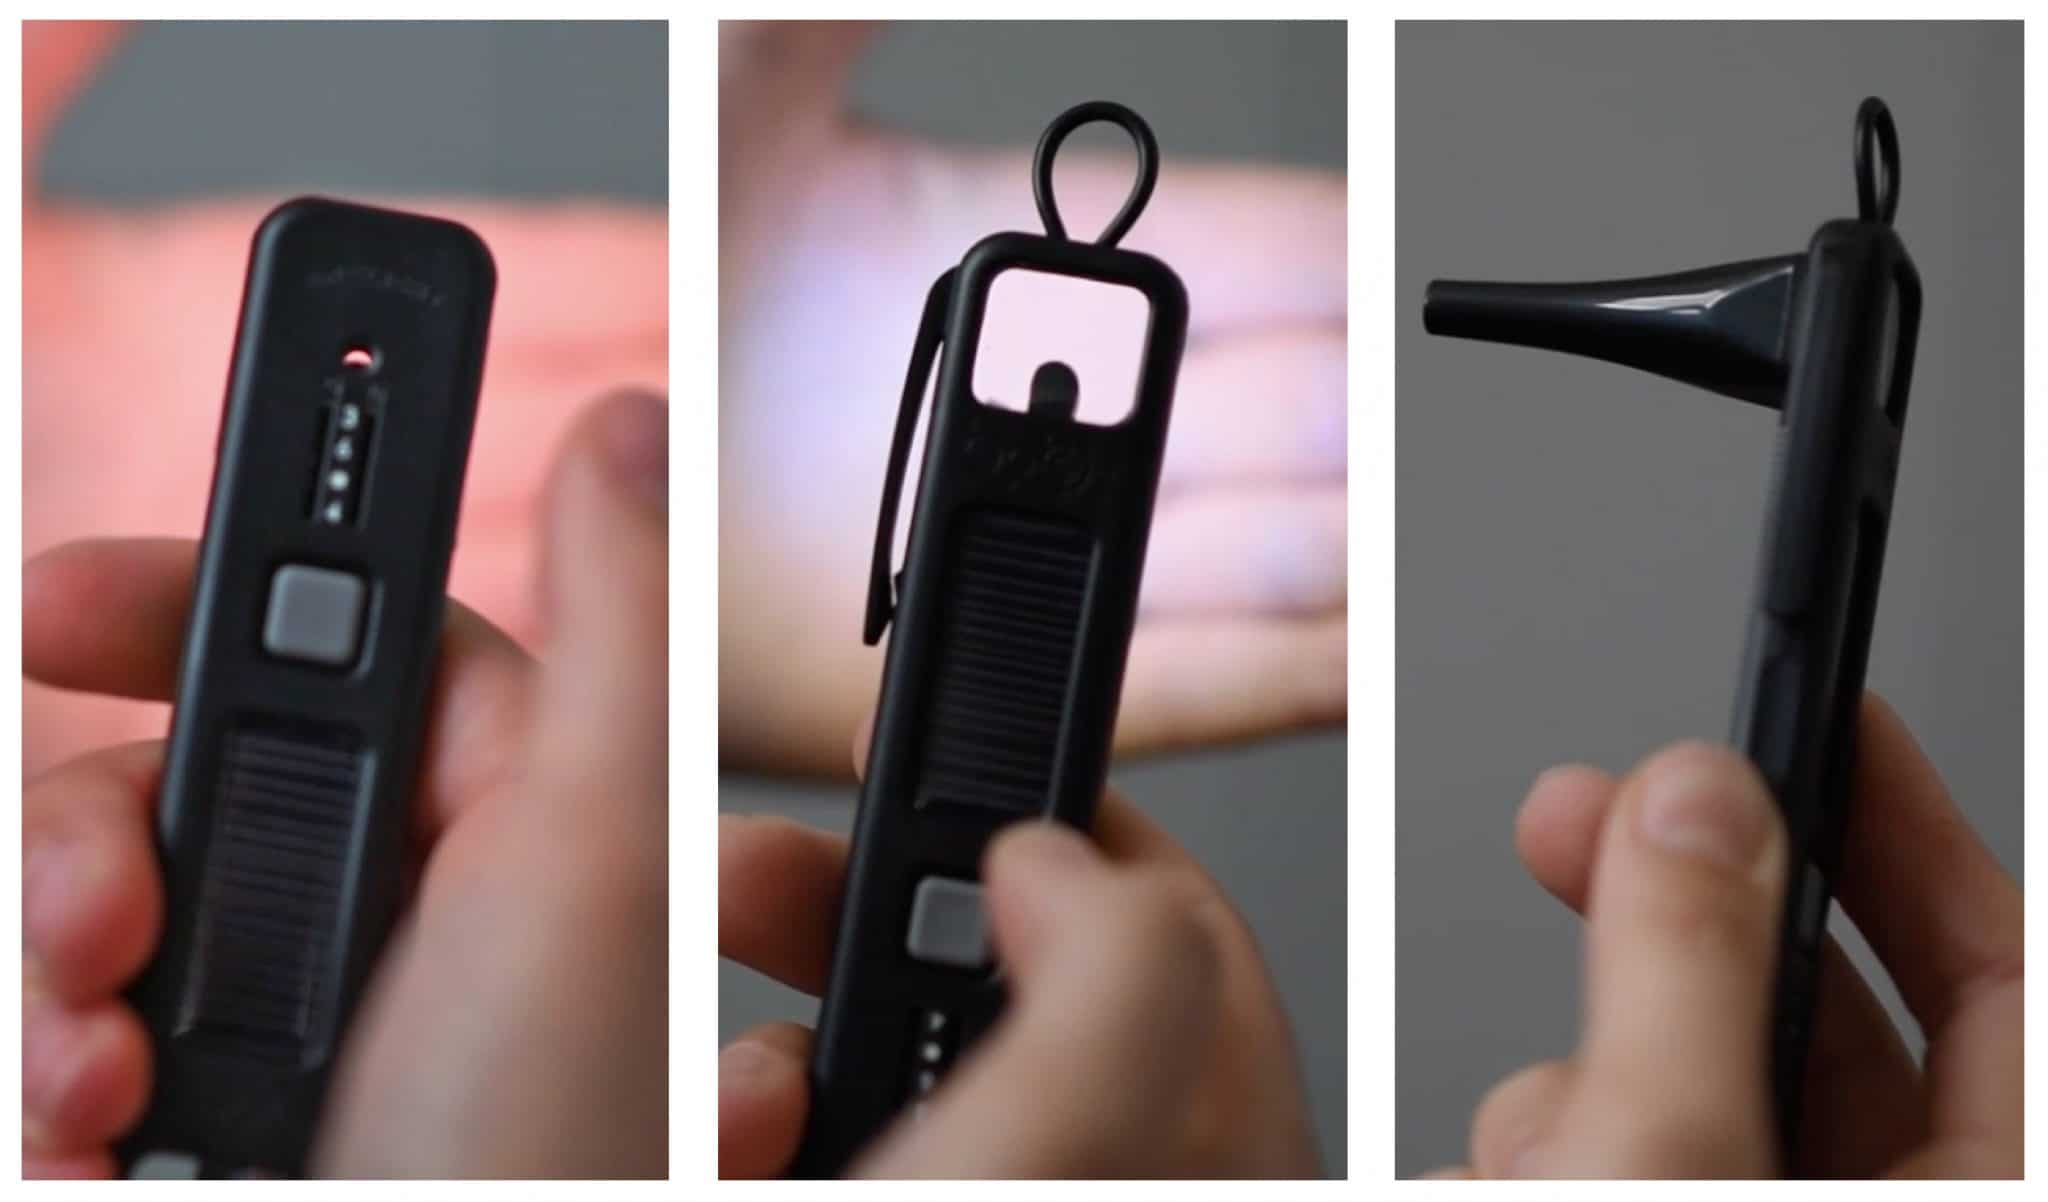
At one end of the device is a small sight hole, LED and a rack of lenses. This is the direct ophthalmoscope.
Select the light setting you wish by pressing the grey button.
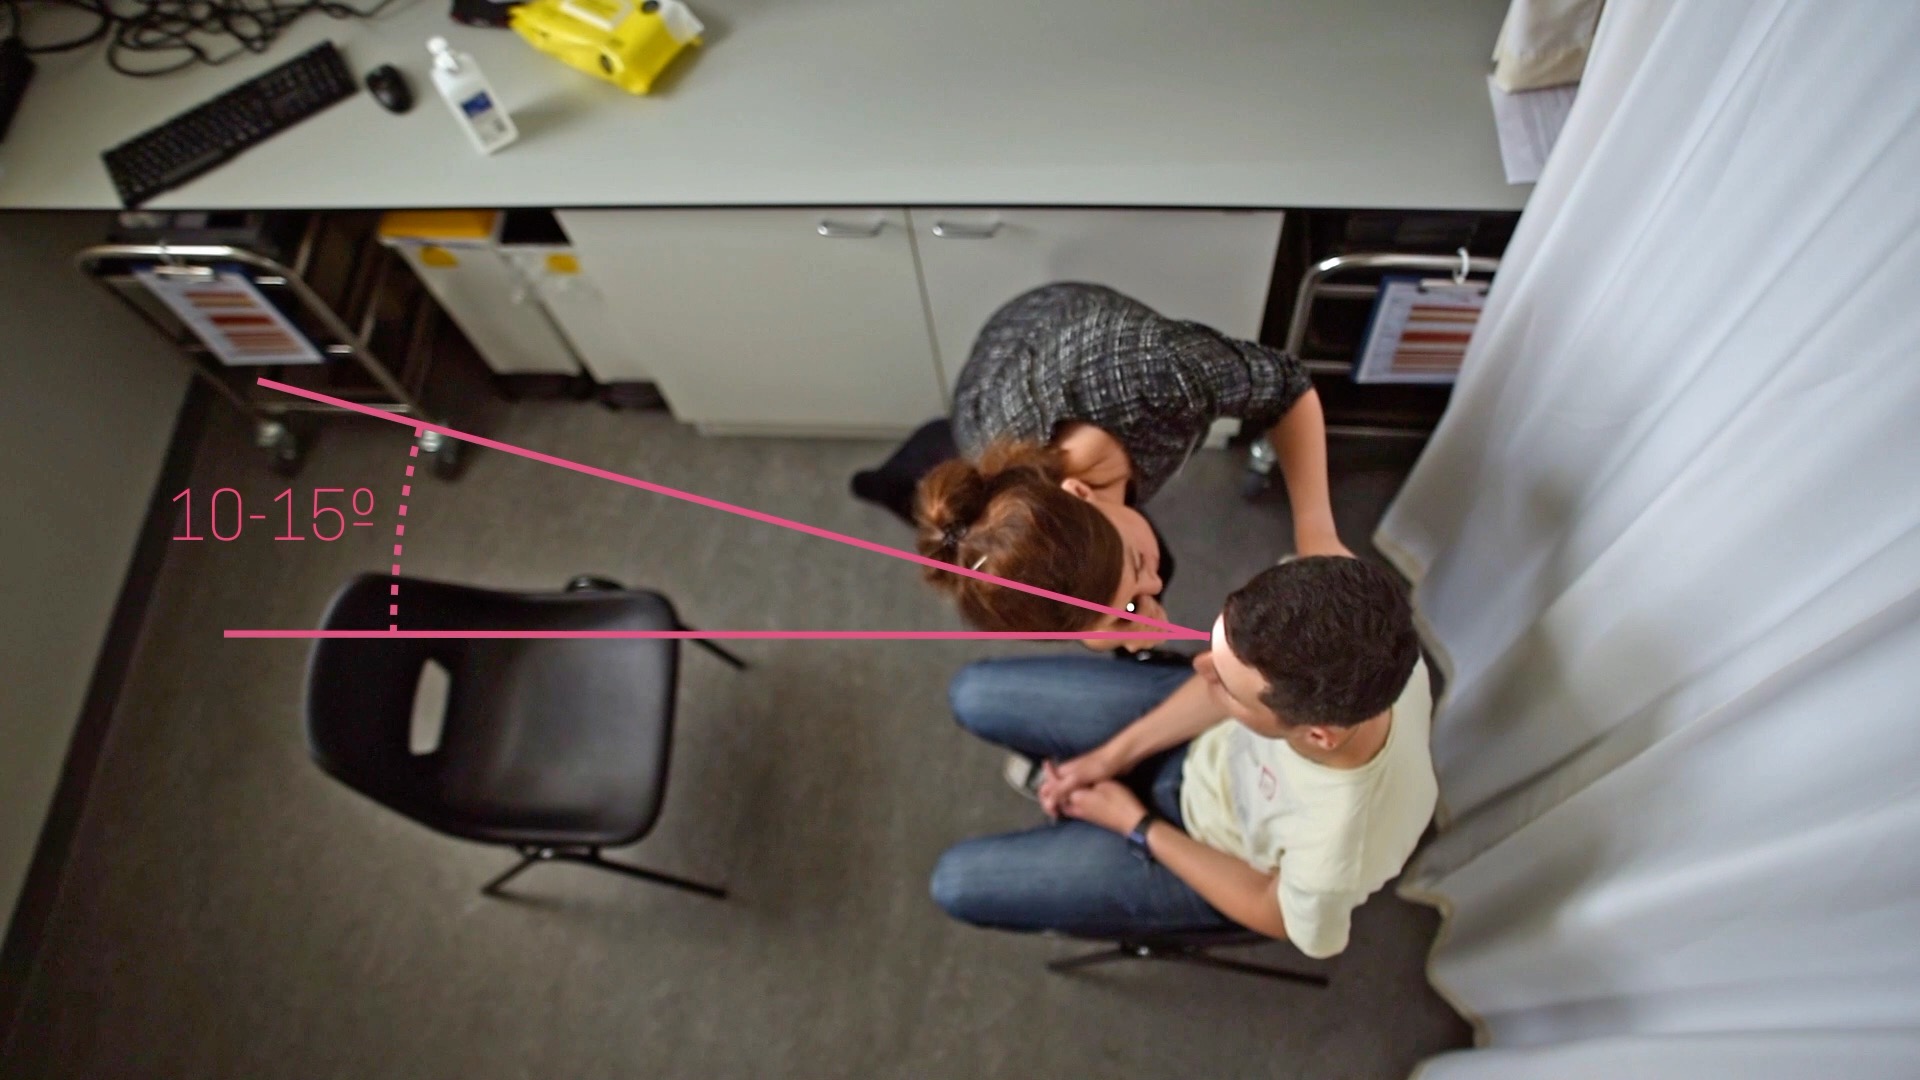
The examiner holds the device close to their eye and looks through the sight hole.
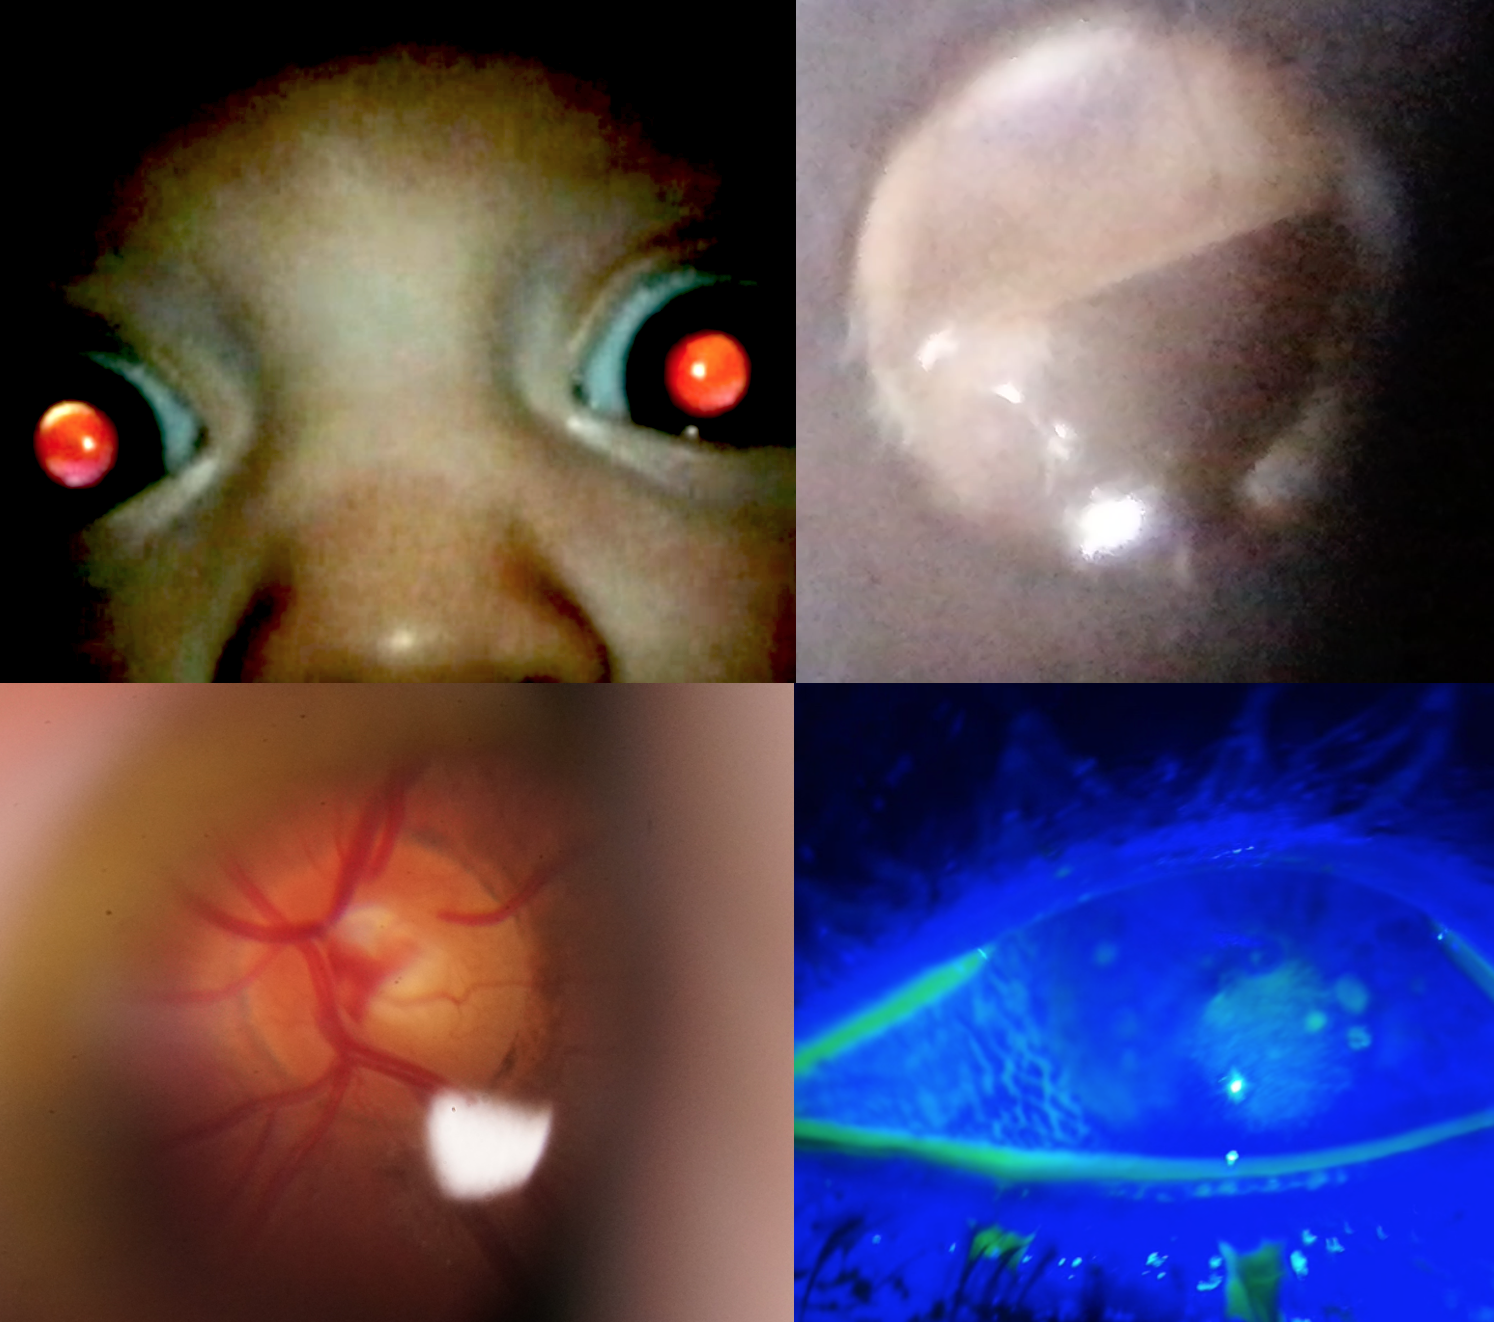
By holding the device at arm’s length the fundal reflex (‘red reflex’) can be seen.
To examine the back of the eye move in more closely (Figure 4).
For a more in-depth description of how to perform direct ophthalmoscopy check out our OSCE guide.

Anterior segment examination
At the other end of the device is an anterior segment loupe:
1. Select the light you require (e.g. varying levels of white light or blue light) using the grey switch and hold it close to your eye.
2. Move in close to the patient’s eye. At around 6cms you will see a magnified view of the eyelids and front of the eye.
3. By toggling through the light settings a blue light will come on which can highlight fluorescein staining of abrasions and ulcers.
For a more in-depth description of how to assess the anterior segment of the eye, check out our OSCE guide.

Ear examination and otoscopy
By attaching a speculum to the loupe end the Arclight also becomes an otoscope.
Hold the device like a pencil and gently pull the pinna posteriorly and superiorly.
By carefully advancing the speculum down into the external auditory meatus you will see the external ear canal and tympanic membrane.
For a more in-depth description of how to perform otoscopy check out our OSCE guide.

Smartphone camera clip
The Arclight can be attached to the camera of a smartphone using a clip (Figure 7), allowing easy recording of footage from the ophthalmoscope, otoscope and anterior segment loupe.
This is helpful for teaching as well as for seeking remote second opinions.
See a demonstration on how to attach the Arclight to a mobile phone here.

Other functions
The Arclight also comes with a number of other tools to assist with clinical assessment.
Additional tools that can be found in the Arclight carrying case:
- 3-metre LogMAR distance chart
- Near visual acuity chart
On the near chart, there is also an Amsler chart for assessing macular disease and a matching card if the patient is very young or having difficulty with expressive language.
On the surface of the Arclight there is also a number of other tools:
- Ruler for measuring the height of lids and size of lesions
- Pupil gauge for measuring the diameter of pupils
- Red desaturation square for optic nerve function assessment
- Colour vision chart
- A white target for visual field assessment
- A colourful picture near the target to assess fixation and eye movements
- Convergence target
- Cup to disc ratio gauge for glaucoma assessment
- Clip to store the device in your top pocket like a pen
Learn more about visual assessment using our OSCE guide.
Social enterprise
The Arclight Project is a university-led cross-subsidy social enterprise. The overarching aim is to equip, train and empower health workers in low to middle-income countries to confidently diagnose and manage eye or ear disease. Profit from sales of the device in higher resource settings funds training and distribution exercises in regions where the burden of disease is greatest yet access to diagnostic tools the least. By re-energising core needs-driven examination skills, encouraging frugal innovative design and promoting effective altruism within an evidence-based framework we support the global movement to reduce avoidable blindness and deafness.
