

- 📖 Geeky Medics OSCE Book
- ⚡ Geeky Medics Bundles
- ✨ 1300+ OSCE Stations
- ✅ OSCE Checklist PDF Booklet
- 🧠 UKMLA AKT Question Bank
- 💊 PSA Question Bank
- 💉 Clinical Skills App
- 🗂️ Flashcard Collections | OSCE, Medicine, Surgery, Anatomy
- 💬 SCA Cases for MRCGP
To be the first to know about our latest videos subscribe to our YouTube channel 🙌
Nasal examination frequently appears in OSCEs and you’ll be expected to identify relevant signs using your clinical examination skills. This guide provides a step-by-step approach to performing a nasal examination in an OSCE setting.
Gather equipment
- Light source: this can be a pen torch, otoscope or a head torch.
- Nasal speculum (also known as Thudicum’s speculum) or an otoscope with a large speculum.
Introduction
Wash your hands and don PPE if appropriate.
Introduce yourself to the patient including your name and role.
Confirm the patient’s name and date of birth.
Briefly explain what the examination will involve using patient-friendly language: “Today I’d like to examine your nose, this will involve me looking and feeling the outside of the nose and the gently looking inside the nose.”
Gain consent to proceed with the examination.
Ask the patient to sit on a chair.
Ask the patient if they have any pain before proceeding with the clinical examination.
External nose inspection
Inspect the external surface of the nose from the front, side and behind the patient to identify any abnormalities.
Skin changes
Inspect for skin lesions:
- Basal cell carcinoma: pearly lesions with telangiectasia and rolled edges.
- Squamous cell carcinoma: scaly lesions, sometimes with associated ulceration and hyperpigmentation.
- Keratoacanthoma: raised lesions with a core of scaly keratin.
Deformity
Inspect for any deviation in the nasal bones or cartilage suggestive of a fracture. This is best performed by standing behind the patient with their head tilted slightly backwards.
 Inspect the external surface of the nose from the front, side and behind (1/3)


Epistaxis
Epistaxis is bleeding from the nose caused by damage to the blood vessels of the nasal mucosa. While most epistaxis is self-limiting, in rare cases, it can become life-threatening.
Epistaxis can be caused by bleeding from anterior or posterior nasal structures. Little’s area on the anterior nasal septum (where Kiesselbach’s plexus is located) is the most common source of anterior epistaxis. This area is easy to visualise during a clinical examination.
The bleeding points that result in posterior epistaxis are deeper within the nose and difficult to visualise during clinical assessment. Posterior epistaxis is typically more profuse and has a greater risk of airway compromise.
Nasal palpation
Warn the patient that you will be applying some pressure to their nose and ask them to let you know if they experience any pain.
1. Palpate the nasal bones assessing:
- Alignment
- Tenderness
- Irregularity (suggestive of fracture)
2. Palpate the nasal cartilage assessing:
- Alignment
- Tenderness
3. Palpate the infraorbital ridges and assess eye movement if there is a history of trauma to screen for an orbital blowout fracture.
- Nasal exam - Palpate the nasal bones (1/2)


Orbital blowout fracture
An orbital blowout fracture is a fracture of the orbital floor or medial wall resulting from blunt trauma to the eye socket (e.g. tennis ball). Typical findings on clinical examination include infraorbital tenderness, epistaxis and restricted eye movement (usually on vertical gaze).
Nasal cavity inspection
Brief assessment
1. Sit facing the patient with your knees together and to one side of the patient’s legs. It is not pleasant for the patient to be straddled.
2. Ask the patient to look forward, keeping their head in a neutral position.
3. Carefully elevate the tip of the nose with your thumb, so that the nasal cavity becomes visible. Use a pen torch or otoscope as a light source to externally illuminate the cavity (elevating the tip of the nose will also assess for dislocated septal cartilage).
4. Inspect the nasal mucosa (including the septum) for any abnormalities.
5. Inspect and compare nasal cavity alignment (note any septal deviation).
- Gently elevate the tip of the patient's nose with your thumb


Further assessment
Further assessment can be performed using an otoscope with a large speculum attached (inserting only the very tip into the nose) or using a nasal speculum (also known as Thudicum’s speculum), which widens the nasal cavity to allow you to peer in using a light source.
How to use a nasal speculum
The correct method for using a nasal speculum is slightly counter-intuitive, however, it does allow the best visualisation of the nasal mucosa:
1. Insert your index finger into the bend of the speculum and support it above with the thumb.
2. The middle and ring fingers are used to manipulate the prongs of the speculum.
3. You will be aiming to look at the gap between these two fingers.
4. Press the prongs of the speculum together to allow them to be placed within the nostril and then reduce your grip on the speculum to widen the prongs until an optimal view of the nasal cavity is achieved.
- Insert your index finger into the bend of the speculum and support it above with the thumb


Assessing the nasal cavities
Regardless of which method you use to visualise the nasal cavities, you should assess the following structures:
- Nasal vestibule: inspect for inflammation, ulceration or oedema affecting the nasal mucosa.
- Nasal septum: note any polyps, deviation, perforation, haematoma, superficial vessels or areas of cautery.
- Inferior turbinates: note any asymmetry, inflammation or polyps.
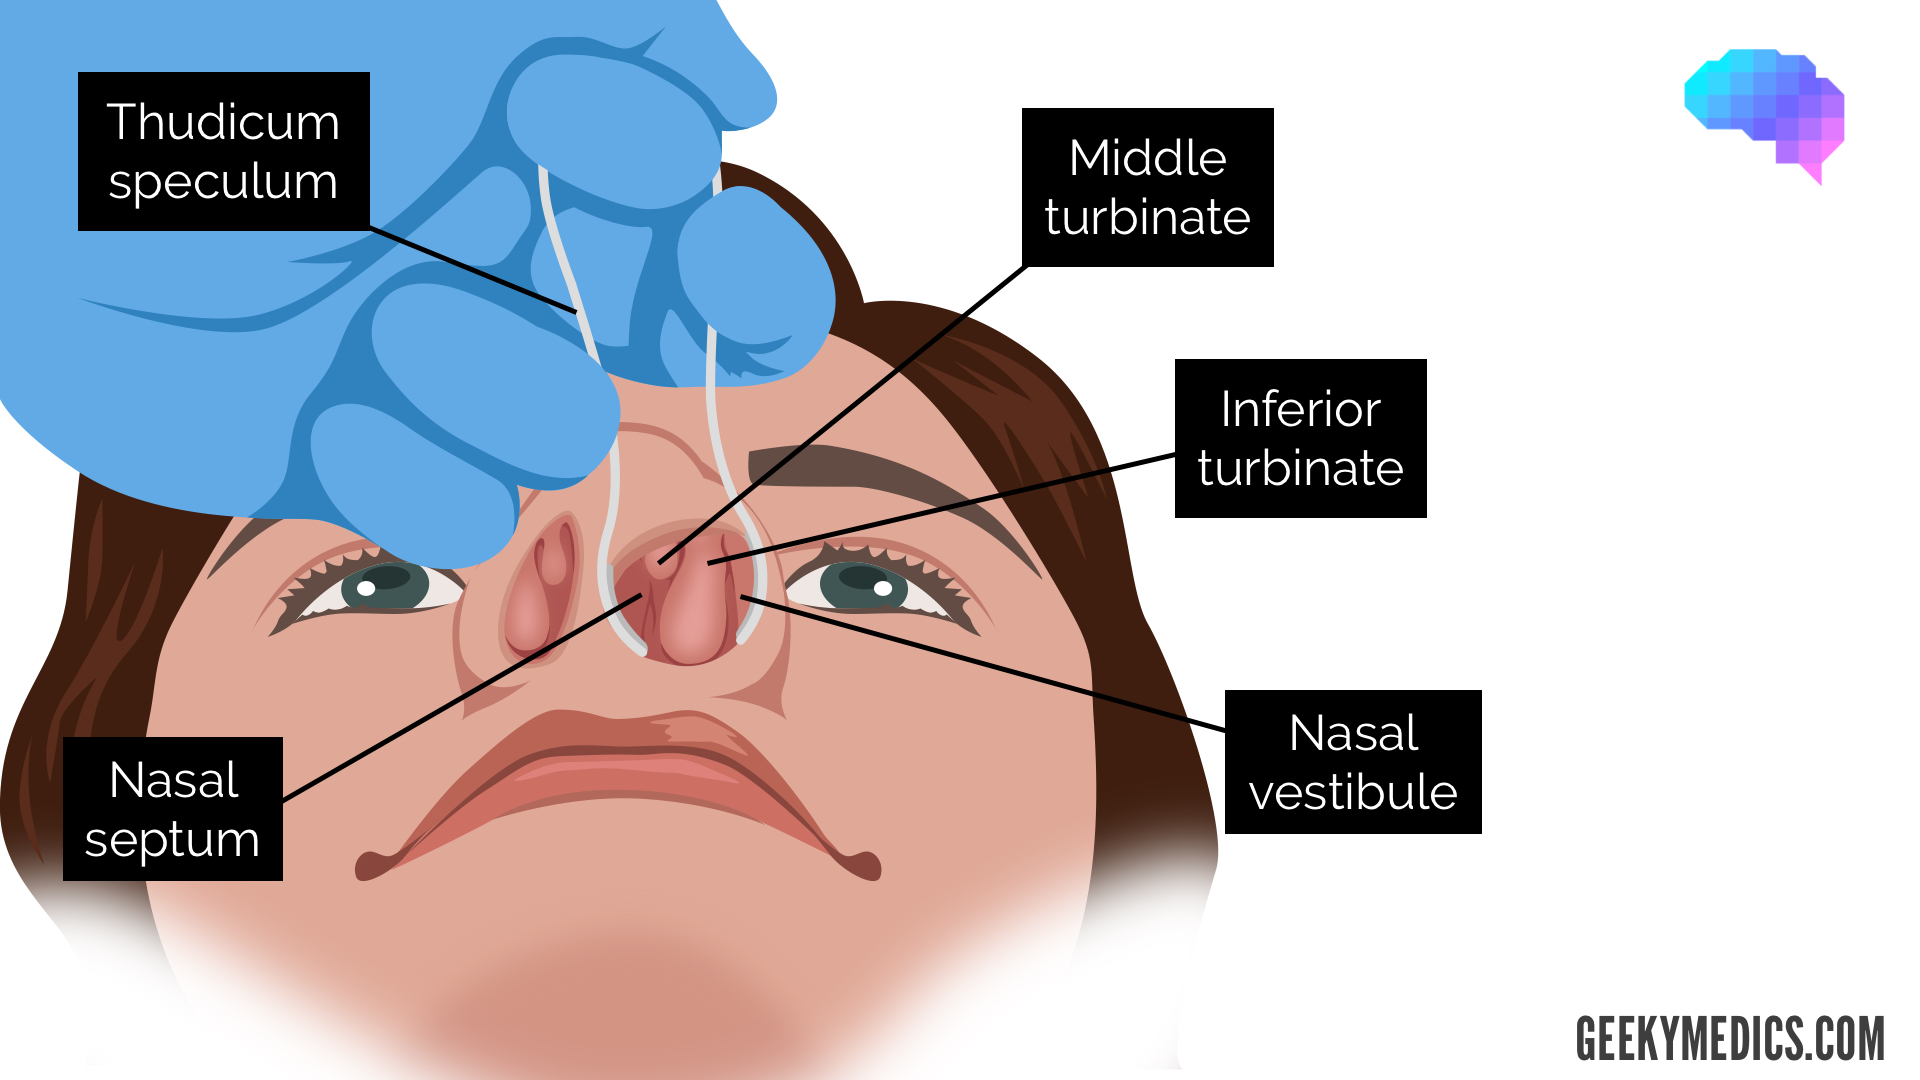
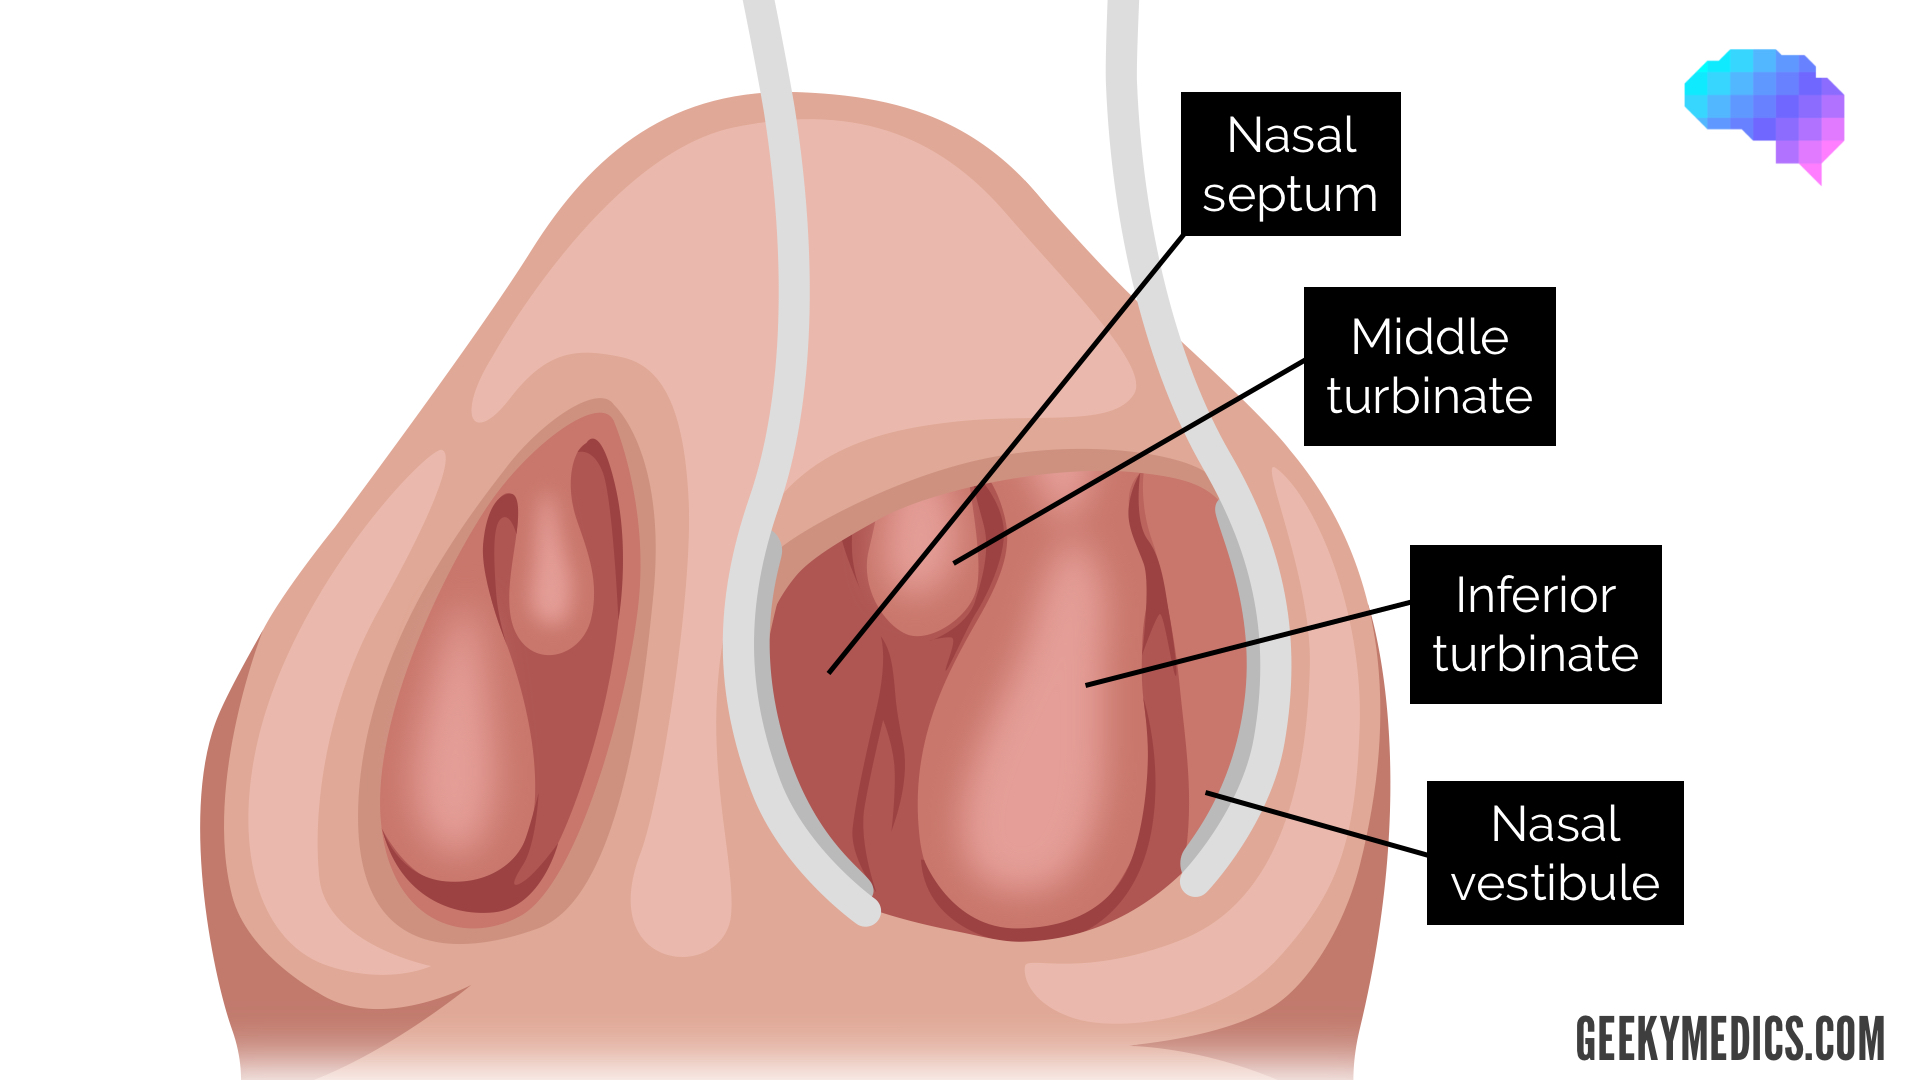
Structures of the nasal cavity
The turbinates are projections of bone covered in nasal mucosa. They control airflow through the nose, exposing it to a large surface area of mucosa, which both warms and cleans the air before it arrives at the lungs.
The nasal septum is the bone and cartilage in the nose that separates the nasal cavity into the two nostrils
The nasal vestibule is the most anterior part of the nasal cavity. It is enclosed by the cartilages of the nose and lined by the same epithelium as the skin.
Nasal airflow
Nasal airflow can be assessed using several methods, with the two most common described below.
Method one
1. Place your thumb over the nostril not being assessed to occlude airflow.
2. Ask the patient to breathe in through their nose and note the degree of airflow.
3. Repeat assessment on the other nostril, noting any difference in apparent airflow.
Interpretation
Reduced airflow through a particular nostril may indicate the presence of something blocking that air passage, such as a polyp, deviated nasal septum or foreign body.
Method two
1. Place a cold shiny surface, such as a metal tongue depressor under the nose.
2. Observe for misting of the metal surface as the patient breathes and compare the misting pattern of the two nostrils.
Interpretation
The absence of misting or a disparity in the misting between the nostrils may suggest unequal or absent airflow through a particular nostril.
- Place a cold shiny surface, such as a metal tongue depressor under the nose


To complete the examination…
Explain to the patient that the examination is now finished.
Thank the patient for their time.
Dispose of PPE appropriately and wash your hands.
Summarise your findings.
Example summary
“Today I examined Mr Smith, a 25-year-old male. On general inspection, the patient appeared comfortable at rest and there were no abnormalities noted on inspection of the external nose.”
“Inspection of the nasal cavity revealed a normally aligned nasal septum and unremarkable nasal mucosa. Nasal airflow was also normal.”
“In summary, these findings are consistent with a normal nasal examination.”
“For completeness, I would like to perform the following further assessments and investigations.”
Further assessments and investigations
- Olfactory assessment (UPSIT: University of Pennsylvania Smell Identification Test)
- Regional lymph node examination
- Oral cavity examination
- Flexible nasendoscopy
- Cranial nerve examination: in cases of nasal trauma
- Beta-2-transferrin: to assess for CSF leak following nasal trauma
Reviewer
Mr Ben Cosway
ENT Consultant
References
- James Heilman, MD. Adapted by Geeky Medics. Basal cell carcinoma. Licence: CC BY.
- Geeky Medics. Squamous cell carcinoma.
- Jmarchn. Adapted by Geeky Medics. Licence: CC BY-SA.
- Rls. Adapted by Geeky Medics. Licence: CC BY-SA.
- MathieuMD. Adapted by Geeky Medics. Nasal polyp. Licence: CC BY-SA 3.0.
- jeffandmandyg. Adapted by Geeky Medics. Deviated nasal septum. Licence: CC BY-SA 2.0.
